5.4 Managing Customers
Customers play a crucial role in your business, and the system helps track and manage all customer-related activities, including Invoices, payments, notes, tasks, workflows, and documents.
Viewing Customers
- To access the Customer Management section, click on “Customers” under the Roles menu.
- A window will appear displaying a list of customers, including their details such as name, email, mobile number, and assigned branch manager.
Adding a New Customer
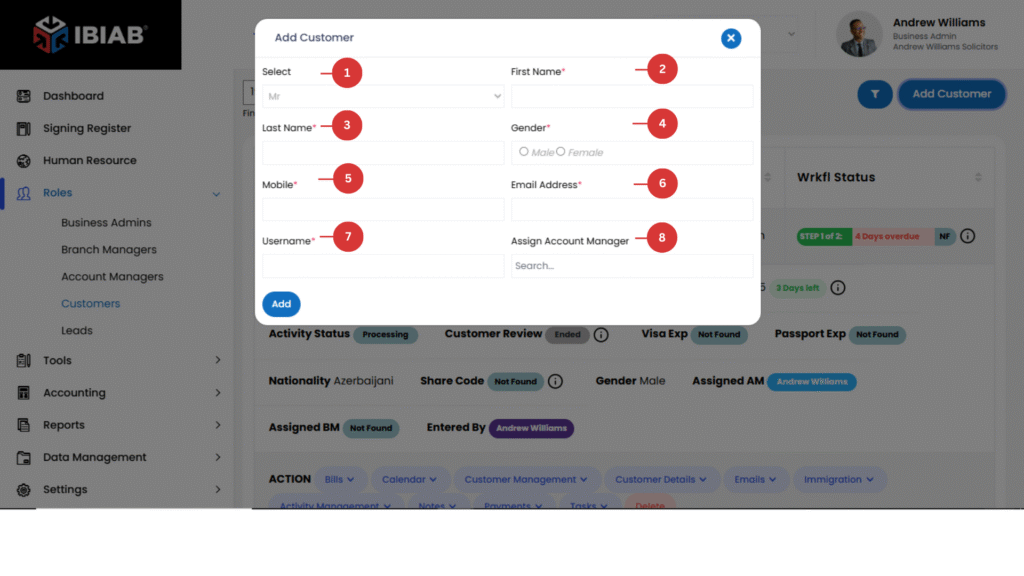
Click on “Add New Customer”, and a popup form will appear with the following fields:
- Title (Mr./Ms./Mrs.) – Select the appropriate title for the customer.
- First Name* – Enter the customer’s first name.
- Last Name* – Enter the customer’s last name.
- Gender – Choose the customer’s gender (Male/Female/Other).
- Mobile Number* – Enter the customer’s mobile contact number.
- Email Address* – Provide the customer’s email address (must be unique).
- Branch Manager – Assign a branch manager responsible for handling this customer.
📌 Note: Fields marked with an asterisk (*) are required. Ensure that the email address and mobile number are correct before saving.
Managing a Specific Customer
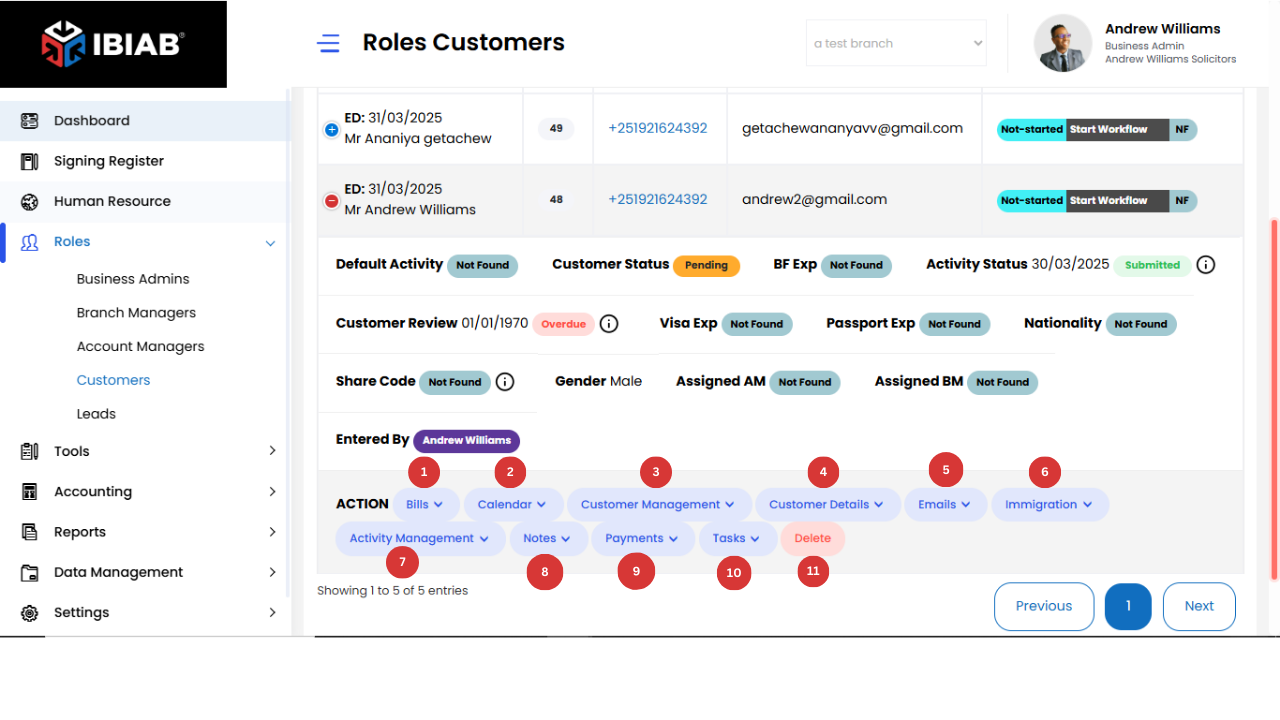
- Next to each customer’s name, there is a plus (+) button.
- Clicking this button expands the action menu, allowing you to perform various management tasks.
Customer Action Buttons & Their Functions:
- Invoices–
- Add Invoices– Create a new Invoice for the customer.
- View Invoices– Check the list of all Invoices associated with this customer.
- Calendar –
- Add Event – Schedule an event or meeting with the customer.
- View Events – Track and manage scheduled events.
- Customer Management –
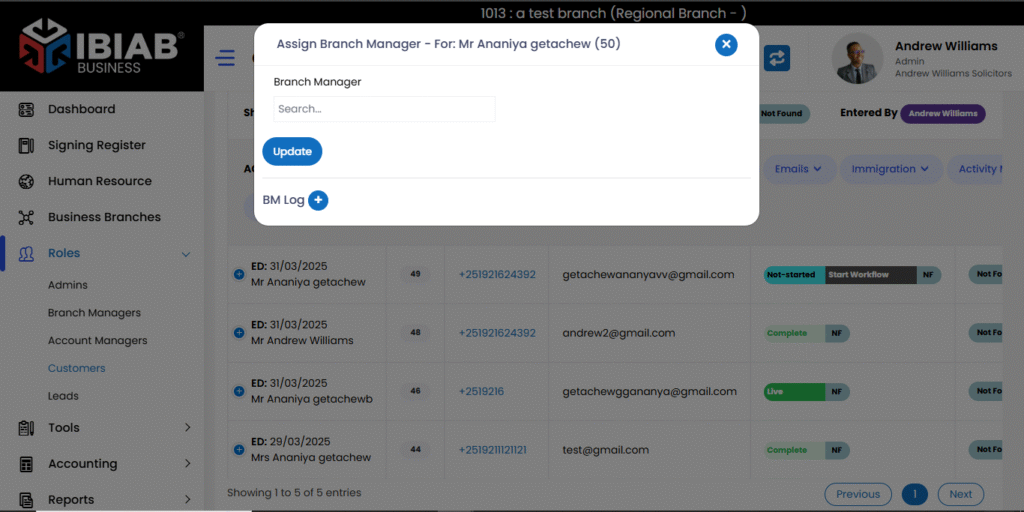
- Assign Branch Manager – Allocate a Branch manager to handle the customer’s account.
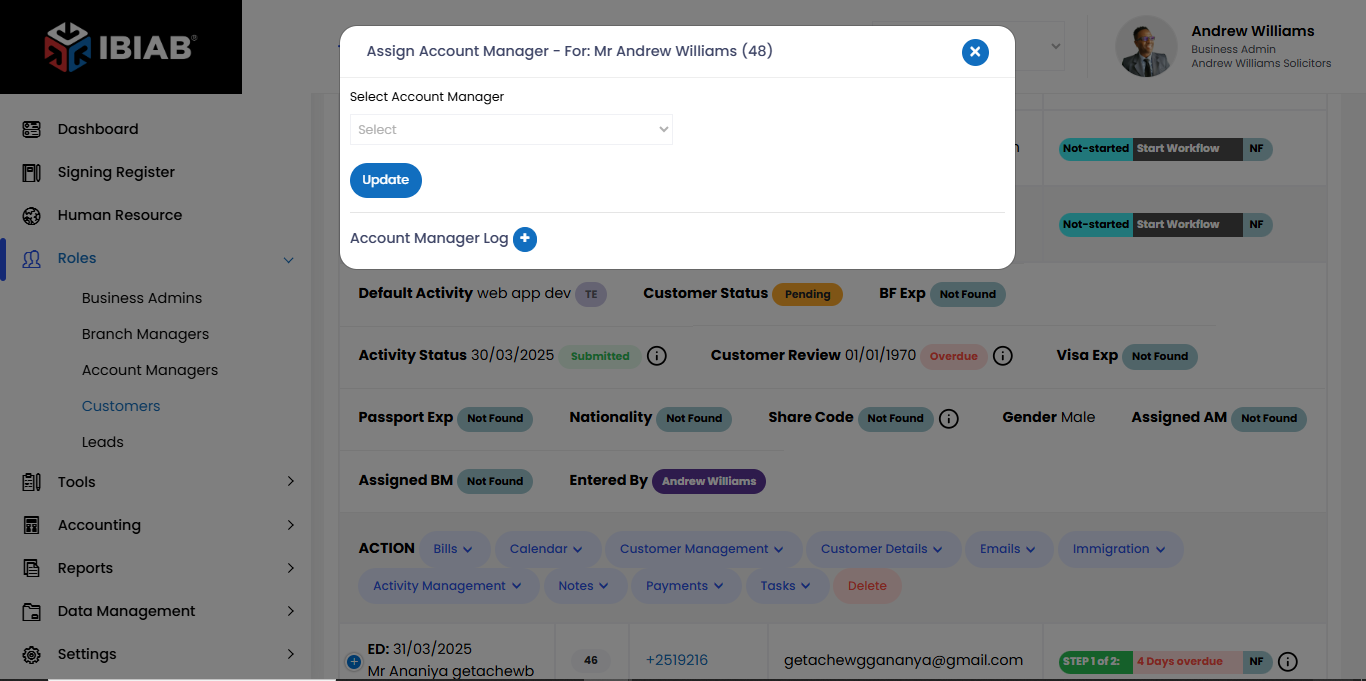
- Assign Account Manager – Allocate an account manager to handle the customer’s account.
- Documents Management – Upload, organize, and track documents associated with the customer.
- Customer Details –
- Edit Address – Update the customer’s physical address.
- Edit Personal Details – Modify the customer’s name, contact details, or other personal information.
- View Details – See a complete summary of the customer’s profile.
- Email –
- Add Email – Send a new email to the customer.
- View Emails – Review the history of emails sent to or received from the customer.
- Immigration – Manage immigration-related records linked to the customer.
- Edit Biometrics – Update and manage the customer’s biometric details, including passport and residency card uploads.
- Edit Employment – Modify the customer’s current employment information, such as job title, employer, and status.
- Edit Case Detail – Edit specific details related to the customer’s case, including matter type, references, and key dates.
- Activity Management– Manage Business Activity – Add or update business activities related to this specific customer.
- Notes
- Add Notes – Create notes for important customer-related details.
- View Notes – Check and manage previously added notes.
- Payments –
1. Add Payment – Record a new payment made by the customer.
2. View Payments – Track payment history and outstanding balances. - Tasks –
1. Add Task – Assign tasks related to the customer.
2. View Tasks – See a list of active and completed tasks. - Delete – Permanently remove the customer’s profile from the system.
📌 Tip: Use Client Details, Notes, and Tasks frequently to maintain a detailed and well-managed customer profile for better business tracking.
1.Invoices
Add Invoice– Create a new Invoice for the customer.
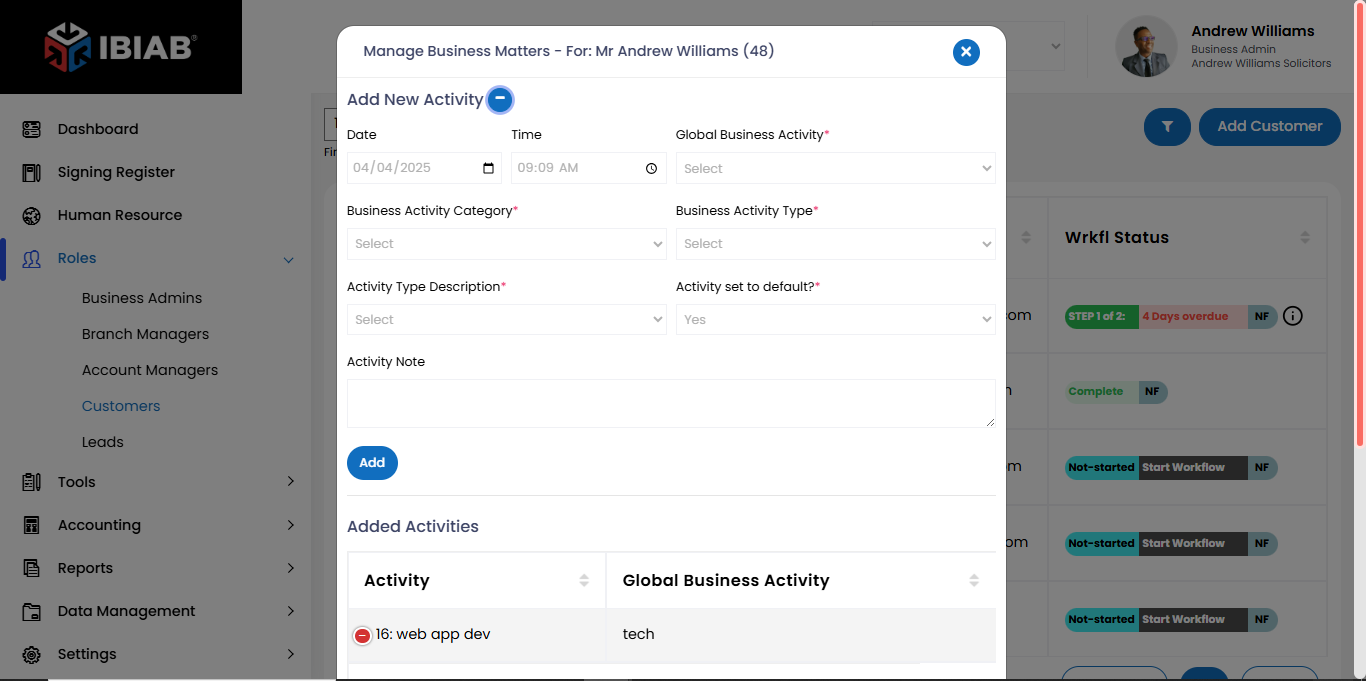
Before adding a Invoice for a customer, it is important to ensure that the customer is attached to a default business activity. Without a default activity, the system may not be able to Add the Invoice.
Steps to Check & Set a Default Business Activity:
Navigate to the Business Activity Menu
- Click on “Business Activity” in the menu.
Check the “Added Activity” Table
- Under the form, you will see a table titled “Added Activity”, which lists all business activities assigned to the customer.
Ensure a Default Activity is Set
- Next to each activity, there is a plus (+) button.
- Click on it to expand the action buttons.
Setting the Default Activity
- Find the green button beside an activity and click on it to set it as the default business activity.
This ensures that when you add a Invoice, it will be properly linked to a business activity.
📌 Tip: If no default business activity is set, you may not be able to proceed with billing correctly. Always check this step before adding a Invoice.
Invoice Entry Fields
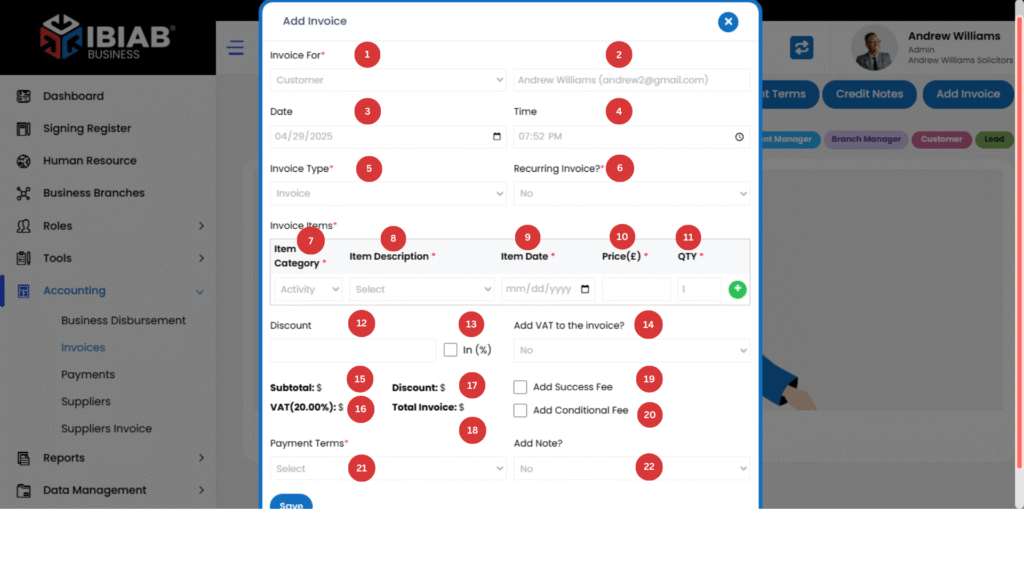
Once the default business activity is set, you can proceed to add a Invoice by filling out the following fields:
- Date – Select the billing date.
- Time – Enter the time of billing.
- Invoice Type* – Choose between:
- Invoice (for actual transactions)
- Quotation (for price estimates)
- Recurring Invoice?*– Indicates whether this Invoice should be automatically repeated at regular intervals.
- Invoice Category* – Select one of the two billing categories:
- Business Activity (related to provided services)
- Business Disbursement (for additional expenses related to the business)
- Business Activity* – Select the specific service or product area this item relates to.
- Activity Fee £* – Enter the charge associated with this business activity.
- Discount – If applicable, enter a discount amount.
- In (%) Checkbox – If checked, discount is applied as a percentage instead of a fixed amount.
- Add VAT? – If VAT applies, check this option. The system will calculate 20% VAT.
Invoice Breakdown
11. Subtotal: £ (Displays the total amount before discount & VAT)
12. VAT (20%): £ (Automatically calculates the VAT amount)
13. Discount: £ (Shows the applied discount amount)
14. Total Invoice: £ (Final amount after discounts & VAT)
Additional Billing Options
15. Add Success Fee? – If checked, additional fields appear:
- Success Fee* – Enter the extra service charge.
- Success Note* – Provide a note regarding the success fee.
16.Add Conditional Fee? – If checked, additional fields appear:
- Conditional Fee* – Specify an extra charge based on conditions.
- Condition* – Define the terms for applying the fee.
17.Payment Terms* – Specify the payment conditions.
18.If “Add Note?” is selected, the following fields appear:
- Note Type – Choose the type of note.
- Customer Note* – Add any relevant information for the customer.
📌 Tip: Always review the invoice before finalizing to ensure the correct calculations and details.
- View Invoice– See all Invoices associated with the customer.
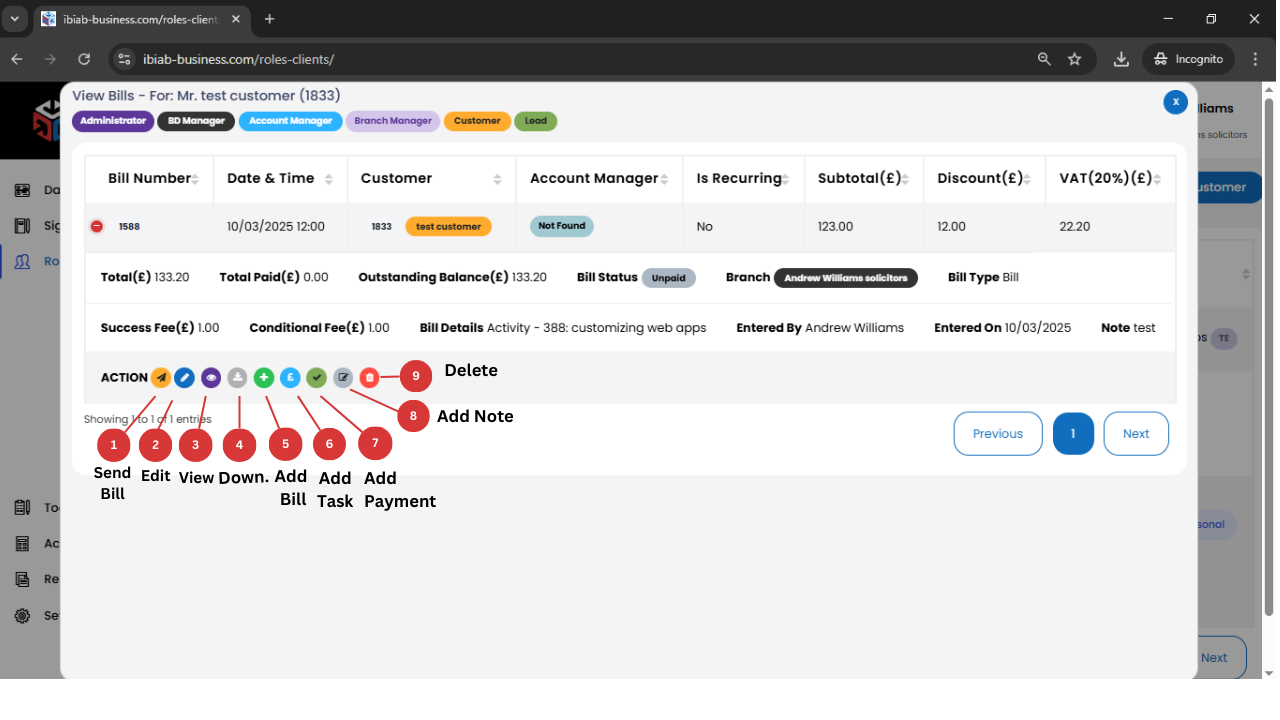
When you click on “View Invoice“ under a customer’s Action Button, a pop-up window appears, allowing you to manage a specific Invoice for that customer.
Invoice Details Display
The pop-up window includes a table that shows the full details of the Invoice, such as:
- Invoice Number
- Date & Time
- Invoice Type (Invoice/Quotation)
- Subtotal
- Discount (if any)
- VAT (20%)
- Total Invoice Amount
- Payment Terms
Invoice Management Action Buttons
Within the View Invoice pop-up, you can take the following actions:
- Send Invoice – Send the Invoice directly to the customer via email.
- Edit Invoice – Modify any details of the Invoice, such as amount, discount, or payment terms.
- View Invoice – Open a detailed view of the Invoice for review.
- Download – Export and download the Invoice as a PDF or other formats.
- Add Invoice – Create a new customer Invoice by entering relevant billing details and charges.
- Add Payment – Record a payment for the Invoice.
- Add Task – Assign a task related to the Invoice (e.g., follow-up for payment).
- Add Note – Attach internal notes regarding the Invoice.
- Delete – Permanently remove the Invoice from the system.
📌 Tip: Before sending or modifying a Invoice, always verify the details to ensure accuracy in transactions.
2.Calendar – When you click on the Calendar menu, it drops down two options:
- Add Event – Schedule an event or meeting with the customer.
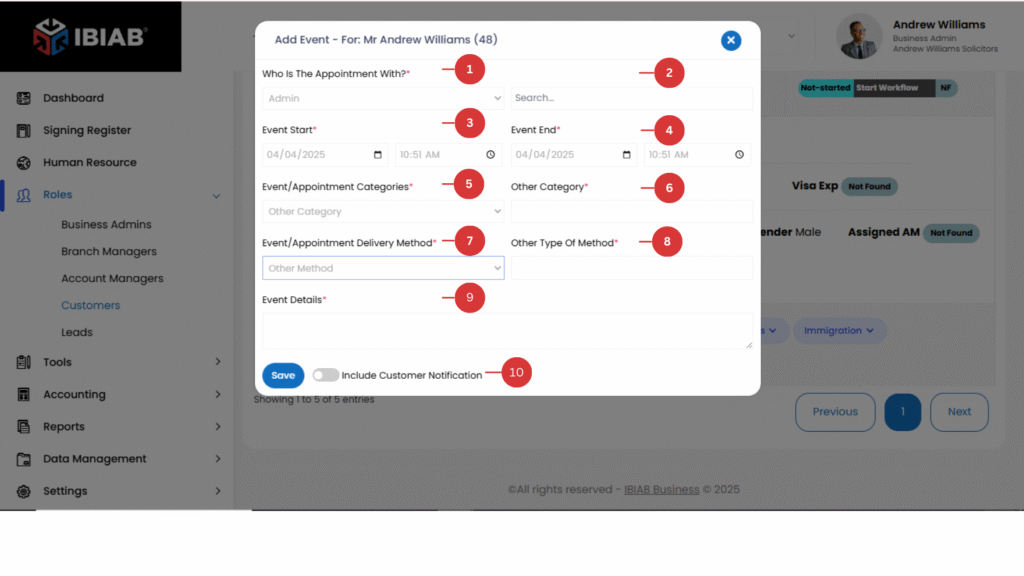
Clicking on “Add Event” opens a form that allows you to schedule a new event or appointment within your business system. The form includes the following fields:
- Who Is the Appointment With? * – A dropdown menu to select the user for the appointment. You can choose a specific user role or manually enter a user’s name.
- User – Select a specific user that you want to add the event too.
- Event Start* – Select the date and time when the event begins.
- Event End* – Select the date and time when the event ends.
📌 Note: The end time must be later than the start time. - Event/Appointment Categories* – Select the category for the event.
If “Other” is selected, an additional field - Other Category* will appear, allowing you to manually enter a custom category.
- Event/Appointment Delivery Method*
- Other type of Method – add type of method
- Event/Appointment Delivery Method* – Choose how the appointment will be conducted (e.g., in-person, phone call, video conference, etc.).
- Include Customer Notification – Send an automatic email notification to the customer when the Invoice is created.
📌 Tip: Always double-check the date, time, and assigned user before submitting the event to avoid scheduling conflicts.
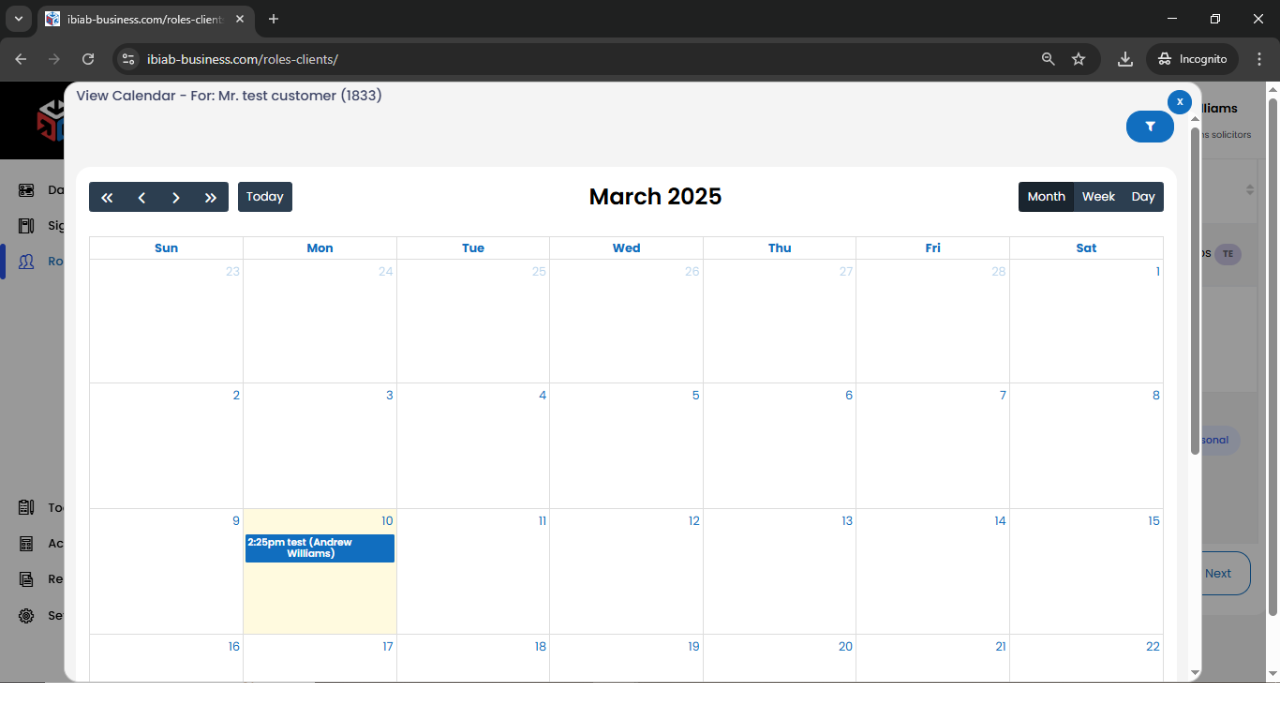
- View Events – Track and manage scheduled events.
When you click on “View Calendar”, a pop-up window appears, displaying your scheduled events in a calendar format.
Features of the Calendar View:
- Calendar Display Options
- You can switch between different view modes to organize how the data is displayed:
- Month View – Shows all events for the selected month.
- Weekday View – Displays events by weekdays.
- Day View – Displays events by Day
- You can switch between different view modes to organize how the data is displayed:
- Filtering Events
- The calendar allows you to filter events based on specific criteria:
- By Events – Shows only scheduled appointments and events.
- By Tasks – Displays assigned tasks along with deadlines.
- By Bring Forward Dates – Filters important reminders and follow-ups.
- By Month – View events for a selected month.
- By Year – Display events scheduled for an entire year.
- The calendar allows you to filter events based on specific criteria:
📌 Tip: Use the filters to quickly find relevant events and tasks, ensuring better planning and workflow management.
3.Customer Management –
A. Assign Branch Manager– Allocate a Branch manager to handle the customer’s account..
B. Assign Account Manager – Allocate an account manager to handle the customer’s account.
C. Documents Management – Upload, organize, and track documents associated with the customer.
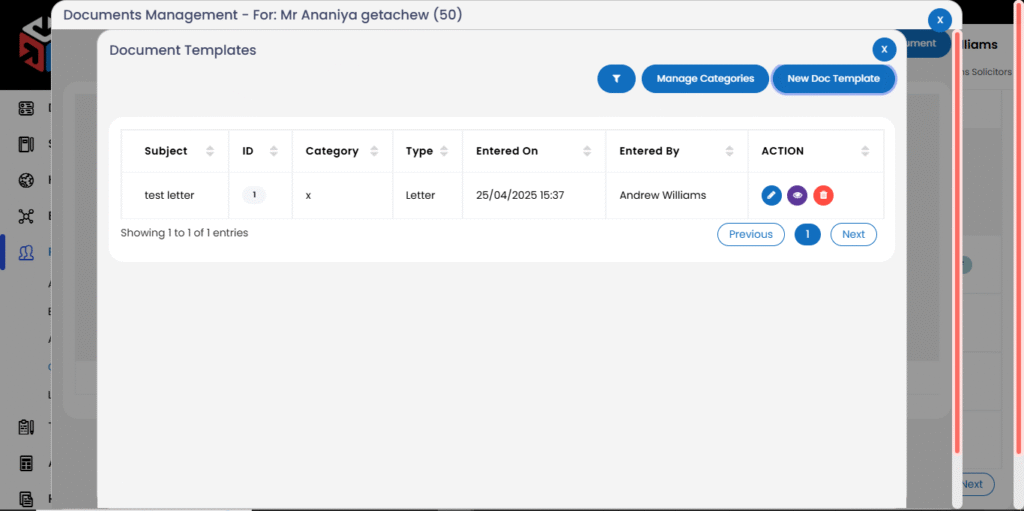
📁 How to Create and Manage Document Templates
The Document Templates feature allows you to standardize frequently used documents—such as letters, agreements, or fax covers—so they can be easily reused and linked to clients or internal processes.
🔹 Step 1: Add a Template Category
Before creating a new template, you must first classify it under a relevant Template Category.
- Navigate to the top-right corner of the Document Templates section.
- Click on the Manage Category button.
- A popup form will appear.
- Enter the Category Name (e.g., Agreements, Legal Notices, Internal Memos).
- Click Save to store your new category.
- You can also use the table below the form to view, edit, or delete existing categories.
💡 Creating categories helps you organize templates by type or department, improving ease of access and consistency.
🔹 Step 2: Create a New Document Template
Once your category is ready, you can proceed to create a new document template.
- Click the New Doc Template button in the top-right corner.
- A form will pop up. Fill in the following fields:
- Document Type* – Choose the type of document (e.g., Letter, Fax Cover, Agreement).
- Template Category* – Select the category you created earlier.
- Subject – Enter a short, descriptive title for the document.
- Content – Input the body of your document. You can use placeholders or dynamic fields if needed.
- Click Save to finalize and store the template.
🔹 Step 3: Manage Templates
After creating templates, you can view and manage them through the template list.
- Use the Action Buttons next to each template to:
- Edit – Modify the content or details of the template.
- View – Preview the template before use.
- Delete – Remove templates that are no longer needed.
✅ Why This Matters
- Ensures consistency across all business communications.
- Saves time by avoiding repetitive document creation.
- Supports compliance by standardizing the use of approved language and formatting.
📌 Tip: Use template categories that reflect real business workflows—like “Customer Agreements,” “HR Letters,” or “Vendor Contracts”—to keep things clean and accessible.
4.Customer Details –
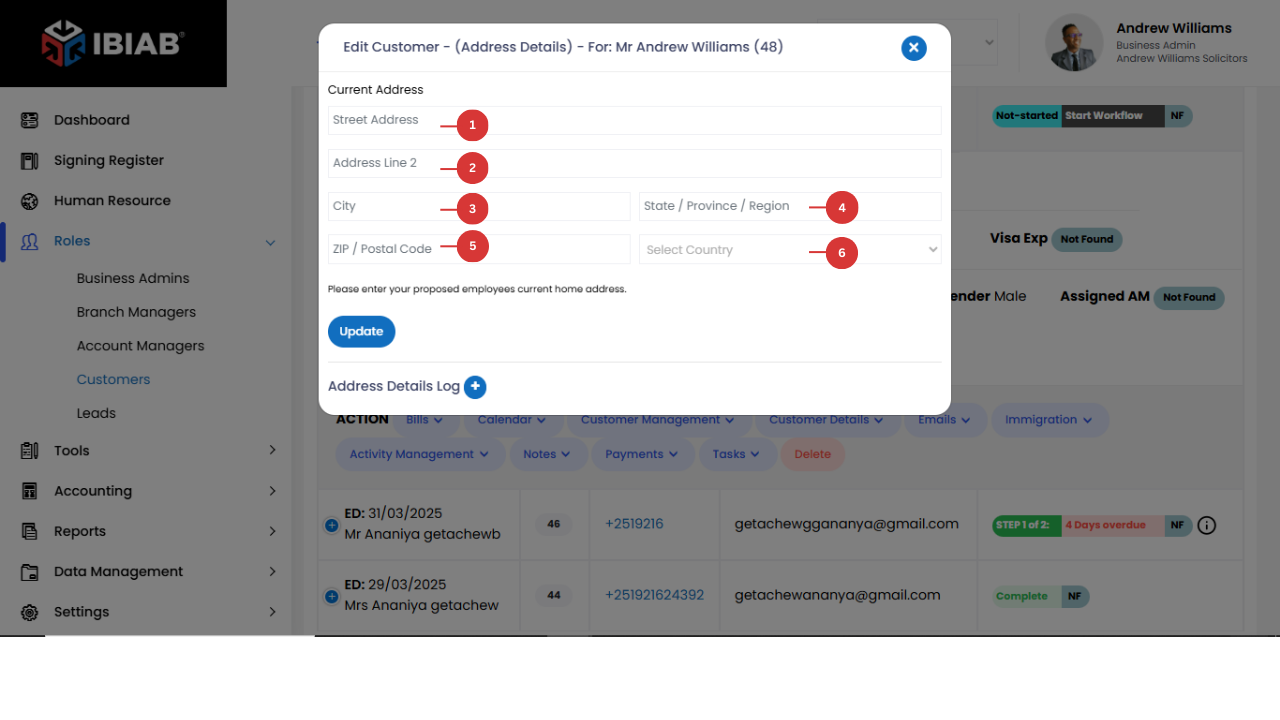
Edit Address – Update the customer’s physical address
When you click on “Edit Address”, a pop-up window appears, allowing you to update or add more details about the business address.
Address Information Fields:
- Street Address – Enter the primary street address of the business.
- Line Address 2 – Add additional address details if necessary (e.g., building name, suite number).
- City – Specify the city where the business is located.
- State / Province / Region – Select the state, province, or region of the business.
- ZIP or Postal Code – Enter the postal code for accurate location identification.
- Country – Choose the country where the business operates.
📌 Tip: Ensure all address details are correct and up to date to avoid issues with communication, billing, or official documentation.
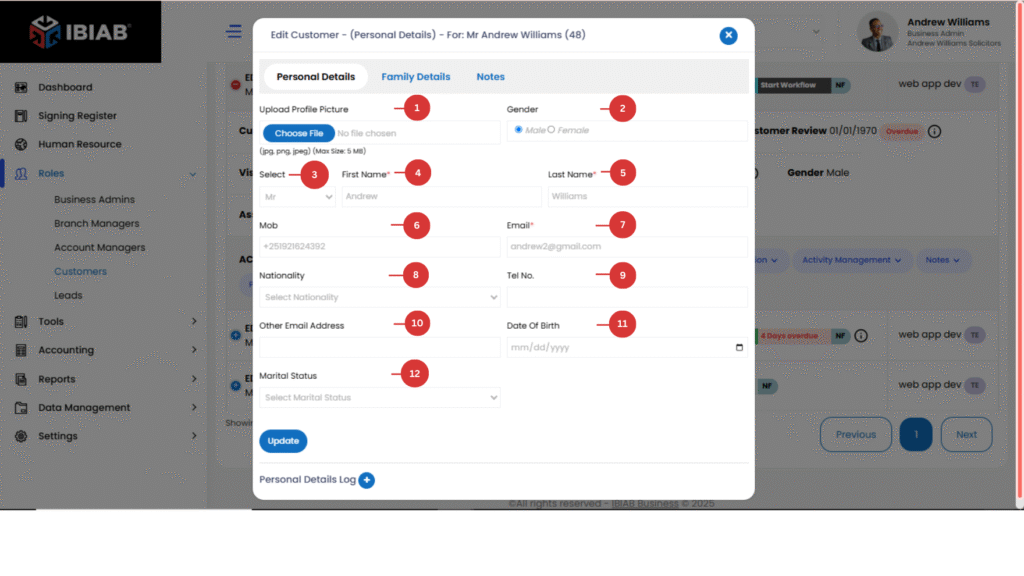
Edit Personal Details – When you click on “Edit Personal Information” under a customer’s action button, a pop-up window appears, allowing you to update and insert detailed information about the customer.
Personal Information Fields
- Upload Profile Picture – Upload or update the customer’s profile image.
- Gender – Select the customer’s gender.
- Title – Choose a title (e.g., Mr., Mrs., Miss, Dr.).
- First Name – Enter the customer’s first name.
- Last Name – Enter the customer’s last name.
- Mobile – Enter the primary mobile number.
- Email – Enter the primary email address.
- Nationality – Select the customer’s nationality.
- Telephone Number – Enter an alternative contact number.
- Other Email Address – Add an additional email address if needed.
- Date of Birth – Select the customer’s birth date.
- Marital Status – Choose marital status (e.g., Single, Married, Divorced, Widowed).
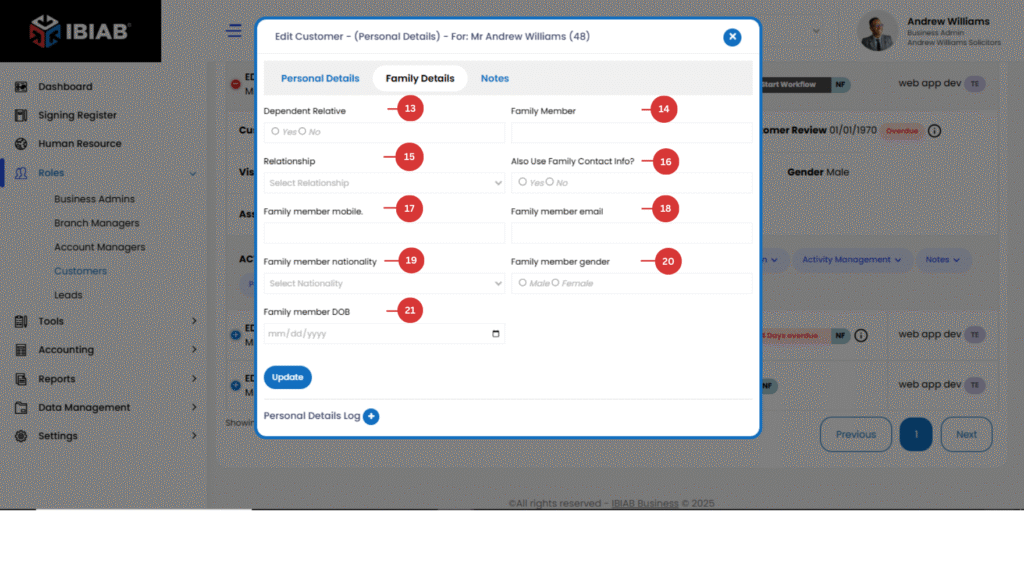
When you click Family detail Tab, the form expands to include family member information: - Dependent Relative – Add a dependent family member (if applicable).
- Family Member Name – Enter the family member’s full name.
- Relationship – Define the relationship (e.g., Spouse, Parent, Child, Sibling).
- Also Use Family Contact Info? (Yes/No) – Choose whether to copy the main customer’s contact details for this family member.
- Family Member Mobile – Enter the family member’s mobile number.
- Family Member Email – Enter their email address.
- Family Member Nationality – Select the nationality of the family member.
- Family Member Gender – Choose gender.
- Family Member DOB – Select their date of birth.
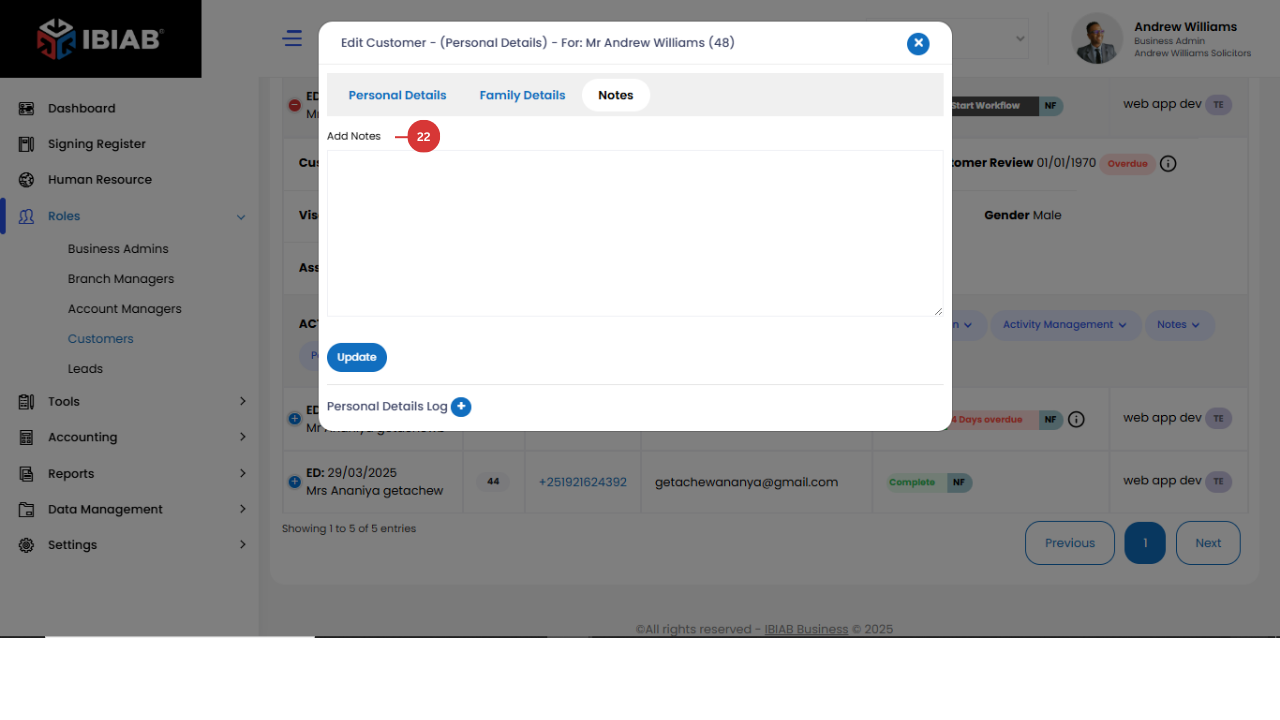
- You can add notes related to the customer’s personal or family details.
📌 Tip: Ensure all required fields are filled before clicking the Update button to save the information.
- View Details – See a complete summary of the customer’s profile.
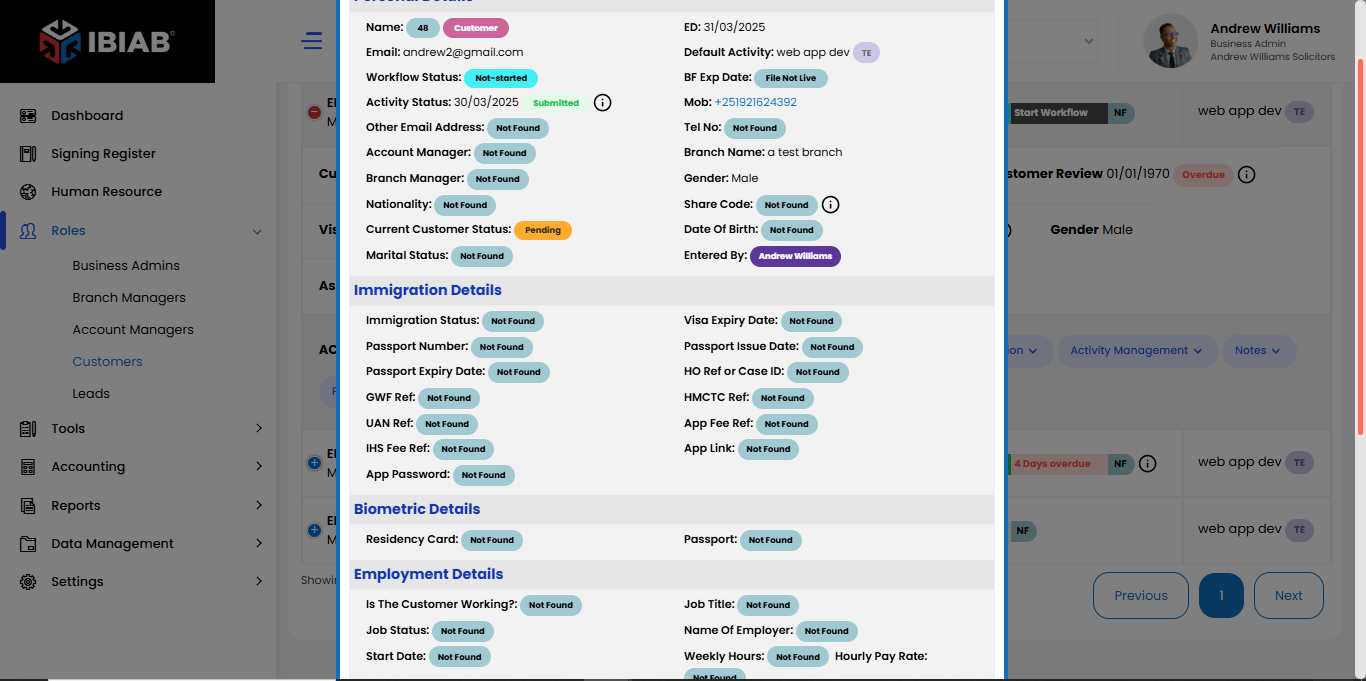
When you click on “View Detail”, a pop-up window appears, displaying all the stored information about the selected customer. This allows you to review their details without making any changes.
Information Sections Displayed:
- Personal Details
- Full Name
- Gender
- Title
- Mobile Number
- Email Address
- Nationality
- Date of Birth
- Marital Status
- Business Address
- Biometric Details(if applicable)
- Fingerprint Data
- Facial Recognition
- ID / Passport Number
- Employment Details
- Job Title
- Company Name
- Department
- Employment Type (Full-time, Part-time, Contract)
- Work Address
- Family Details
- List of Dependents or Family Members
- Relationship to the Customer
- Contact Information of Family Members
- Family Member’s Nationality & Date of Birth
📌 Tip: This section is for viewing only. To edit or update information, you need to use the Edit Personal Information or Edit Address options.
6.Email
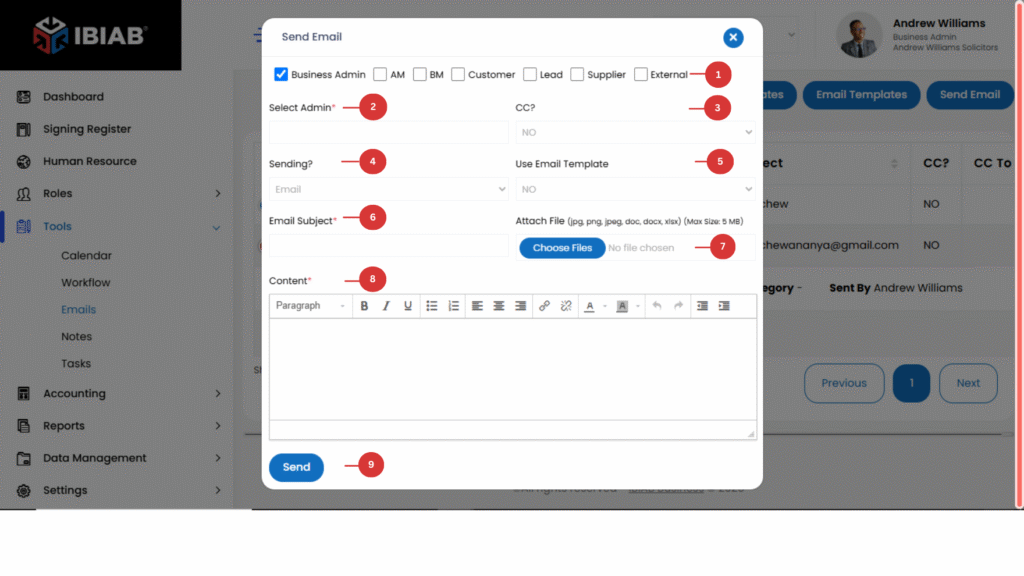
Add Email – When clicking on the Add Email button, a popup window will appear, allowing you to send an email to a specific role or individual.
- Select a Role – Choose the specific role you want to send the email to (e.g., Administrator, Account Manager, Business Development Manager).
- Admin Input Field – Search for or manually enter the recipient’s email address.
- CC Field – If you choose Yes, an additional input field will appear where you can enter another email address to CC (copy) the email.
- Sending Method – Choose between:
- Email – Sends the message via email.
- Letter – Allows you to format the email as a formal letter.
- Email Templates – Use a predefined email template from your company’s email system.
- Email Subject Field – Enter the subject of your email.
- Attach Field – Upload any attachments (e.g., PDFs, documents, images).
- Content Field – Write the main content of your email.
Click Send to deliver the email.
📌 Tip: Double-check the email address and content before sending to ensure accuracy.
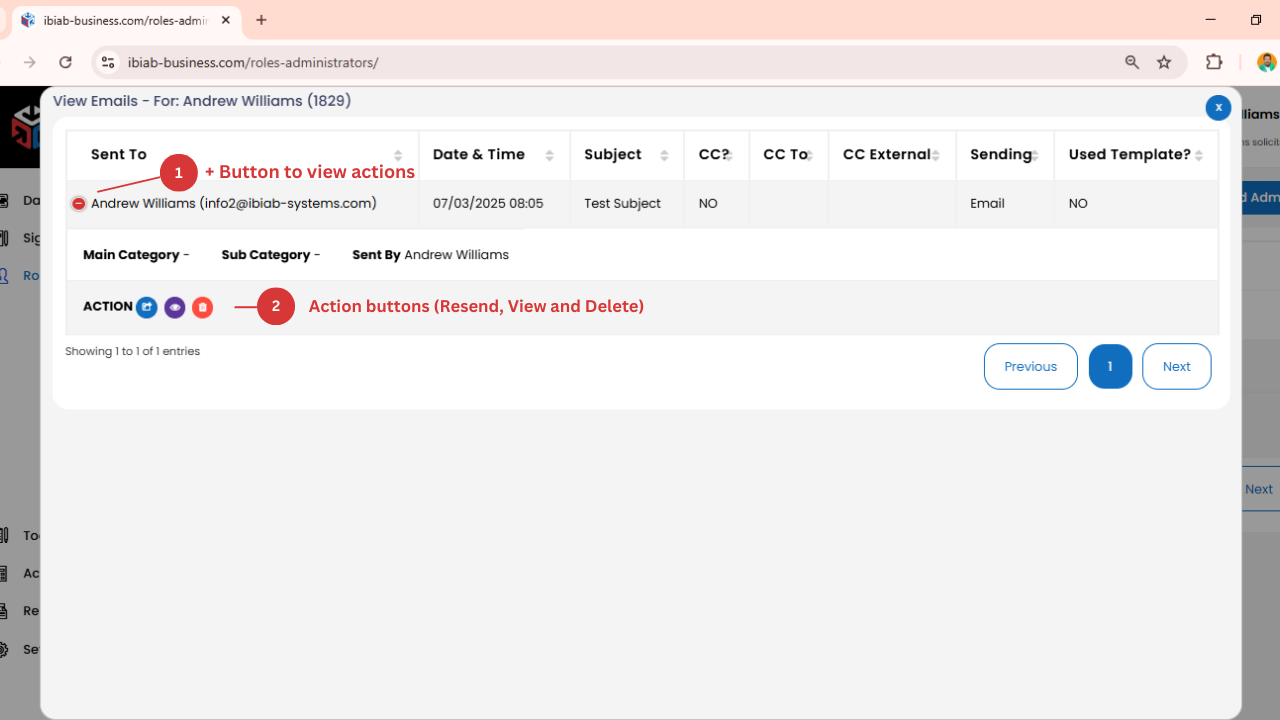
View Emails – Review the history of emails sent to or received from the customer.
1.+ button to expand Action buttons
2. List of action buttons
7.Immigration – Manage immigration-related records linked to the customer.
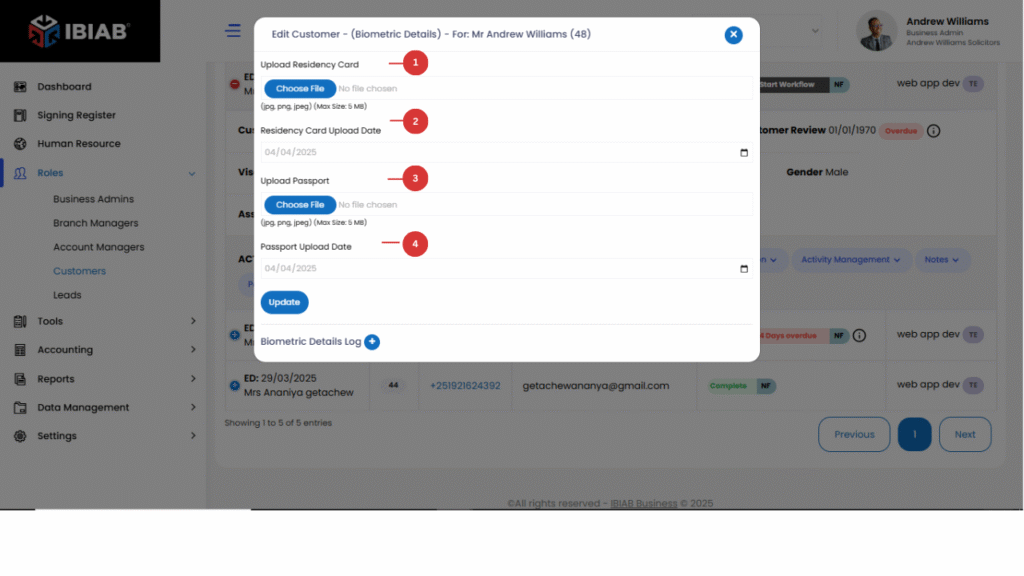
a. Edit biometrics–
Manage and update biometric-related documents for the customer.
- Residency Card Upload Date – Date the residency card was uploaded.
- Upload Passport – Upload the customer’s valid passport.
- Passport Upload Date – Date the passport document was uploaded.
B. Edit Employment
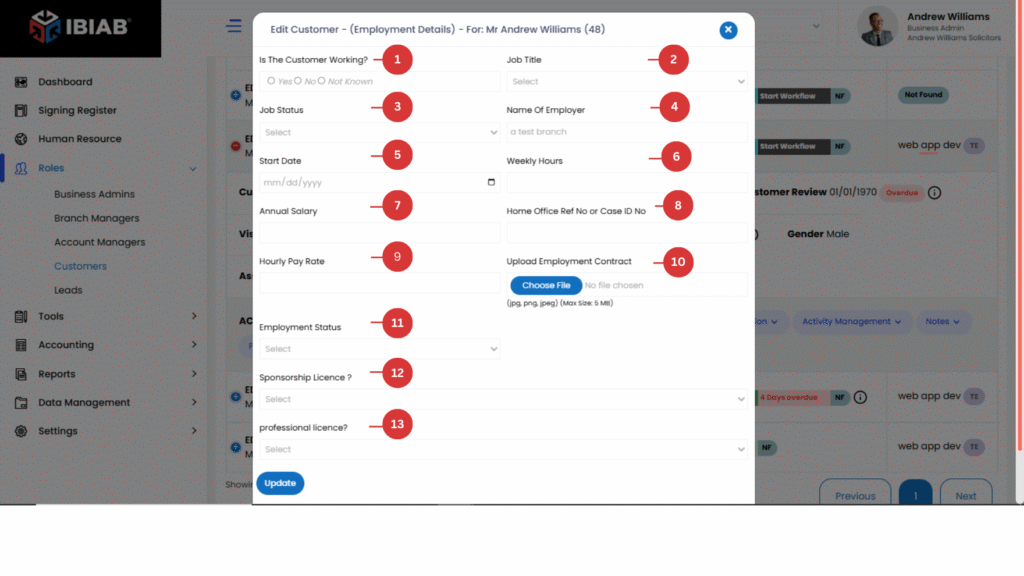
The Employment Details section allows you to edit and update a customer’s job-related information. When you select “Employment Details”, a pop-up window appears, where you can modify specific employment details.
Employment Information Fields:
- Is The Customer Working?(Select one option)
- Yes – The customer is currently employed.
- No – The customer is unemployed.
- Not Known – Employment status is unknown.
- Job Title – Select the customer’s profession (e.g., Accounting, Finance, Engineering).
- Job Status – Indicate whether the job is full-time, part-time, contract, or self-employed.
- Name of Employer – Enter the name of the company or employer.
- Start Date – Choose the date when the customer started their job.
- Weekly Hours – Enter the number of hours worked per week.
- Annual Salary – Specify the customer’s yearly income.
- Home Office Ref No or Case ID No – Enter a reference number if applicable (for legal or immigration purposes).
- Hourly Pay Rate – If the job is hourly, enter the hourly wage.
- Upload Employment Contract – Attach a copy of the employment contract (PDF, Word, or scanned document).
- Employment Status – Specifies whether an individual is employed, self-employed, unemployed, or retired.
- Sponsorship License Details (If the customer is sponsored by an employer)
If “Sponsorship License” is selected as Yes, the following additional fields appear:
CAS Certificate – Upload the Certificate of Acceptance for Studies (if applicable).- COS Allocation – Enter the Certificate of Sponsorship allocation reference.
- COS Start Date – Enter the start date of the sponsorship.
- COS End Date – Enter the end date of the sponsorship.
- Professional License Details (If the customer holds a professional license)
If “Professional License” is selected as Yes, the following additional fields appear:
- License Organization Name – Enter the issuing organization’s name.
- License Number – Enter the unique license number.
- License Start Date – Choose the date when the license was issued.
- License Expiry Date – Choose the date when the license expires.
📌 Tip: Make sure all required fields are filled before clicking “Update” to save changes.
C. Edit Case Detail
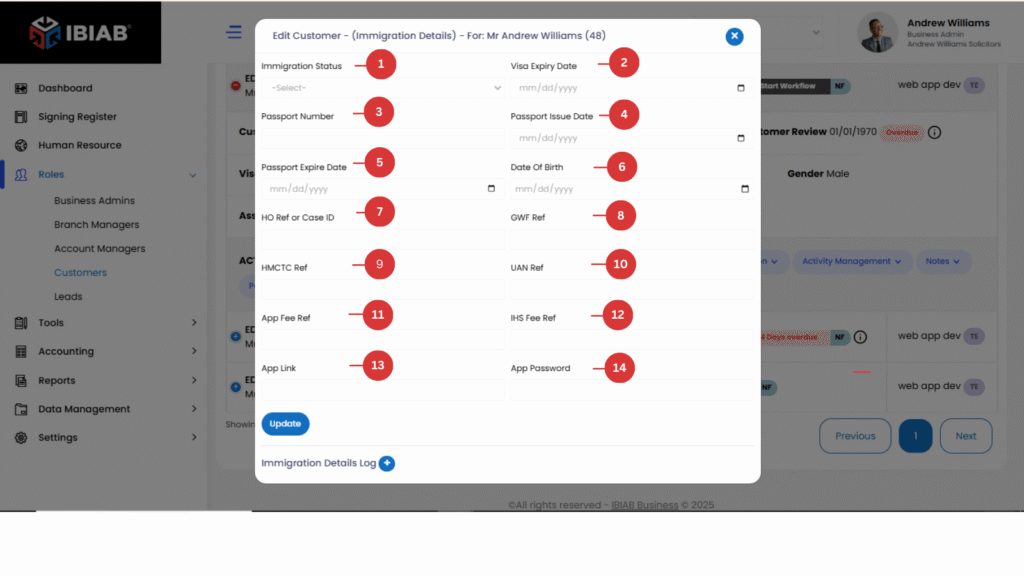
When you click on “Edit Customer Immigration”, a pop-up window appears, allowing you to update and manage the customer’s immigration details.
Immigration Information Fields:
- Immigration Status – Select or enter the customer’s current immigration status (e.g., Work Visa, Student Visa, Permanent Resident, Asylum Seeker).
- Visa Expiry Date – Select the expiration date of the customer’s visa.
- Passport Number – Enter the customer’s passport number.
- Passport Issue Date – Select the date when the passport was issued.
- Passport Expiry Date – Select the date when the passport will expire.
- Date of Birth – Enter the customer’s date of birth (for verification purposes).
- HO Ref or Case ID – Enter the Home Office Reference Number or Case ID if applicable.
- GWF Ref – Enter the GWF (Global Web Form) Reference Number assigned to the visa application.
- HMCTC Ref – Enter the HM Courts & Tribunals Service (HMCTC) Reference Number, if applicable.
- UAN Ref – Enter the Unique Application Number (UAN) used for immigration applications.
- App Fee Ref – Enter the application fee reference for visa processing.
- IHS Fee Ref – Enter the Immigration Health Surcharge (IHS) fee reference number if applicable.
- App Link – Provide a URL link to the online visa or immigration application.
- App Password – Enter the password for accessing the immigration application portal (if needed).
📌 Tip: Ensure that all required fields are accurately filled before clicking “Update” to save changes.
7. Activity Management
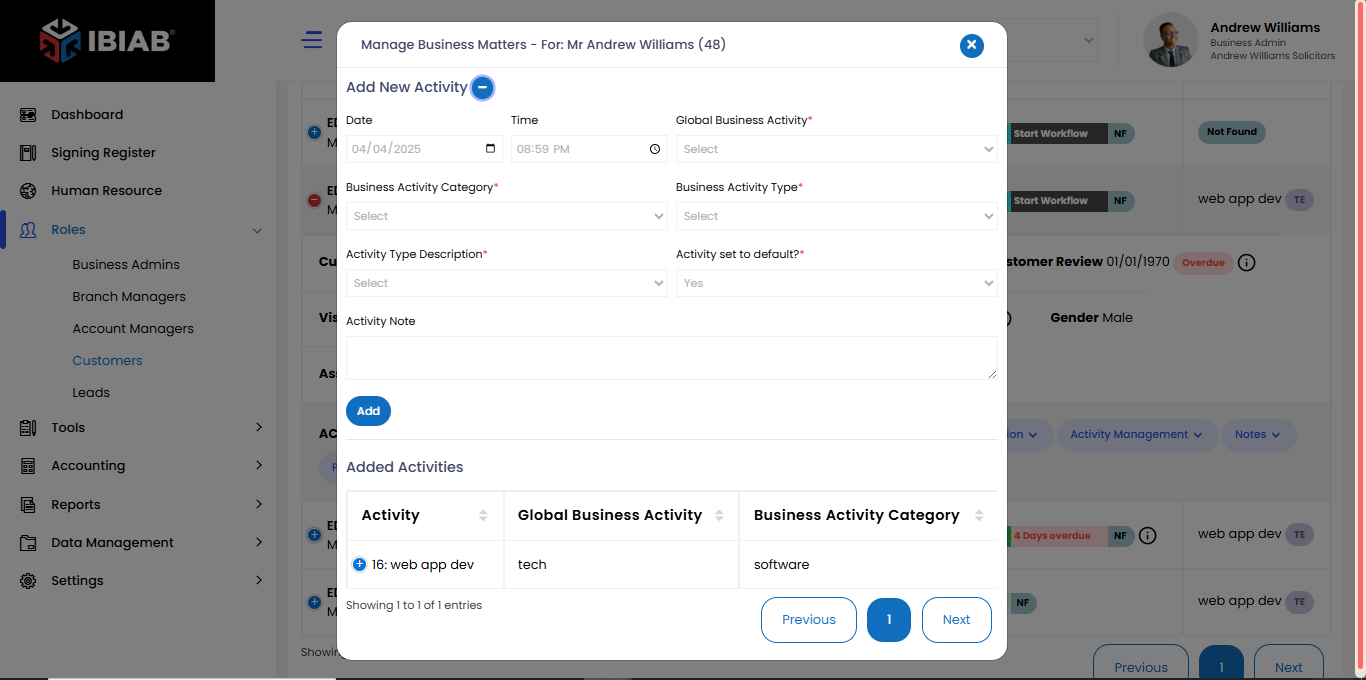
When you click on “Activity Management”, a menu appears with different options to manage legal and business matters efficiently. The options include:
Activity Management Options:
1. Manage Business Matter – View, create, and update active business matters. This section allows users to handle ongoing cases, contracts, or other essential business operations.
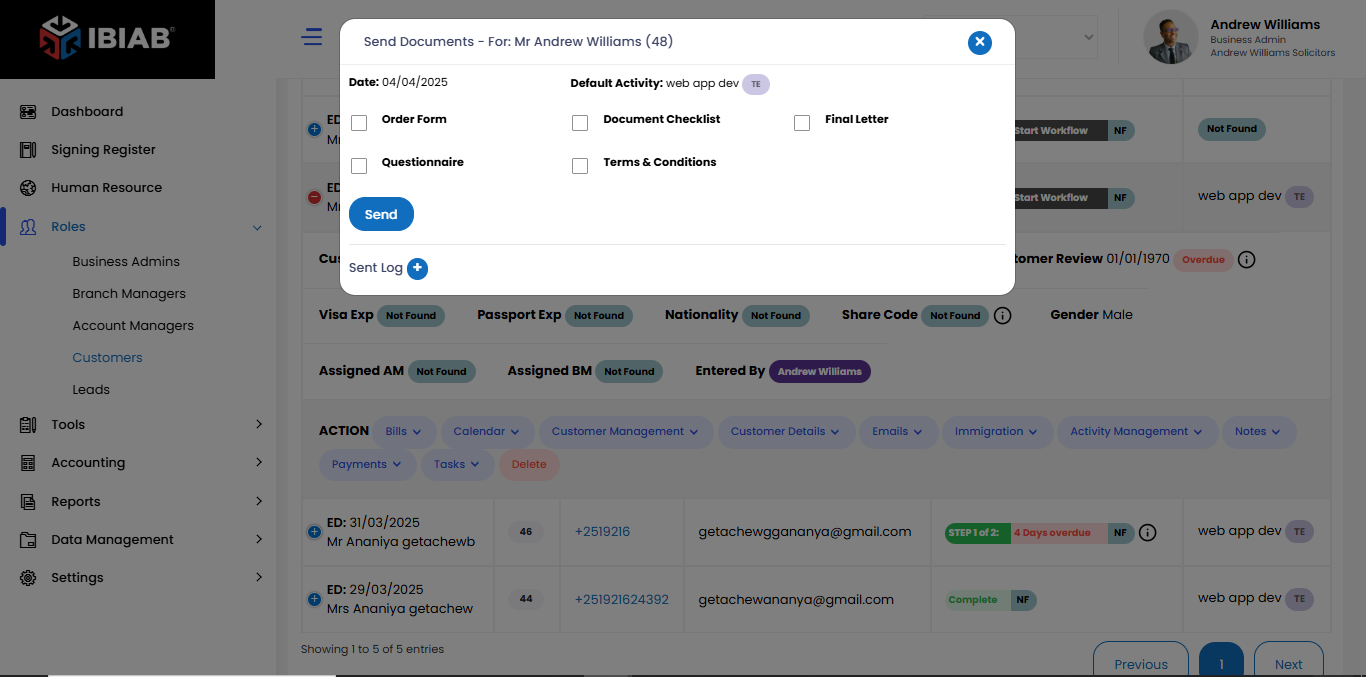
2. Send Document – Upload and send documents related to the matter. You can attach legal contracts, agreements, case files, or any supporting documents to relevant parties.
When you click on “Send Document”, a popup will appear, allowing you to send different documents to a customer, lead, or business manager.
Available Documents to Send:
- Order Form – Used for placing official orders related to services or products.
- Customer Care Letter – A formal letter sent to customers to provide support or important information.
- Customer Business Cover Letter – A cover letter that accompanies business-related documents.
- Document Checklist – A list of required documents that the recipient needs to provide.
- Initial Questionnaire – A form that collects preliminary information from the customer or lead.
- Terms & Conditions – The official terms and policies related to the business agreement.
📌 Note: After selecting the document(s), you can attach additional notes or instructions before clicking the “Send” button.
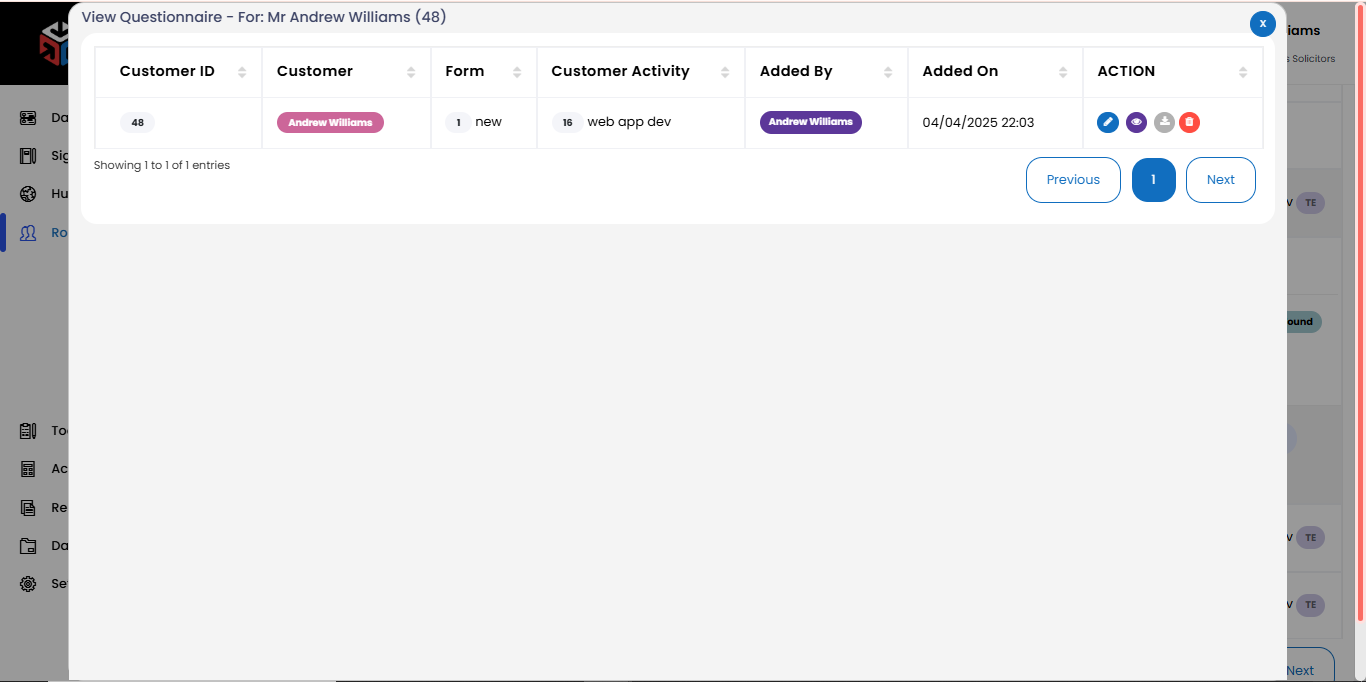
3. View Questionnaire– Opens a detailed view of all matters, including case progress, documents, and assigned account managers.
8.Notes
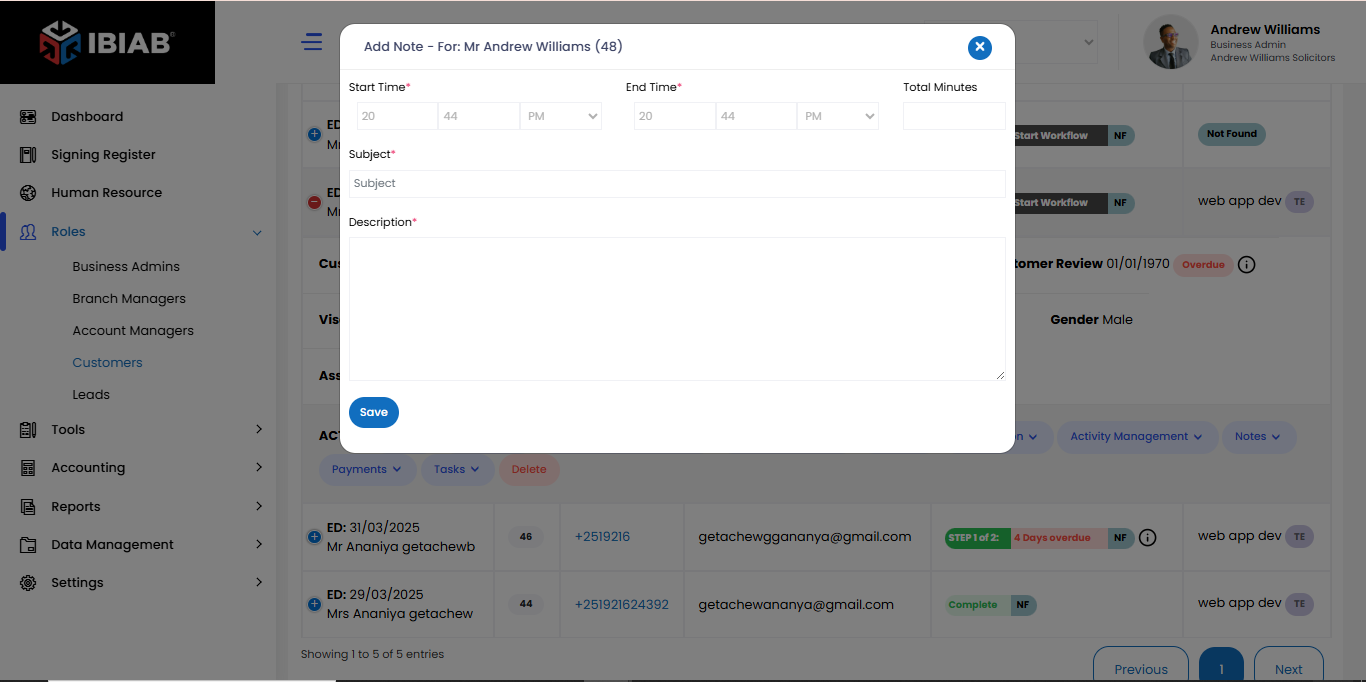
Add Notes – Add internal notes related to the administrator.
The Notes section allows users to add important details related to a specific role or task.
Fields in the Notes Section:
- Start Time* – Select the start time for the note entry.
- End Time* – Select the end time (must be greater than the start time).
- Total Minutes – Automatically calculates the duration based on the start and end times.
- Subject* – Enter a title or brief subject for the note.
- Description* – Provide detailed information about the note.
Important Rule:
⚠️ End Time must be greater than Start Time to ensure valid time tracking.
📌 Tip: Ensure all *required fields (marked with an asterisk ) are completed before saving the note.
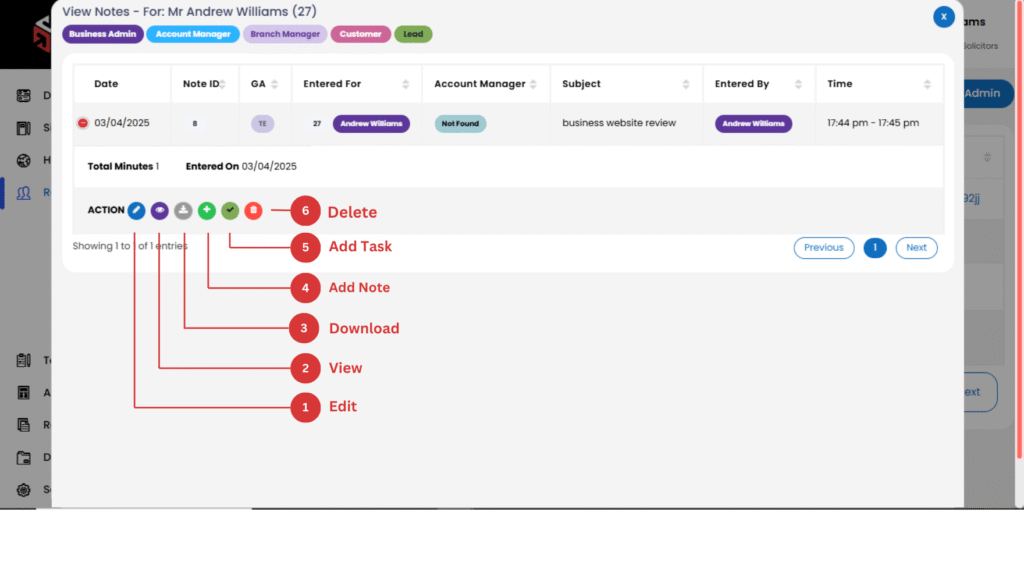
Users can see a list of existing notes with details such as start time, end time, subject, and description.
Clicking on the plus (+) button next to a note will expand the available action buttons.
Available Actions:
- Edit – Modify the note details.
- View – Open and read the full note.
- Download – Save the note as a file.
- Add Note– Link a Note entry to the note if necessary.
- Add Task – Create a related task based on the note.
- Delete – Remove the note permanently.
📌 Tip: Use the Edit option to update information instead of deleting a note to maintain records.
9. Payments
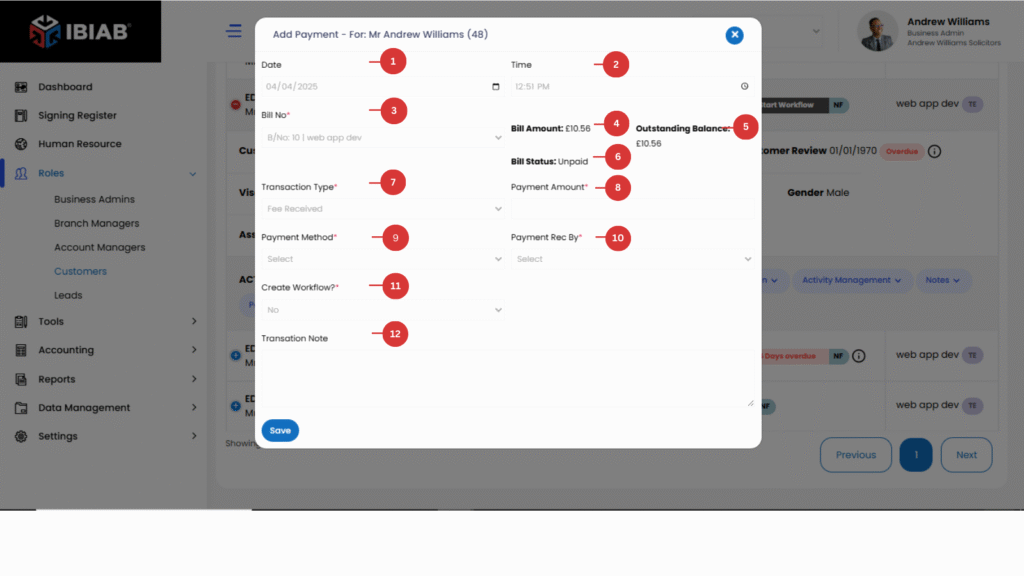
The “Add Payment” feature allows you to record a new payment made by a customer. When you click on “Add Payment”, a pop-up window appears where you can enter and manage the payment details.
Payment Information Fields:
- Date – Select the date when the payment was made.
- Time – Choose the time of the payment transaction.
- Invoice No* – Select the Invoice number from the system (linked to the customer’s invoices).
- Invoice Amount – Displays the total Invoice amount (automatically retrieved from the selected Invoice).
- Outstanding Balance – Shows the remaining balance after partial payments.
- Invoice Status – Displays the current status of the Invoice (e.g., Paid, Partially Paid, Unpaid).
Payment Details: - Transaction Type* – Select the type of transaction (e.g., Full Payment, Partial Payment, Refund).
- Payment Amount* – Enter the amount the customer is paying.
- Payment Method* – Choose the payment method (e.g., Cash, Credit Card, Bank Transfer, PayPal).
- Payment Received By* – Select the staff member or account manager who received the payment.
Workflow Management (Optional): - Create Workflow?*
If “Yes” is selected, an additional field appears:
Assign Account Manager – Choose the account manager responsible for managing the payment workflow. - Transaction Note – Add any relevant notes about the transaction (e.g., reference number, special conditions).
📌 Tip: Double-check the payment details before clicking “Save Payment” to ensure accurate records. payment should not be higher than due amount
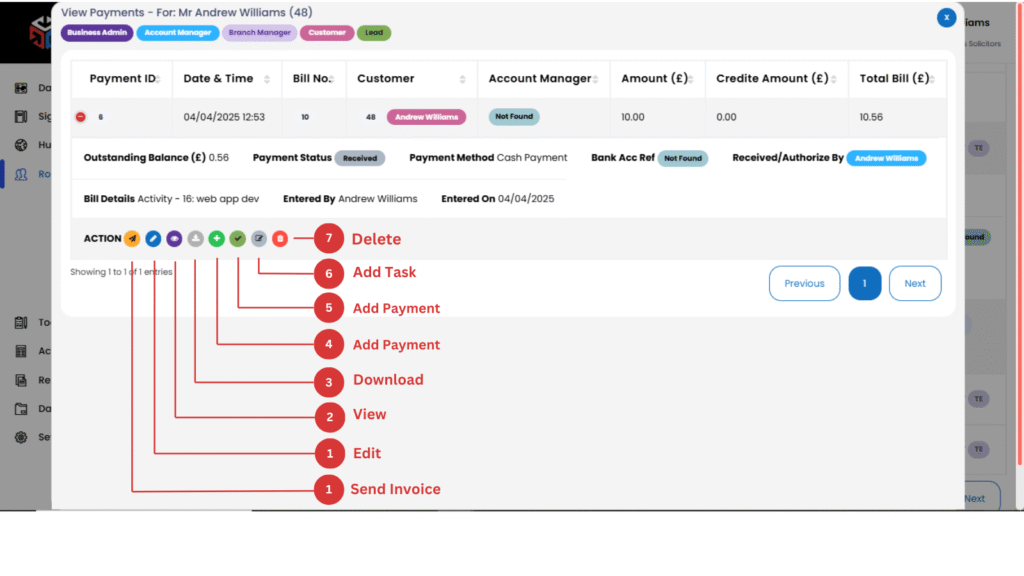
View Payments – Track payment history and outstanding balances.
The “View Payment” section provides a detailed list of all recorded payments made by customers. When you click on “View Payment”, a table appears displaying the following payment details:
Payment List Columns:
- Payment ID – Unique identifier for each payment transaction.
- Date & Time – Shows the exact date and time the payment was recorded.
- Invoice No. – Displays the associated Invoice number linked to the payment.
- Customer – Name of the customer who made the payment.
- Account Manager – The account manager responsible for handling the payment.
- Amount (£) – The amount paid in GBP (£).
- Total Invoice (£) – The total Invoice amount before payments.
- Outstanding Balance (£) – Displays the remaining balance after payments.
Payment Action Buttons:
Clicking on the plus (+) button beside a payment entry will expand the row and show action buttons that allow you to perform specific actions on that payment:
- Send Invoice – Sends the Invoice directly to the customer via email.
- Edit Invoice – Modify the Invoice details, such as amount, discount, or payment terms.
- View Invoice – Opens a detailed view of the Invoice for review.
- Download – Exports and downloads the Invoice in PDF or other formats.
- Add Payment – Allows recording of an additional payment for the Invoice.
- Add Task – Assigns a task related to the Invoice (e.g., follow-up for pending payments).
- Add Note – Adds internal notes regarding the Invoice for tracking purposes.
- Delete – Permanently removes the Invoice from the system.
📌 Tip: Always review Invoice details before making modifications or sending to customers.
10.Tasks
- Add Task – Assign a task to the administrator.
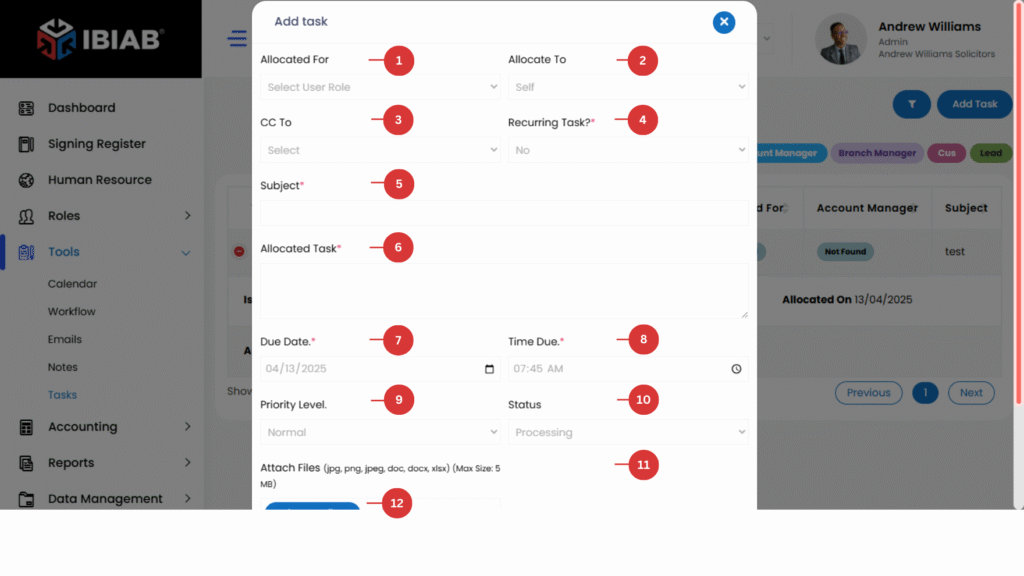
The Add Task feature allows users to create and assign tasks to different users within the system. When clicking on the “Add Task” button, a task creation form will pop up.
Fields in the Add Task Form:
- Allocated For – Select the specific user role for which the task is being created.
- Allocated To – Choose the specific user responsible for completing the task.
- CC To – If required, add other users who should receive updates about the task.
- Recurring (Daily, Weekly..) – the task will be automatically repeated at set intervals.
- Subject* – Enter a brief title describing the task.
- Allocated Task (Description)* – Provide a detailed explanation of the task.
- Due Date* – Set the deadline by which the task should be completed.
- Time Due* – Specify the exact time the task is due.
- Priority Level – Select a priority:
- Low
- Medium
- High
- Urgent
- Status – Choose the status of the task:
- In Progress
- Completed
- On Hold
- Pending
- Attach Files – Upload any necessary documents, images, or files related to the task.
How to Add a Task:
- Click on “Add Task”.
- Fill in the required details (marked with an asterisk *).
- Ensure the correct user/role is assigned and set the due date/time.
- If the task is recurring, select Yes and define the frequency.
- Click “Save” to create the task.
📌 Tip: Assign tasks with clear descriptions and due dates to improve efficiency and task tracking.
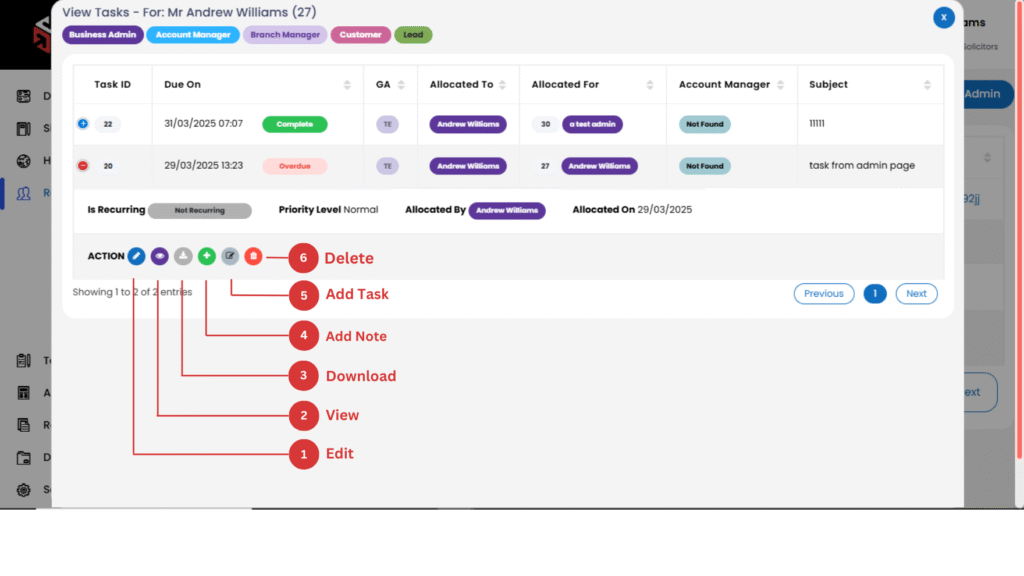
- View Task – See tasks assigned to different users in the system.
Viewing and Managing Tasks
The View Task section allows users to see and manage all tasks within the system. It provides a list of existing tasks, along with key details such as:
- Task Subject
- Allocated For (Department, Project, or Purpose)
- Allocated To (User or Role responsible for the task)
- Due Date
Expanding Task Options
- Clicking on the plus (+) button next to a task expands action buttons, allowing users to manage the task.
Available Actions:
- Edit – Modify task details such as subject, description, due date, priority, or status.
- View – Open the task details to review the assigned information.
- Download – Save the task details as a document for offline access.
- Add More Tasks – Assign additional tasks related to the current one.
- Add Note – Attach notes to the task for additional context or updates.
- Delete – Permanently remove the task from the system.
📌 Tip: Use the Edit option to update the task status as it progresses to keep track of completed and pending tasks efficiently.
* Additional settings for Customers
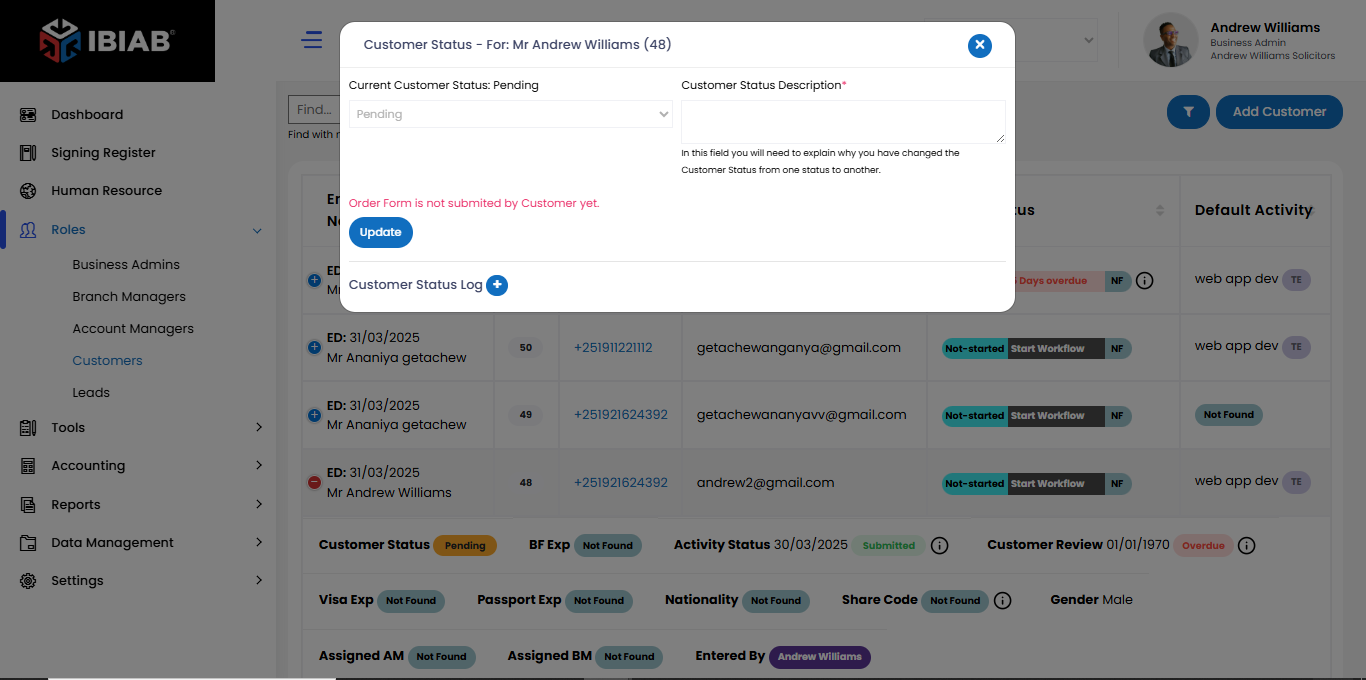
Customer Status
Track the current progress or state of a customer’s case within your system.
- Current Customer Status: Select the most accurate status such as Pending, Live, Granted, Rejected, On-hold, or Closed.
- Customer Status Description* – Provide a brief explanation or notes about the selected status.
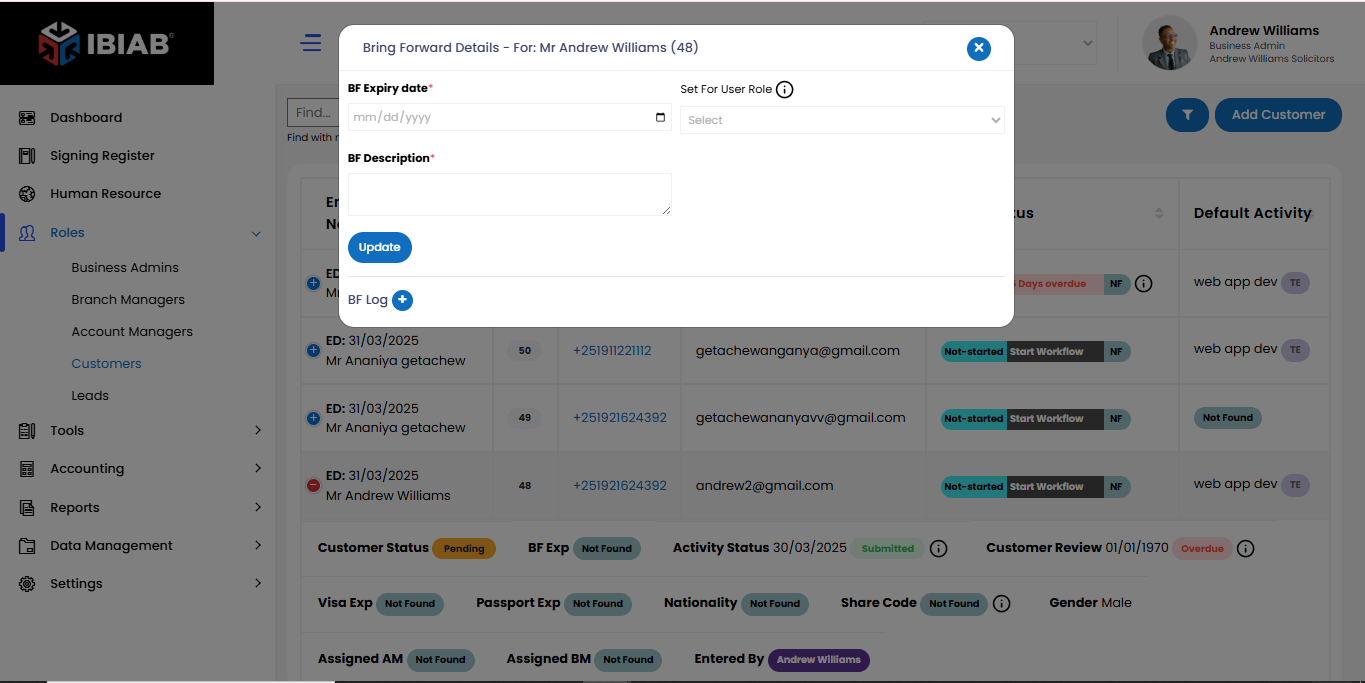
Bring Forward Details
Set a follow-up reminder or future action related to a task or case.
- BF Expiry Date* – Choose the deadline or due date for the follow-up.
- Set For User Role – Assign the follow-up to a specific user role (e.g., Account Manager, Branch Manager).
- BF Description* – Add a short description outlining the purpose or context of the bring forward.
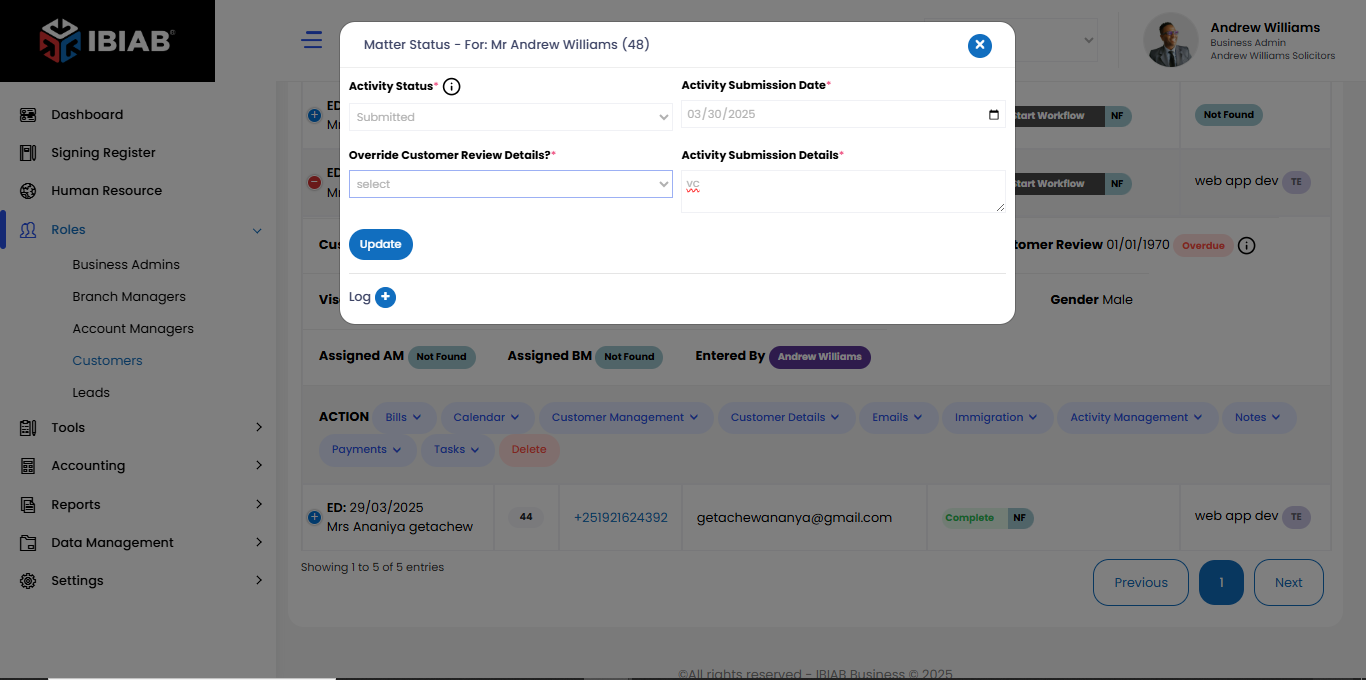
Matter Status
Track the progress and submission details of a specific business activity.
- Activity Status* – Select whether the activity is Submitted or Completed.
- Activity Submission Date* – Enter the date the activity was officially submitted or completed.
- Override Customer Review Details?* – Choose Yes to manually override previously recorded customer review data.
- Activity Submission Details* – Provide a summary or description of what was submitted or completed for this activity.
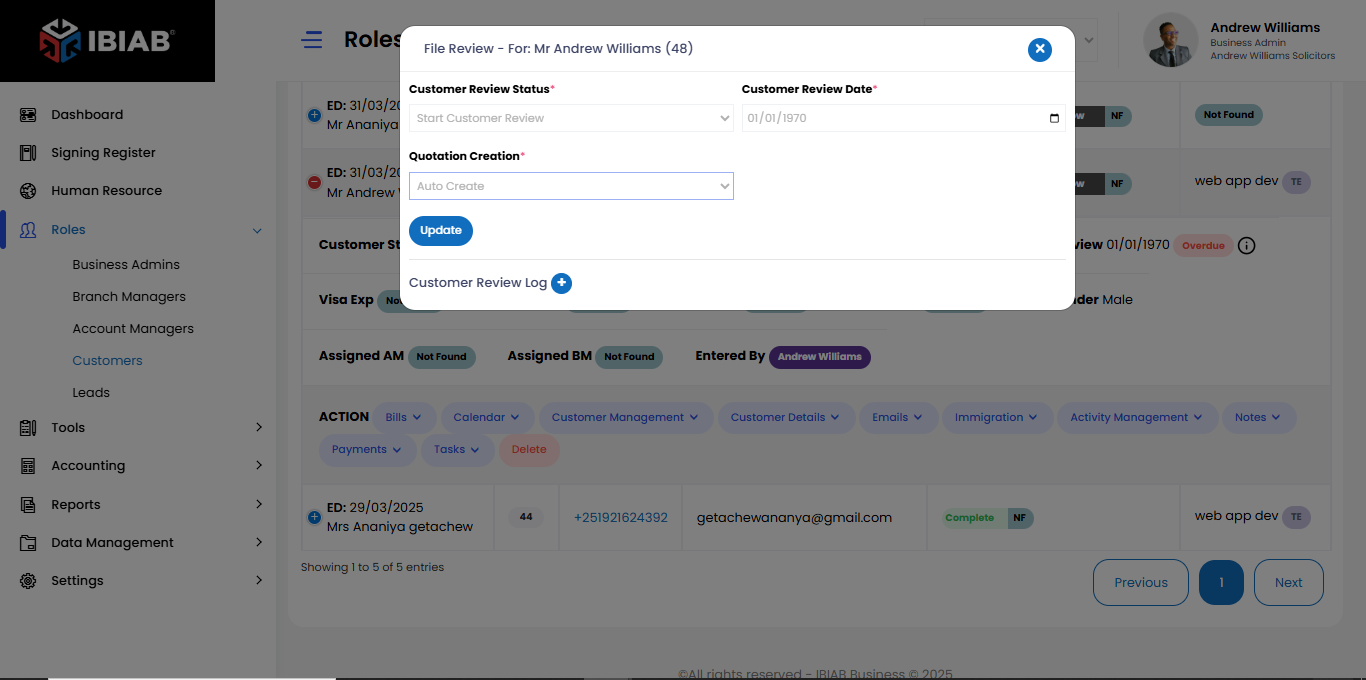
File Review
Manage and track the customer review process and quotation generation for a specific file.
- Customer Review Status* – Select whether the customer review is at the Start or End stage.
- Start Customer Review – Enable this to begin the customer review process.
- Customer Review Date* – Enter the date the customer review was initiated or completed.
- Quotation Creation* – Choose Auto to automatically generate quotations or Manual to create them yourself.
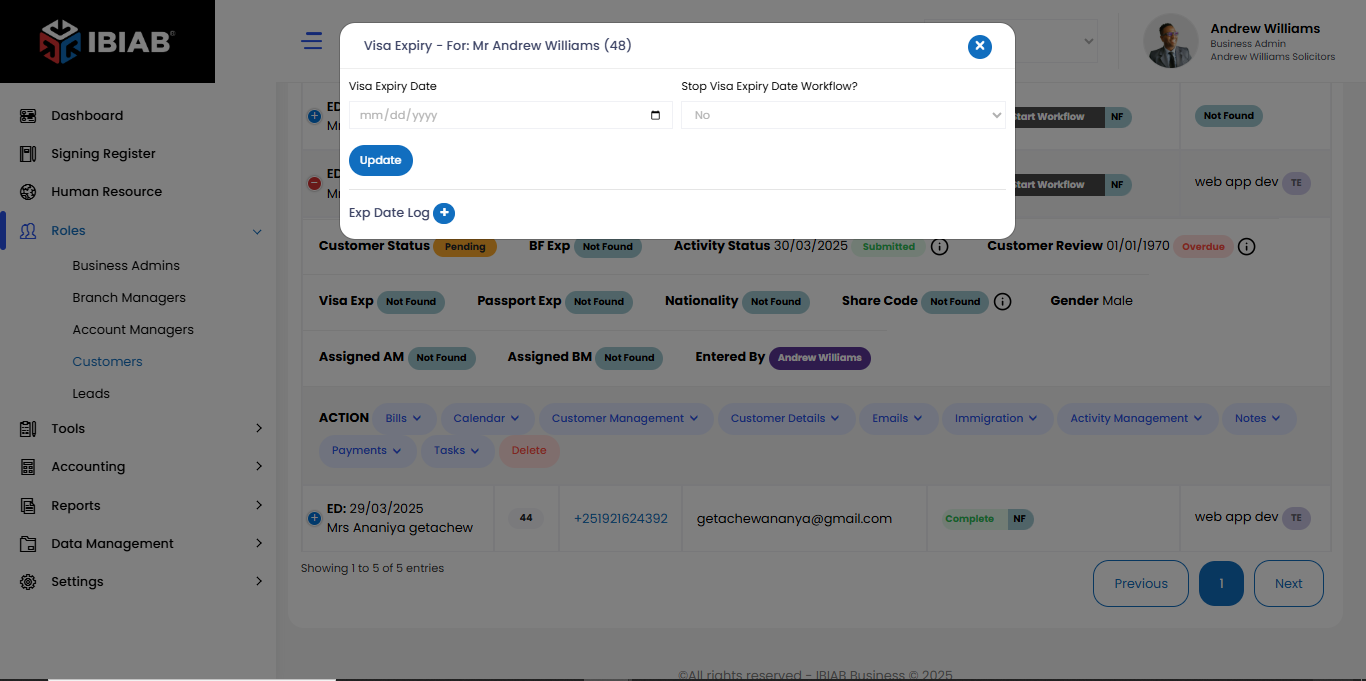
Visa Expiry
Track and manage visa expiry details for your customer records.
- Visa Expiry Date – Enter the date the visa is set to expire.
- Stop Visa Expiry Date Workflow? – Enable this if you want to halt any automated workflows related to visa expiry for this record.
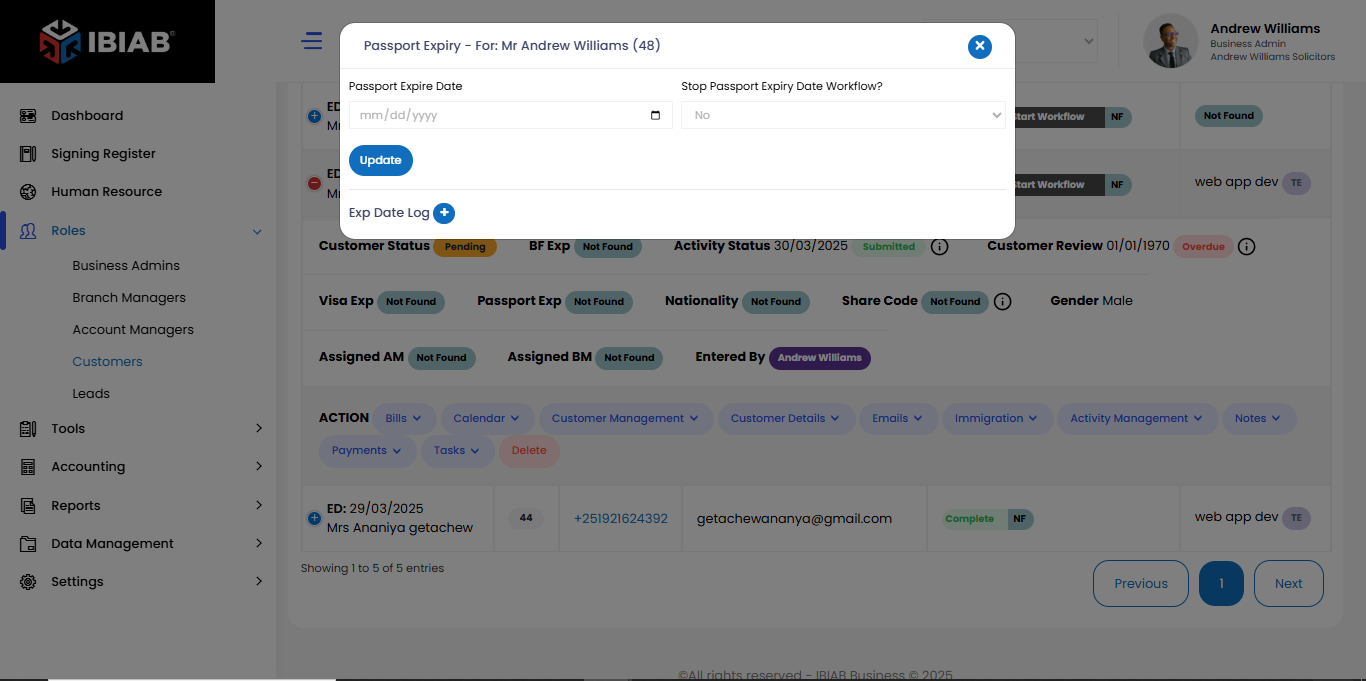
Passport Expiry
Keep track of customer passport expiry to ensure timely renewals and avoid delays.
- Passport Expire Date – Enter the date the passport is due to expire.
- Stop Passport Expiry Date Workflow? (Yes/No) – Choose “Yes” if you want to disable automated workflows or reminders related to passport expiry for this customer.
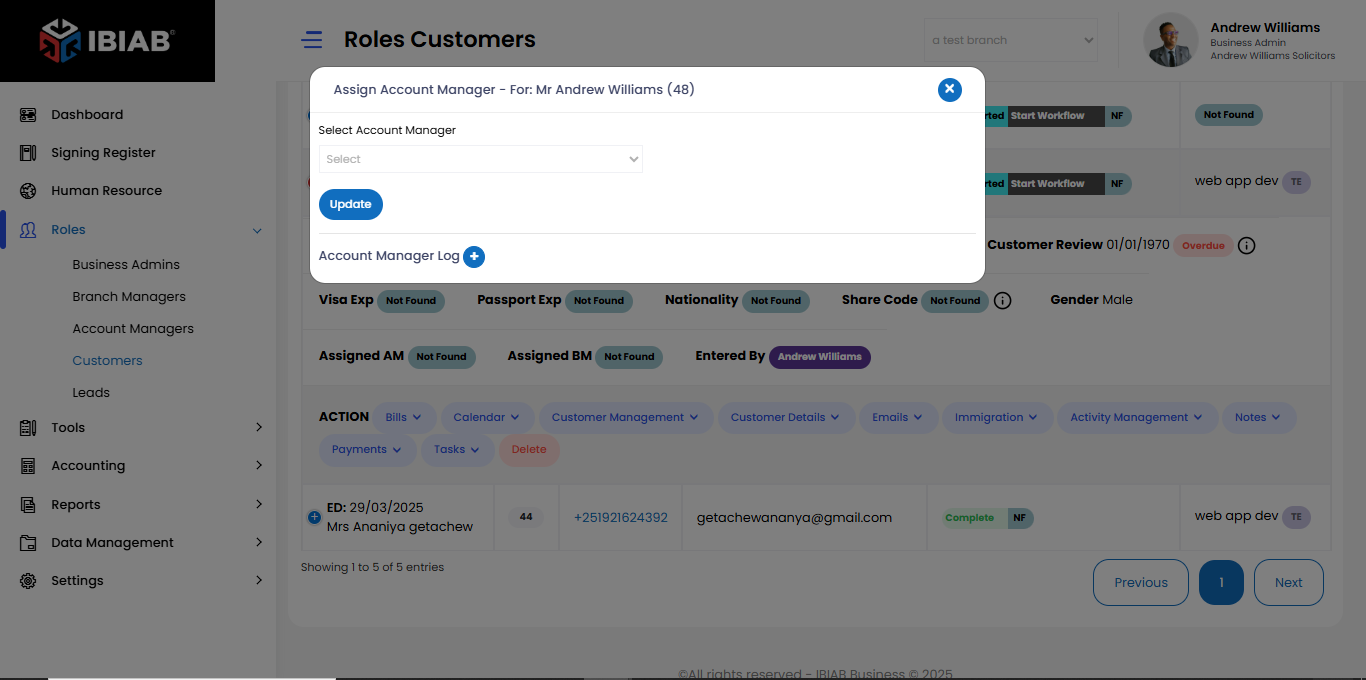
Assign Account Manager
Choose an account manager responsible for overseeing this customer’s file and communications.
- Select Account Manager – Pick from the list of available account managers.
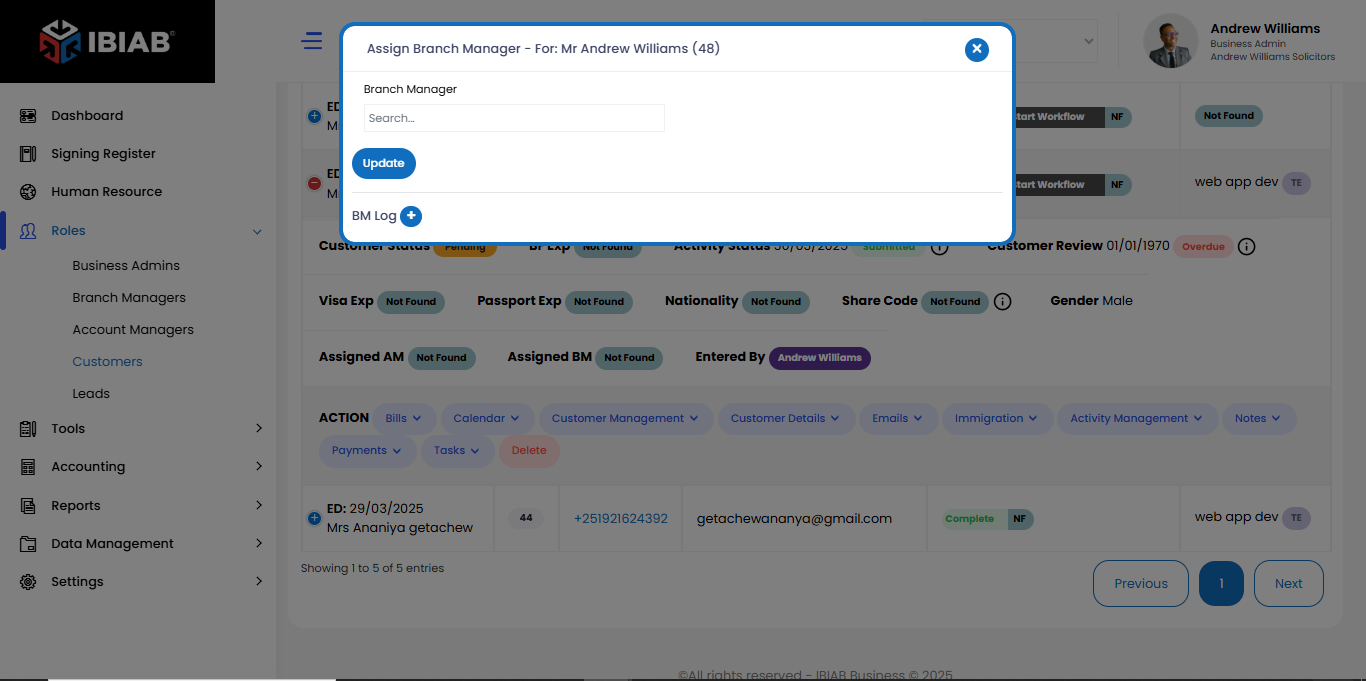
Assign Branch Manager
Select the branch manager responsible for managing this branch’s operations and overseeing related activities.
- Branch Manager – Choose from the list of available branch managers.
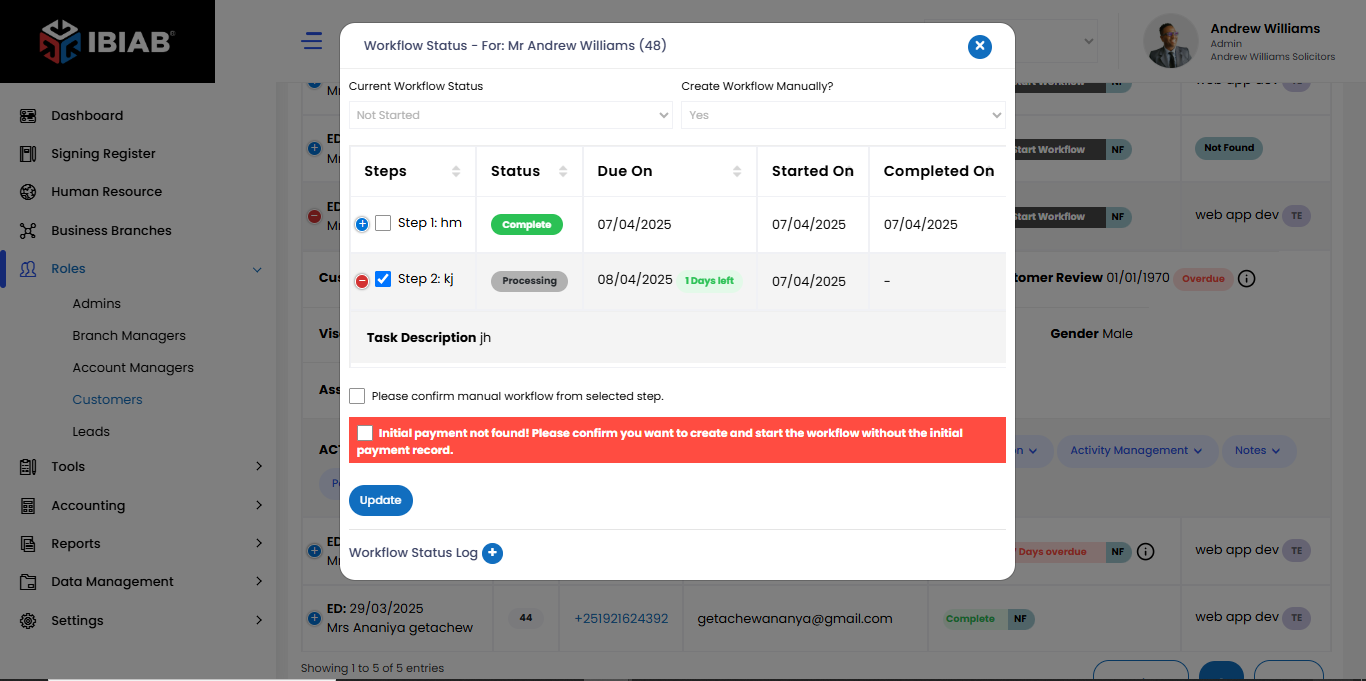
Workflow Status
Use this section to manually manage and initiate a workflow for a specific task or matter.
- Current Workflow Status – Displays the current status of the workflow: Not Started or Completed.
- Create Workflow Manually? – Select Yes to enable manual creation and management of workflow steps.
a table that listing all available workflow steps is visible. You can check the box next to each step to select which part of the workflow you want to begin with.
The table contains the following columns:
- Steps – Name or description of each workflow step.
- Status – Indicates the current status (e.g., Pending, In Progress, Completed).
- Due On – The due date for completing that step.
- Started On – The date the step was initiated.
- Completed On – The date the step was finished.
✅ Note: Please confirm your selected workflow step to proceed with manual initiation.