5.3 Branch Managers
Branch Managers play a crucial role in overseeing business workflows and ensuring that each step is executed efficiently.
Viewing Branch Managers
- When you click on ” Branch Manager” in the side menu, a window will appear listing all registered Branch Managers in the system.
- This list includes key details such as Name, Email, Mobile Number, Gender, and Username.
- You can also see action buttons for editing, viewing, and managing Branch managers.
Branch manager Role Actions
- The Branch manager section lists all registered Branch managers. Clicking on the plus (+) button next to a name expands a list of action buttons for managing that specific account manager.
1. Branch Manager Details
- Edit Detail – Modify Branch Manager information.
- Email Role – Assign or update the Branch Manager role via email.
- View Detail – See full details of the Branch Manager.
2. Emails
- Send Email – Send an email to the Branch Manager.
- View Email – Access previously sent or received emails.
3. Notes
- Add Notes – Add internal notes related to the Branch Manager.
- View Notes – Review existing notes.
4. Tasks
- Add Task – Assign a task to the Branch Manager.
View Task – See tasks assigned to the Branch Manager.
5. Overdue Tasks
- Overdue Tasks – Review existing overdue tasks.
Adding a New Branch Manager
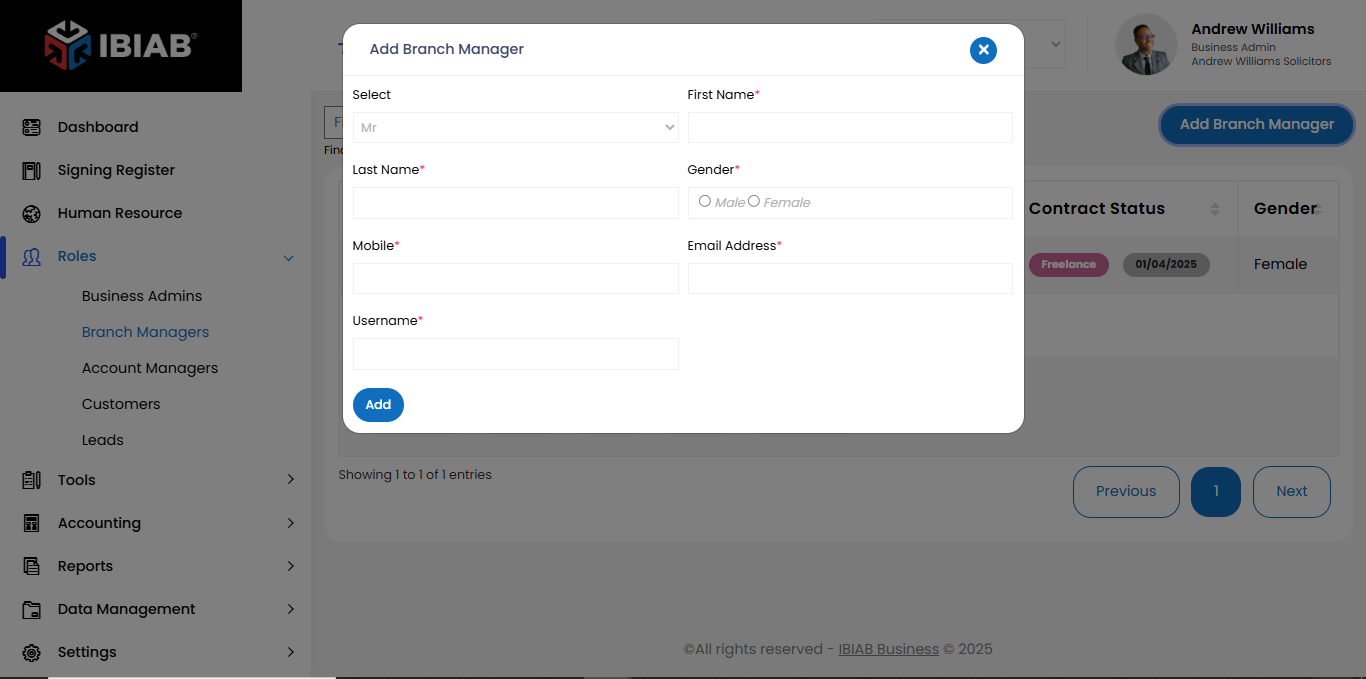
To add a new Branch Manager, click on “Add Branch Manager”, which will open a form containing the following fields:
- Upload Profile Picture – Upload a photo of the account manager.
- Title (Mr/Ms)
- First Name* – Enter the first name of the manager.
- Last Name* – Enter the last name of the manager.
- Gender – Select the gender (Male/Female/Other).
- Mobile Number (Mob*) – Provide the contact number of the manager.
- Email Address* – Enter a valid email address (used for login and notifications).
- Username* – Choose a unique username for the manager’s account.
Important Notes:
- Fields marked with an asterisk (*) are required.
- Ensure the email and username are unique to avoid duplication errors.
- Once all fields are filled, click “Save” to add the new Account Manager.
📌 Tip: Assign roles and permissions to Account Managers to define their level of access and responsibilities within the system.
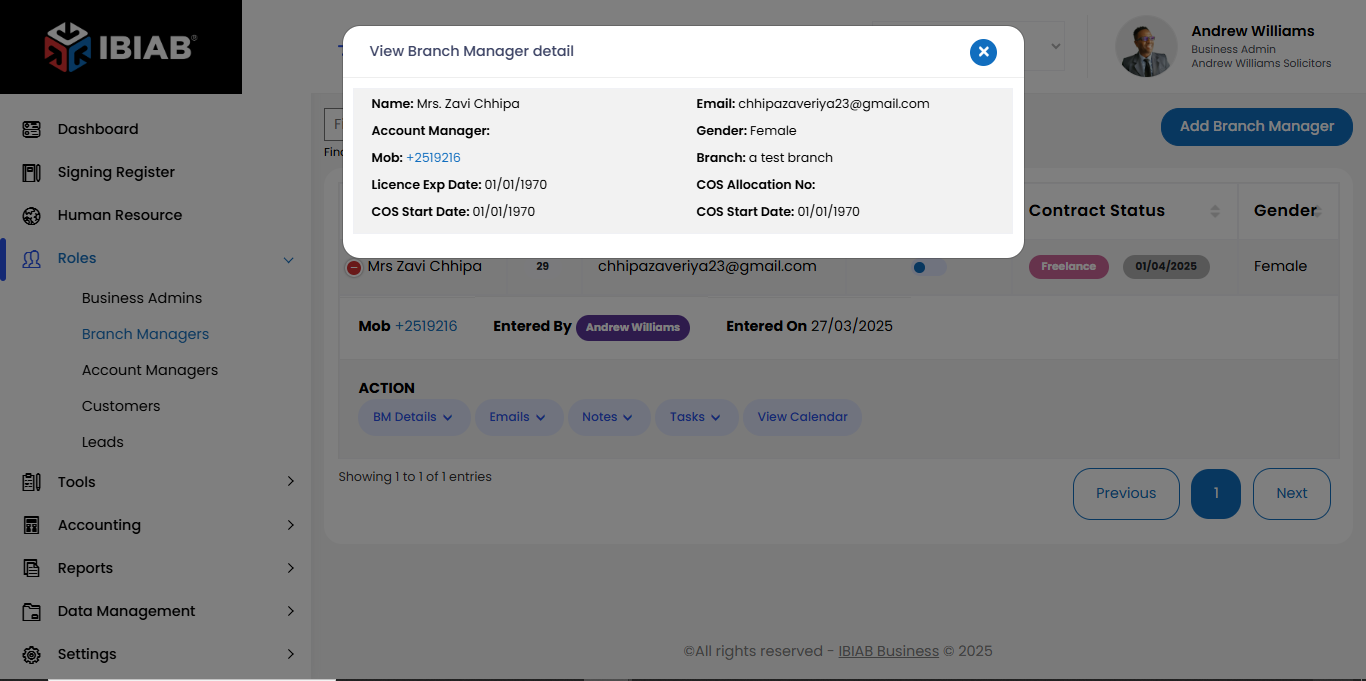
View Detail – See full details of the Branch Manager.
2. Emails
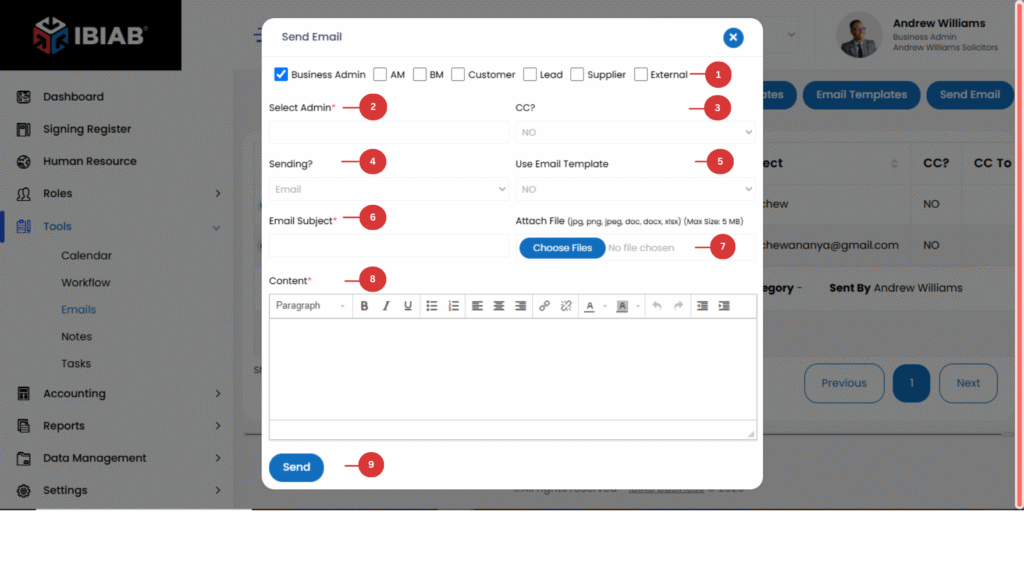
Send Email – When clicking on the Email button, a popup window will appear, allowing you to send an email to a specific role or individual.
- Select a Role – Choose the specific role you want to send the email to (e.g., Administrator, Account Manager, Business Development Manager).
- Admin Input Field – Search for or manually enter the recipient’s email address.
- CC Field – If you choose Yes, an additional input field will appear where you can enter another email address to CC (copy) the email.
- Sending Method – Choose between:
- Email – Sends the message via email.
- Letter – Allows you to format the email as a formal letter.
- Email Templates – Use a predefined email template from your company’s email system.
- Email Subject Field – Enter the subject of your email.
- Attach Field – Upload any attachments (e.g., PDFs, documents, images).
- Content Field – Write the main content of your email.
- Click Send to deliver the email.
📌 Tip: Double-check the email address and content before sending to ensure accuracy.
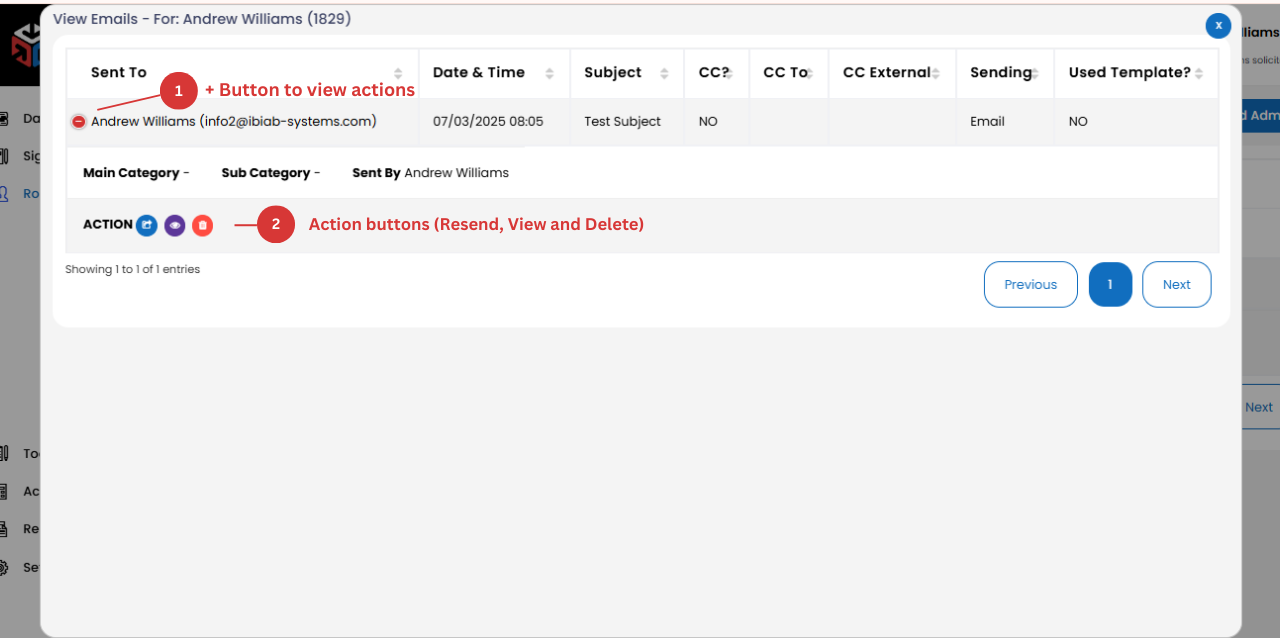
View Email – Access previously sent or received emails.
1.+ button to expand Action buttons
2. List of action buttons
3. Notes
Add Notes – Add internal notes related to the Branch Manager.
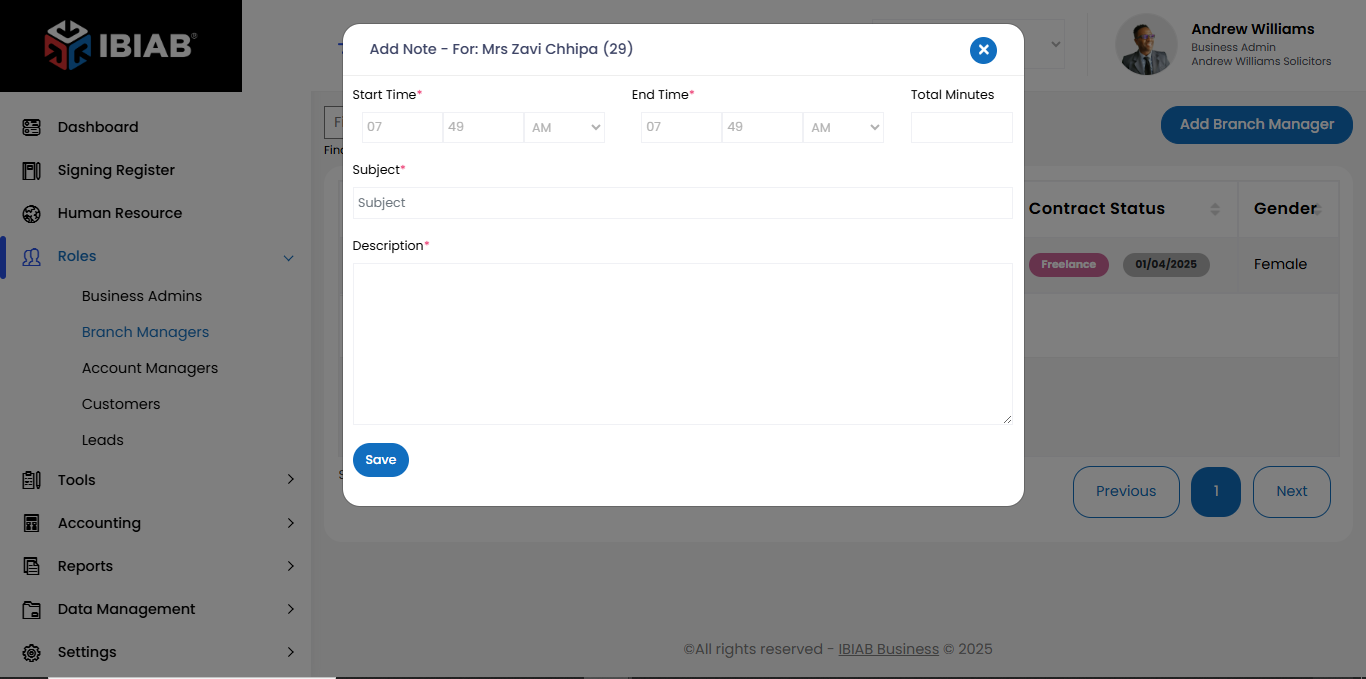
The Notes section allows users to add important details related to a specific role or task.
Fields in the Notes Section:
- Start Time* – Select the start time for the note entry.
- End Time* – Select the end time (must be greater than the start time).
- Total Minutes – Automatically calculates the duration based on the start and end times.
- Subject* – Enter a title or brief subject for the note.
- Description* – Provide detailed information about the note.
Important Rule:
⚠️ End Time must be greater than Start Time to ensure valid time tracking.
📌 Tip: Ensure all *required fields (marked with an asterisk ) are completed before saving the note.
View Notes – Review existing notes.
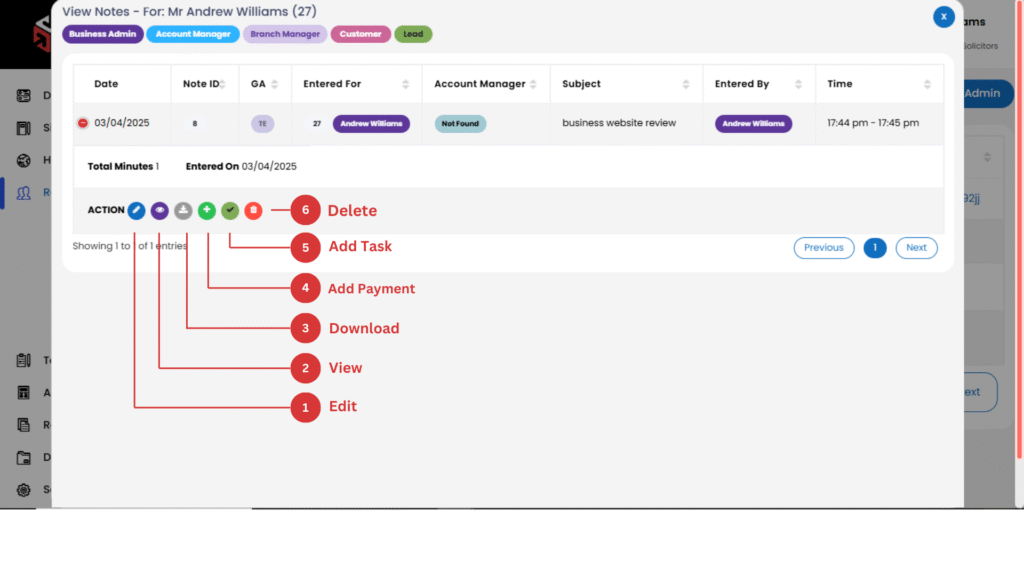
The View Notes section allows users to manage previously added notes.
- Users can see a list of existing notes with details such as start time, end time, subject, and description.
- Clicking on the plus (+) button next to a note will expand the available action buttons.
Available Actions:
- Edit – Modify the note details.
- View – Open and read the full note.
- Download – Save the note as a file.
- Add Note– Link a Note entry to the note if necessary.
- Add Task – Create a related task based on the note.
- Delete – Remove the note permanently.
📌 Tip: Use the Edit option to update information instead of deleting a note to maintain records.
4. Tasks
- Add Task – Assign a task to the Branch Manager.
The Add Task feature allows users to create and assign tasks to different users within the system. When clicking on the “Add Task” button, a task creation form will pop up.
Fields in the Add Task Form:
- Allocated For – Select the specific user role for which the task is being created.
- Allocated To – Choose the specific user responsible for completing the task.
- CC To – If required, add other users who should receive updates about the task.
- Recurring (Daily, Weekly..) – the task will be automatically repeated at set intervals.
- Subject* – Enter a brief title describing the task.
- Allocated Task (Description)* – Provide a detailed explanation of the task.
- Due Date* – Set the deadline by which the task should be completed.
- Time Due* – Specify the exact time the task is due.
- Priority Level – Select a priority:
- Low
- Medium
- High
- Urgent
- Status – Choose the status of the task:
1.Pending
2.In Progress
3.Completed
4.On Hold - Attach Files – Upload any necessary documents, images, or files related to the task.
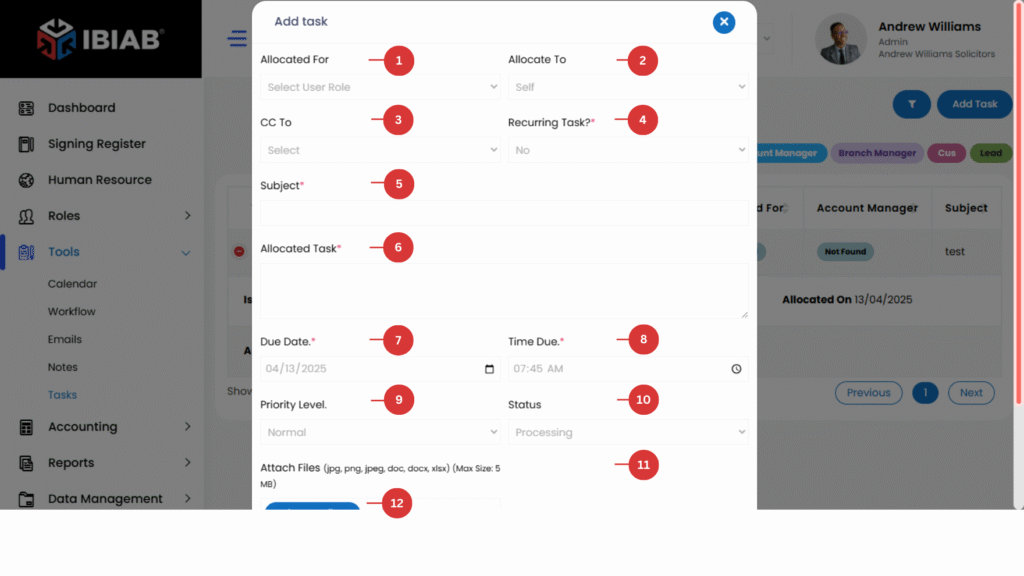
How to Add a Task:
- Click on “Add Task”.
- Fill in the required details (marked with an asterisk *).
- Ensure the correct user/role is assigned and set the due date/time.
- If the task is recurring, select Yes and define the frequency.
- Click “Save” to create the task.
📌 Tip: Assign tasks with clear descriptions and due dates to improve efficiency and task tracking.
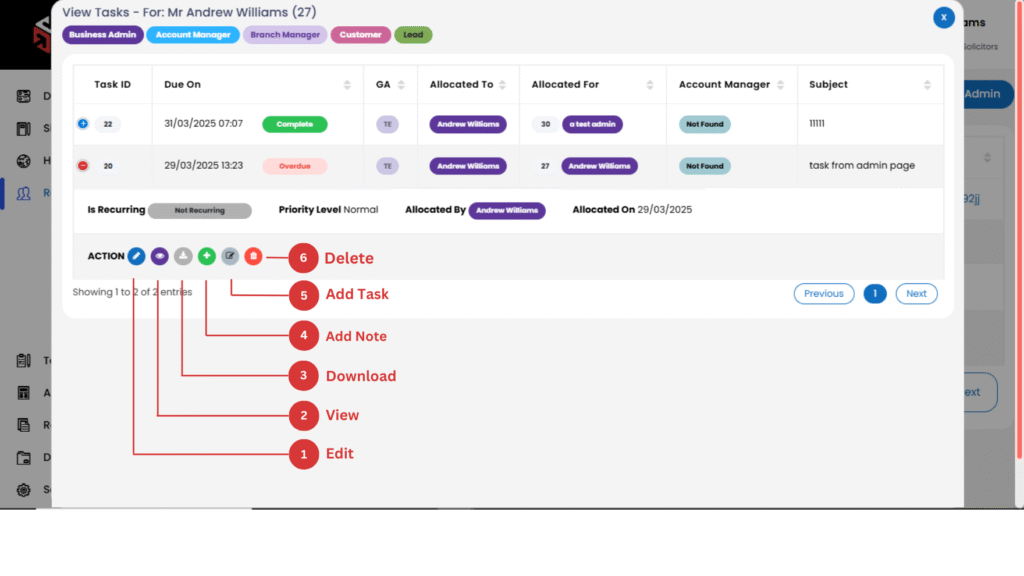
View Task – See tasks assigned to different users in the system.
Viewing and Managing Tasks
The View Task section allows users to see and manage all tasks within the system. It provides a list of existing tasks, along with key details such as:
- Task Subject
- Allocated For (Department, Project, or Purpose)
- Allocated To (User or Role responsible for the task)
- Due Date
Expanding Task Options
- Clicking on the plus (+) button next to a task expands action buttons, allowing users to manage the task.
Available Actions:
- Edit – Modify task details such as subject, description, due date, priority, or status.
- View – Open the task details to review the assigned information.
- Download – Save the task details as a document for offline access.
- Add More Tasks – Assign additional tasks related to the current one.
- Add Note – Attach notes to the task for additional context or updates.
- Delete – Permanently remove the task from the system.
📌 Tip: Use the Edit option to update the task status as it progresses to keep track of completed and pending tasks efficiently.