
7.3 Payment
When you click on the Payments menu under Accounting, a table displays a list of payments with an “Add Payment” button at the top to record new payments.
View Payments – Track payment history and outstanding balances.
The “View Payment” section provides a detailed list of all recorded payments made by customers. a table appears displaying the following payment details:
Payment List Columns:
- Payment ID – Unique identifier for each payment transaction.
- Date & Time – Shows the exact date and time the payment was recorded.
- Bill No. – Displays the associated bill number linked to the payment.
- Customer – Name of the customer who made the payment.
- Account Manager – The account manager responsible for handling the payment.
- Amount (£) – The amount paid in GBP (£).
- Total Bill (£) – The total bill amount before payments.
- Outstanding Balance (£) – Displays the remaining balance after payments.
Payment Action Buttons:
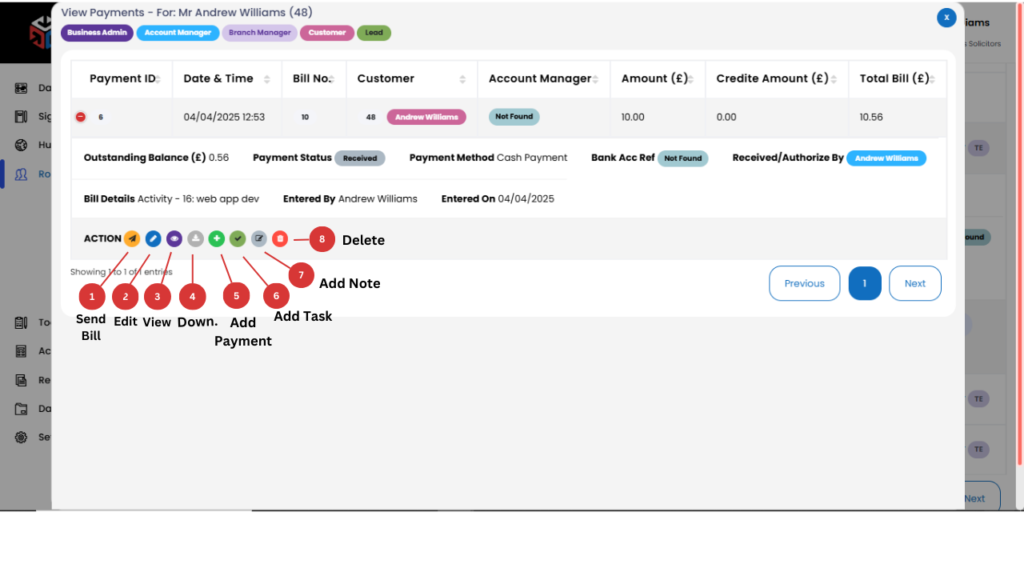
Clicking on the plus (+) button beside a payment entry will expand the row and show action buttons that allow you to perform specific actions on that payment:
- Send Bill – Sends the bill directly to the customer via email.
- Edit Bill – Modify the bill details, such as amount, discount, or payment terms.
- View Bill – Opens a detailed view of the bill for review.
- Download – Exports and downloads the bill in PDF or other formats.
- Add Payment – Allows recording of an additional payment for the bill.
- Add Task – Assigns a task related to the bill (e.g., follow-up for pending payments).
- Add Note – Adds internal notes regarding the bill for tracking purposes.
- Delete – Permanently removes the bill from the system.
📌 Tip: Always review bill details before making modifications or sending to customers.
The “Add Payment” button allows you to record a new payment made by a customer. When you click on “Add Payment”, a pop-up window appears where you can enter and manage the payment details.
Payment Information Fields:
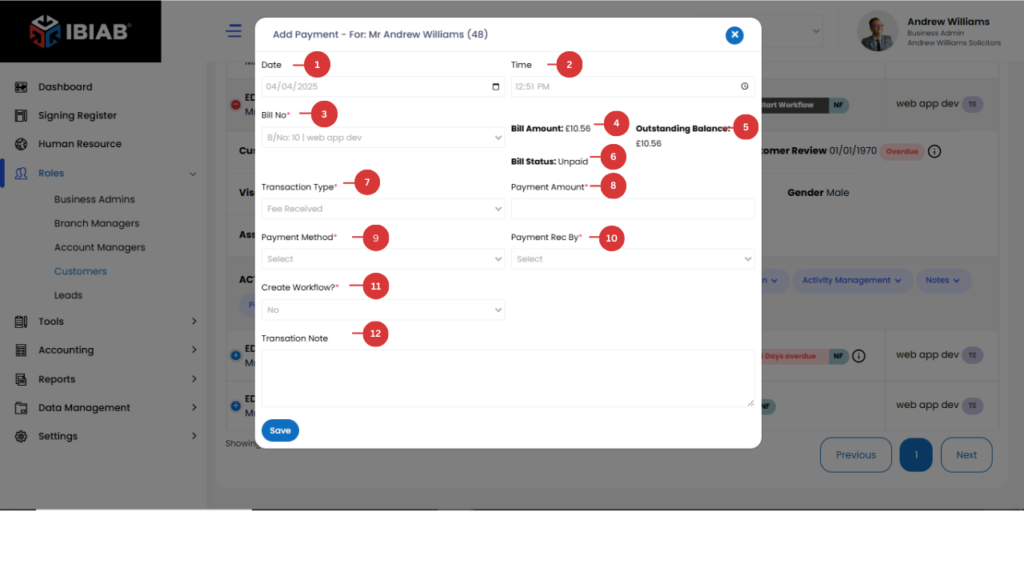
- Date – Select the date when the payment was made.
- Time – Choose the time of the payment transaction.
- Bill No* – Select the bill number from the system (linked to the customer’s invoices).
- Bill Amount – Displays the total bill amount (automatically retrieved from the selected bill).
- Outstanding Balance – Shows the remaining balance after partial payments.
- Bill Status – Displays the current status of the bill (e.g., Paid, Partially Paid, Unpaid).
Payment Details: - Transaction Type* – Select the type of transaction (e.g., Full Payment, Partial Payment, Refund).
- Payment Amount* – Enter the amount the customer is paying.
- Payment Method* – Choose the payment method (e.g., Cash, Credit Card, Bank Transfer, PayPal).
- Payment Received By* – Select the staff member or account manager who received the payment.
Workflow Management (Optional): - Create Workflow?*
If “Yes” is selected, an additional field appears:
Assign Account Manager – Choose the account manager responsible for managing the payment workflow.
- Transaction Note – Add any relevant notes about the transaction (e.g., reference number, special conditions).
📌 Tip: Double-check the payment details before clicking “Save Payment” to ensure accurate records. payment should not be higher than due amount