5.2 Employees
Employees play a crucial role in overseeing business workflows and ensuring that each step is executed efficiently.
Viewing Employees
- When you click on “Employees” in the side menu, a window will appear listing all registered Employees in the system.
- This list includes key details such as Name, Email, Mobile Number, Gender, and Username.
- You can also see action buttons for editing, viewing, and managing Employees.
Employees Role Actions
- The Employees section lists all registered Employees. Clicking on the plus (+) button next to a name expands a list of action buttons for managing that specific Employees.
1. Employees Details
- Edit Detail – Modify Employees information.
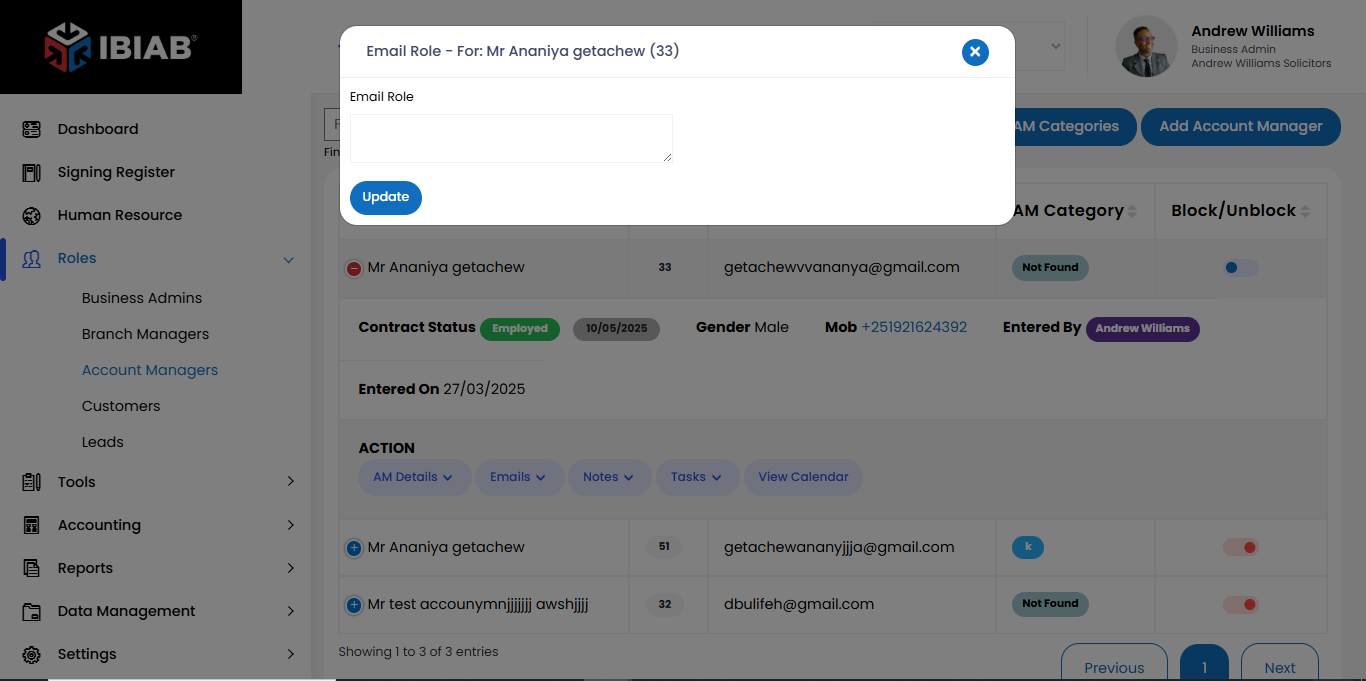
- Email Role – Assign or update the Employees role via email.
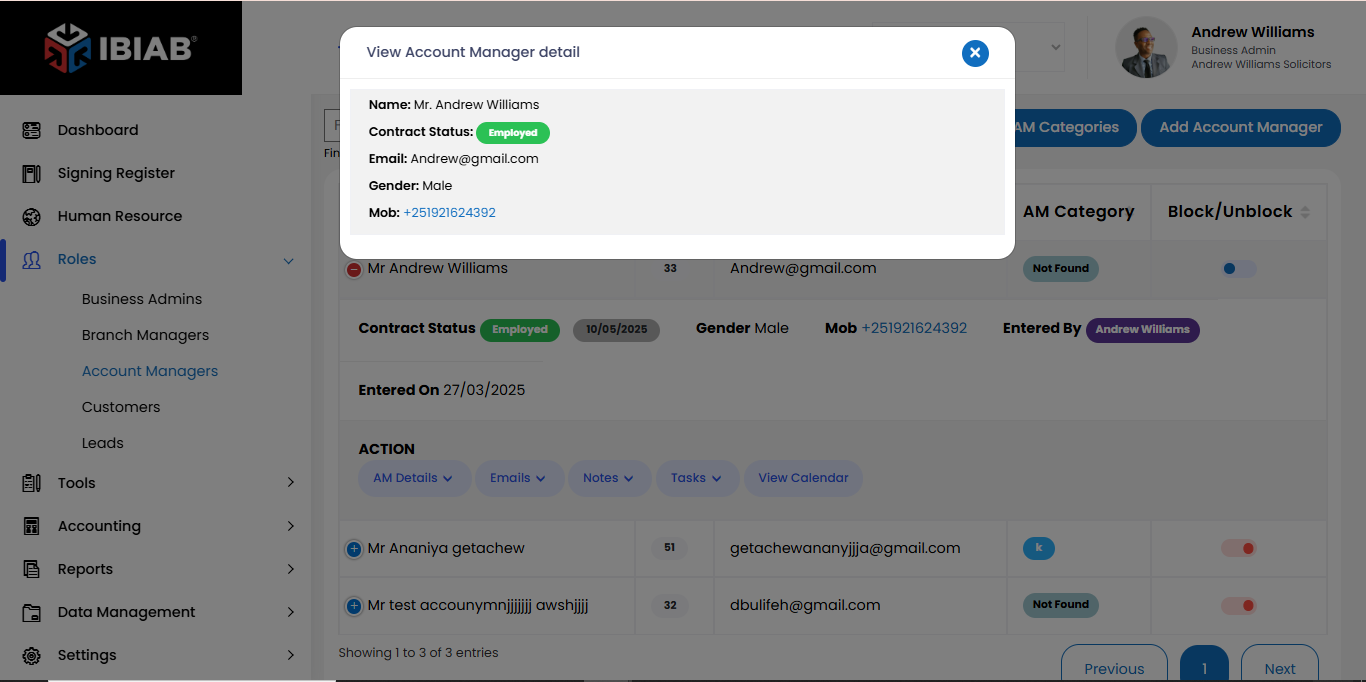
- View Detail – See full details of the Employees.
2. Emails
- Send Email – Send an email to the Employees.
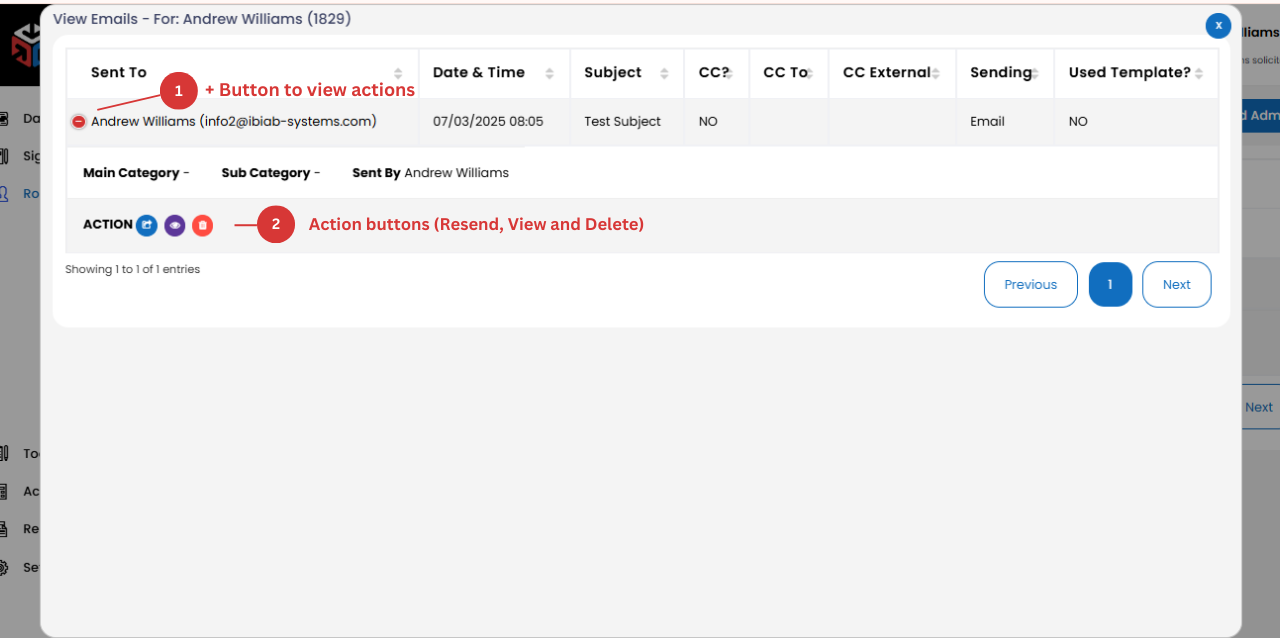
- View Email – Access previously sent or received emails.
3. Notes
- Add Notes – Add internal notes related to the Employees.
- View Notes – Review existing notes.
4. Tasks
- Add Task – Assign a task to the Employees.
View Task
See tasks assigned to the Employees.
5. Overdue Tasks
- Overdue Tasks – Review existing overdue tasks.
5. Staff Sickness
- Record and track employee sick days with supporting documentation.
6.Salary Review
- Manage and document salary adjustments, reviews, and approvals.
7.Employee Expense
- Submit and process staff expense claims with receipts.
8.Holiday Request
- Request, approve, and monitor annual leave balances.
Adding a New Employees
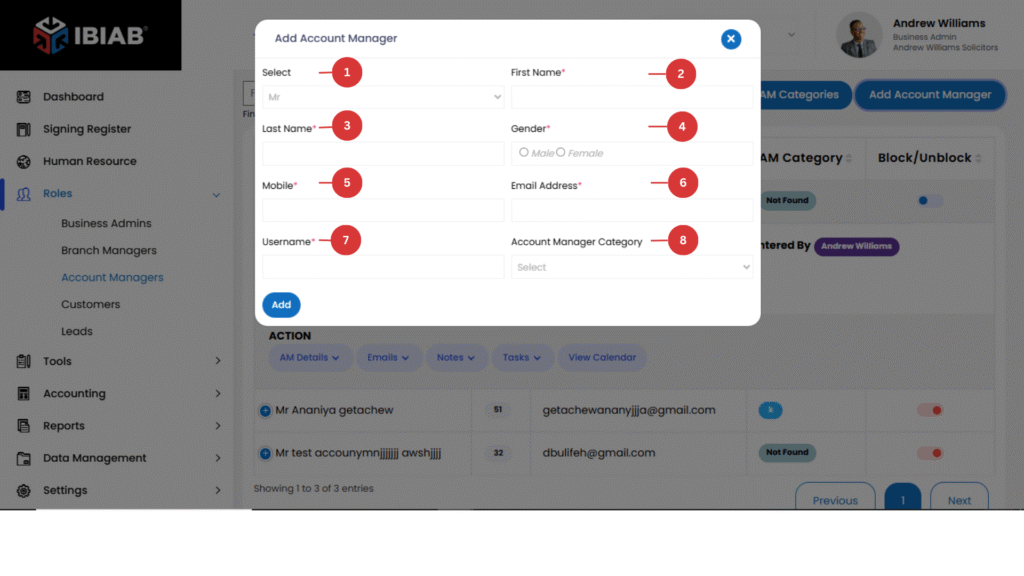
To add a new Employees, click on “Add Employees”, which will open a form containing the following fields:
- Upload Profile Picture – Upload a photo of the Employees.
- Title (Mr/Ms)
- First Name* – Enter the first name of the manager.
- Last Name* – Enter the last name of the manager.
- Gender – Select the gender (Male/Female/Other).
- Mobile Number (Mob*) – Provide the contact number of the manager.
- Email Address* – Enter a valid email address (used for login and notifications).
- Username* – Choose a unique username for the manager’s account.
Important Notes:
- Fields marked with an asterisk (*) are required.
- Ensure the email and username are unique to avoid duplication errors.
- Once all fields are filled, click “Save” to add the new Employees.
📌 Tip: Assign roles and permissions to Employees to define their level of access and responsibilities within the system.
1. Employees Details
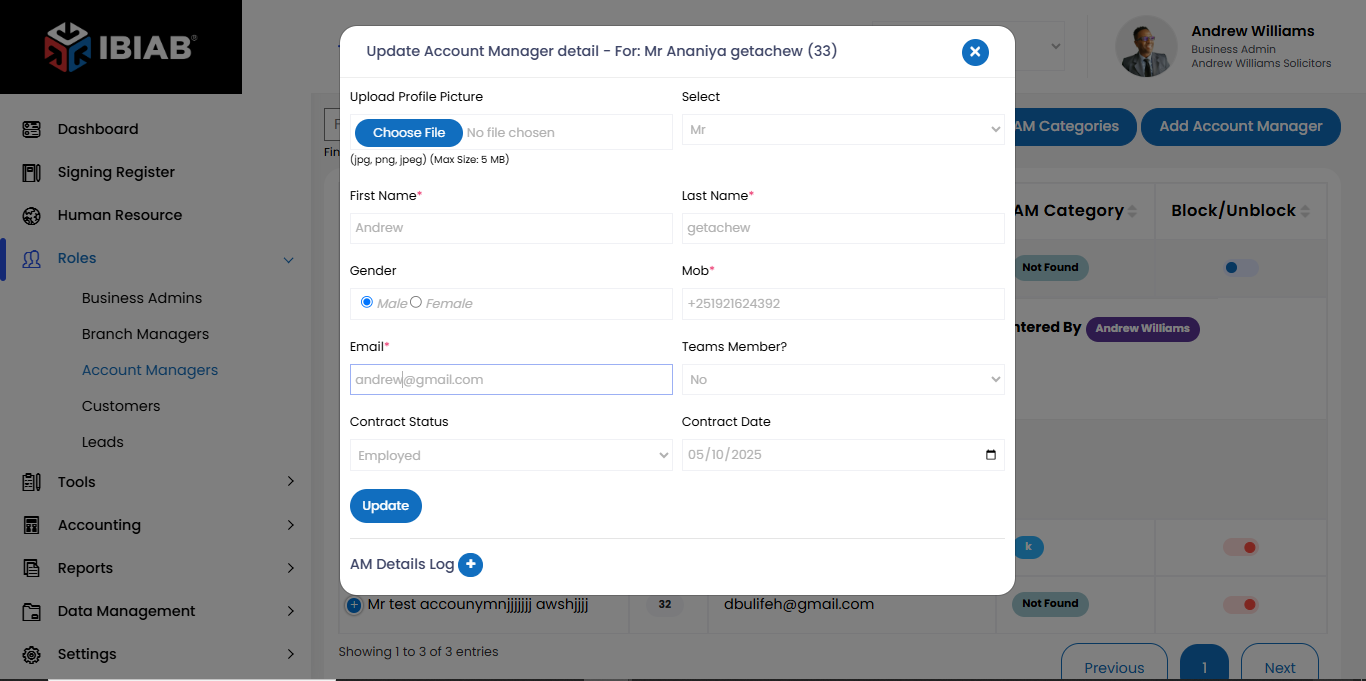
When you click on the Employees Details button and select Edit Detail, a popup window will appear, allowing you to update the administrator’s information.
Steps to Edit Employees Details:
- Click on the Employees Details dropdown.
- Select Edit Detail.
- A popup form will appear.
- Update the necessary information for the administrator.
- Ensure all *required fields (marked with an asterisk ) are filled.
- Click the Update button to save the changes.
📌 Tip: The system will not allow you to proceed unless all required fields are completed.
Email Role – Assign or update the admin’s role via email.
View Detail – See full details of the administrator.
2. Emails
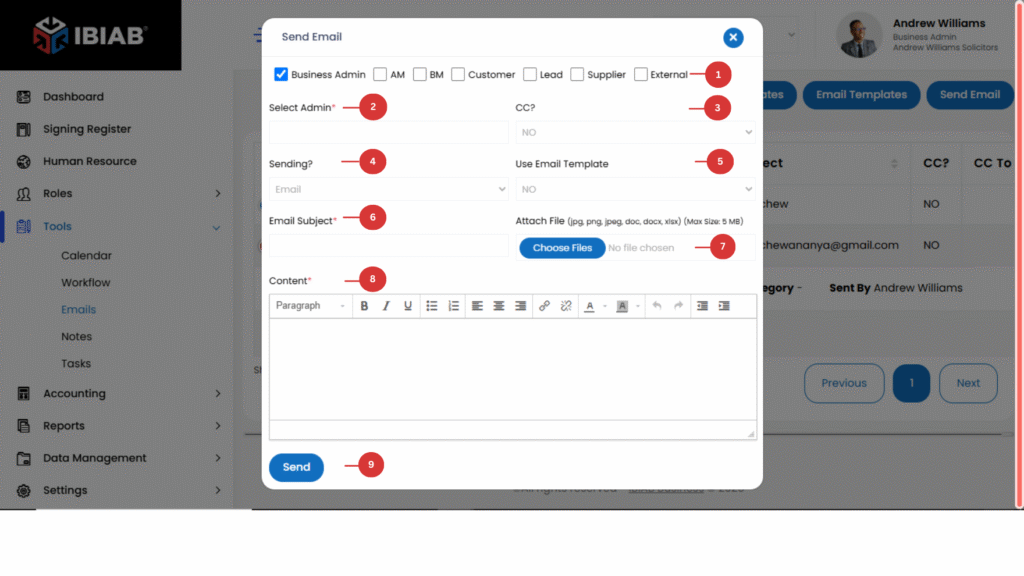
Send Email – When clicking on the Email button, a popup window will appear, allowing you to send an email to a specific role or individual.
- Select a Role – Choose the specific role you want to send the email to (e.g., Administrator, Employees, Business Development Manager).
- Admin Input Field – Search for or manually enter the recipient’s email address.
- CC Field – If you choose Yes, an additional input field will appear where you can enter another email address to CC (copy) the email.
- Sending Method – Choose between:
- Email – Sends the message via email.
- Letter – Allows you to format the email as a formal letter.
- Email Templates – Use a predefined email template from your company’s email system.
- Email Subject Field – Enter the subject of your email.
- Attach Field – Upload any attachments (e.g., PDFs, documents, images).
- Content Field – Write the main content of your email.
- Click Send to deliver the email.
📌 Tip: Double-check the email address and content before sending to ensure accuracy.
View Email – Access previously sent or received emails.
1.+ button to expand Action buttons
2. List of action buttons
3. Notes
Add Notes – Add internal notes related to the Employees.
The Notes section allows users to add important details related to a specific role or task.
Fields in the Notes Section:
- Start Time* – Select the start time for the note entry.
- End Time* – Select the end time (must be greater than the start time).
- Total Minutes – Automatically calculates the duration based on the start and end times.
- Subject* – Enter a title or brief subject for the note.
- Description* – Provide detailed information about the note.
Important Rule:
⚠️ End Time must be greater than Start Time to ensure valid time tracking.
📌 Tip: Ensure all *required fields (marked with an asterisk ) are completed before saving the note.
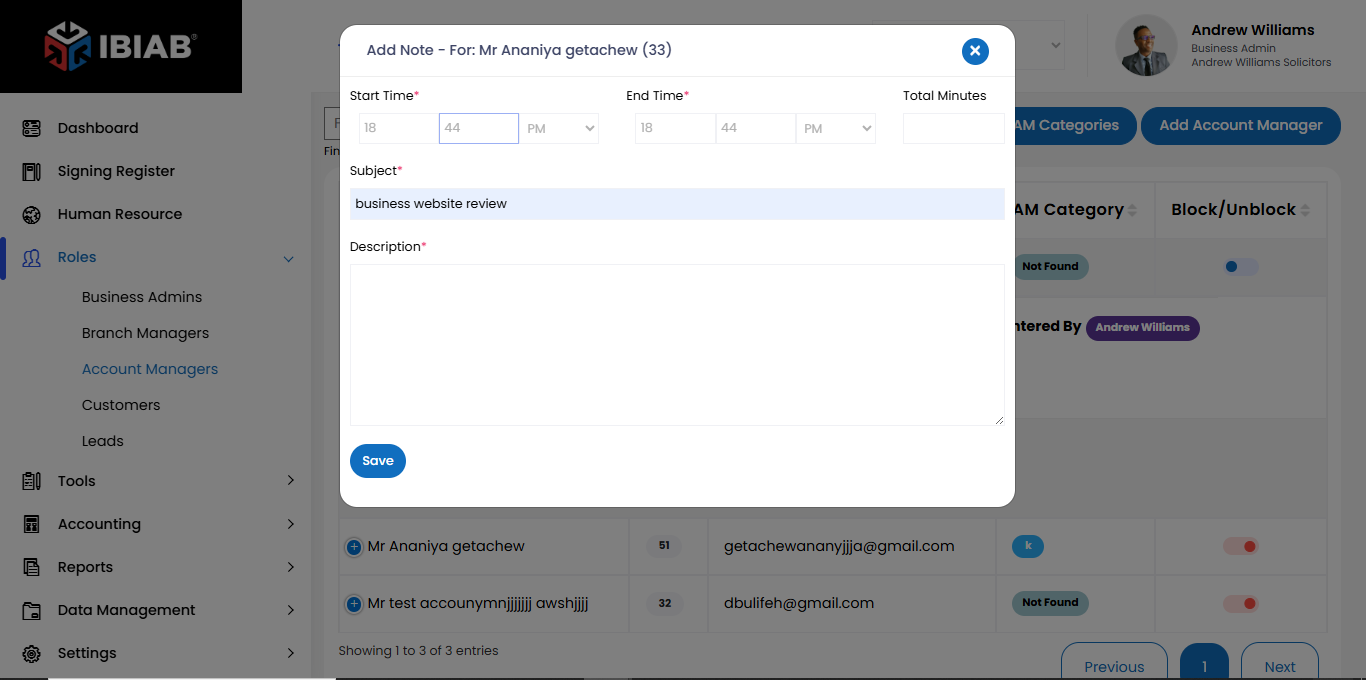
View Notes – Review existing notes.
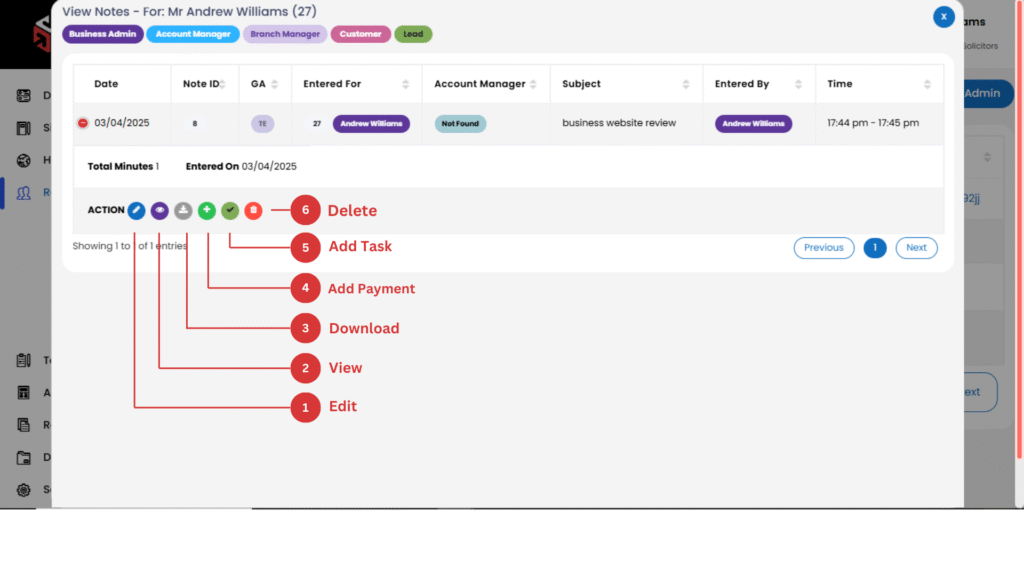
The View Notes section allows users to manage previously added notes.
- Users can see a list of existing notes with details such as start time, end time, subject, and description.
- Clicking on the plus (+) button next to a note will expand the available action buttons.
Available Actions:
- Edit – Modify the note details.
- View – Open and read the full note.
- Download – Save the note as a file.
- Add Note– Link a Note entry to the note if necessary.
- Add Task – Create a related task based on the note.
- Delete – Remove the note permanently.
📌 Tip: Use the Edit option to update information instead of deleting a note to maintain records.
4. Tasks
- Add Task – Assign a task to the Employees.
The Add Task feature allows users to create and assign tasks to different users within the system. When clicking on the “Add Task” button, a task creation form will pop up.
Fields in the Add Task Form:
- Allocated For – Select the specific user role for which the task is being created.
- Allocated To – Choose the specific user responsible for completing the task.
- CC To – If required, add other users who should receive updates about the task.
- Recurring (Daily, Weekly..) – the task will be automatically repeated at set intervals.
- Subject* – Enter a brief title describing the task.
- Allocated Task (Description)* – Provide a detailed explanation of the task.
- Due Date* – Set the deadline by which the task should be completed.
- Time Due* – Specify the exact time the task is due.
- Priority Level – Select a priority:
- Low
- Medium
- High
- Urgent
- Status – Choose the status of the task:
1.Pending
2.In Progress
3.Completed
4.On Hold - Attach Files – Upload any necessary documents, images, or files related to the task.
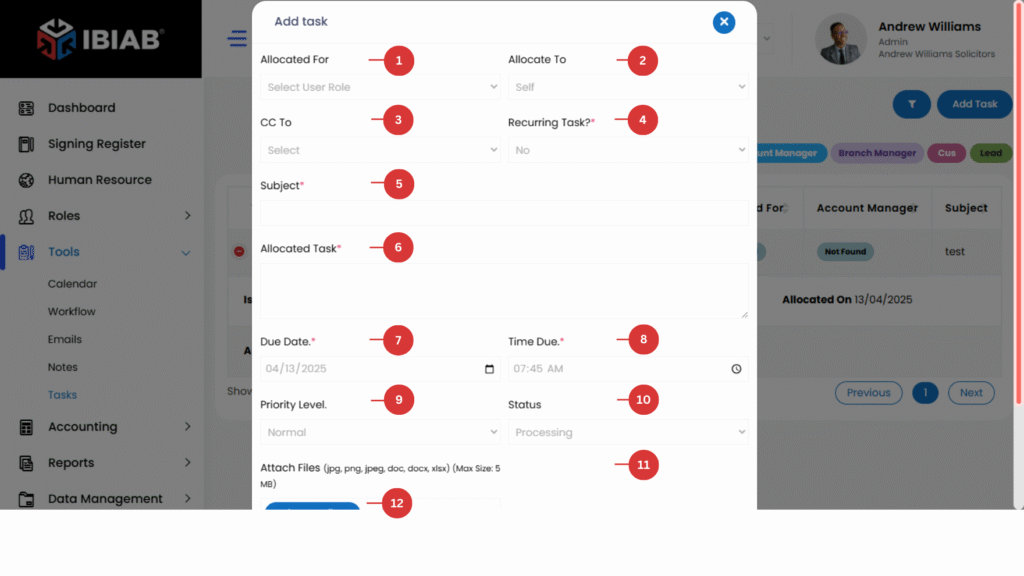
How to Add a Task:
- Click on “Add Task”.
- Fill in the required details (marked with an asterisk *).
- Ensure the correct user/role is assigned and set the due date/time.
- If the task is recurring, select Yes and define the frequency.
- Click “Save” to create the task.
📌 Tip: Assign tasks with clear descriptions and due dates to improve efficiency and task tracking.
View Task – See tasks assigned to different users in the system.
Viewing and Managing Tasks
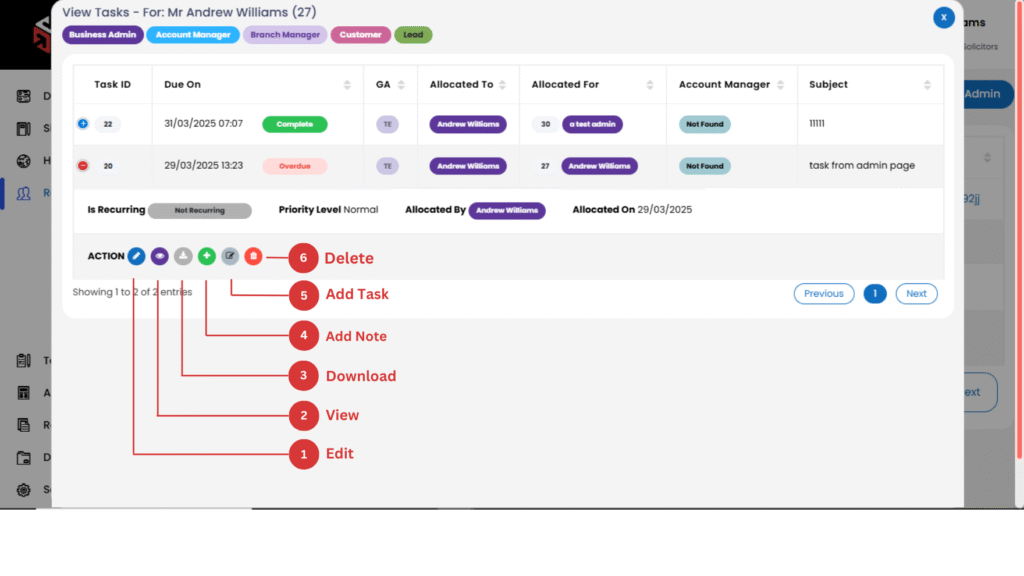
The View Task section allows users to see and manage all tasks within the system. It provides a list of existing tasks, along with key details such as:
- Task Subject
- Allocated For (Department, Project, or Purpose)
- Allocated To (User or Role responsible for the task)
- Due Date
Expanding Task Options
- Clicking on the plus (+) button next to a task expands action buttons, allowing users to manage the task.
Available Actions:
- Edit – Modify task details such as subject, description, due date, priority, or status.
- View – Open the task details to review the assigned information.
- Download – Save the task details as a document for offline access.
- Add More Tasks – Assign additional tasks related to the current one.
- Add Note – Attach notes to the task for additional context or updates.
- Delete – Permanently remove the task from the system.
📌 Tip: Use the Edit option to update the task status as it progresses to keep track of completed and pending tasks efficiently.
5. Staff Sickness – Record and track employee sick days with supporting documentation.
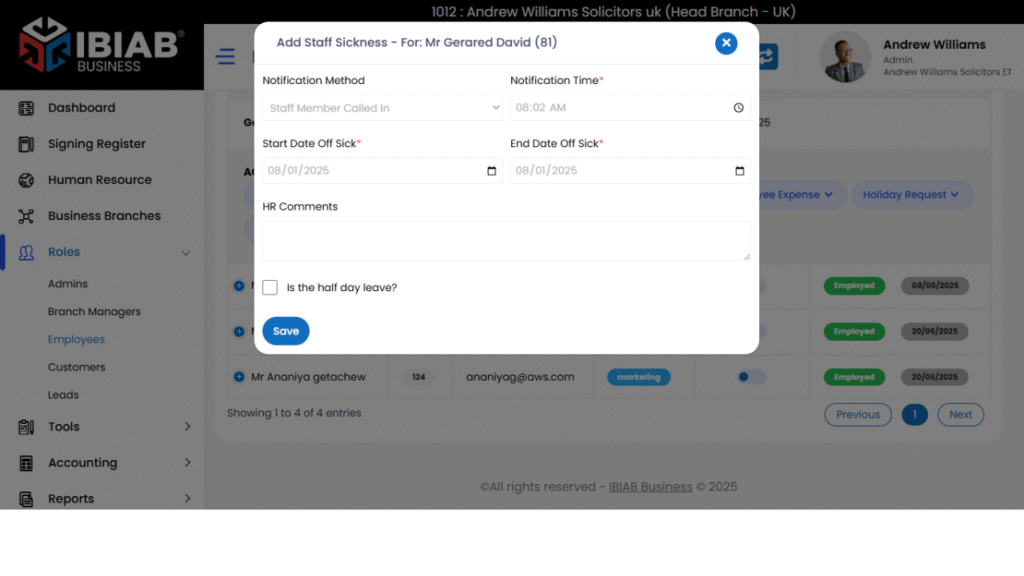
This module allows HR to manage and track staff sick leave efficiently through two main menus: Add Staff Sickness and View Staff Sickness.
➕ Add Staff Sickness
Used to record new sick leave entries.
🔹 Form Fields:
- Notification Method
(Dropdown – e.g. Phone, Email, In-Person) - Staff Member Called In
(Text field – name of the person who took the call) - Notification Time*
(Required – date and time the sickness was reported) - Start Date Off Sick*
(Required – first day of sick leave) - End Date Off Sick*
(Required – last day of sick leave) - HR Comments
(Optional text area – for additional notes) - Is this a Half Day Leave?
(Yes/No toggle or checkbox)
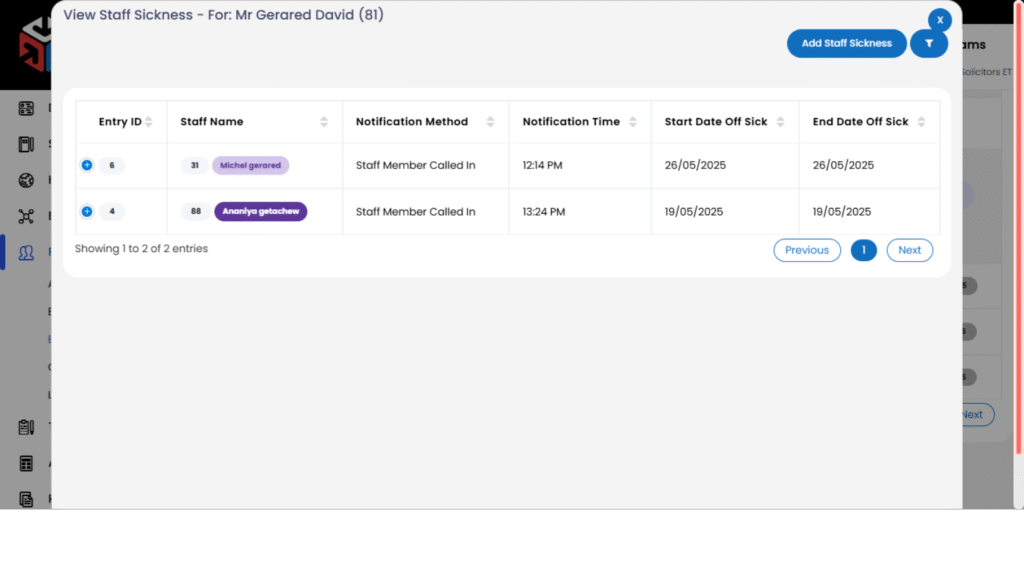
📄 View Staff Sickness
Used to browse existing sick leave records.
🔸 Table Columns Displayed:
- Entry ID – Unique identifier for the record
- Staff Name – Full name of the employee
- Notification Method – How the leave was reported
- Notification Time – When the sickness was reported
- Start Date Off Sick – Beginning of sick leave
- End Date Off Sick – End of sick leave
- Total Sick Days – Auto-calculated total leave days
- Half Day Leave? – Indicates if it’s a half-day leave
6.Salary Review – Manage and document salary adjustments, reviews, and approvals.
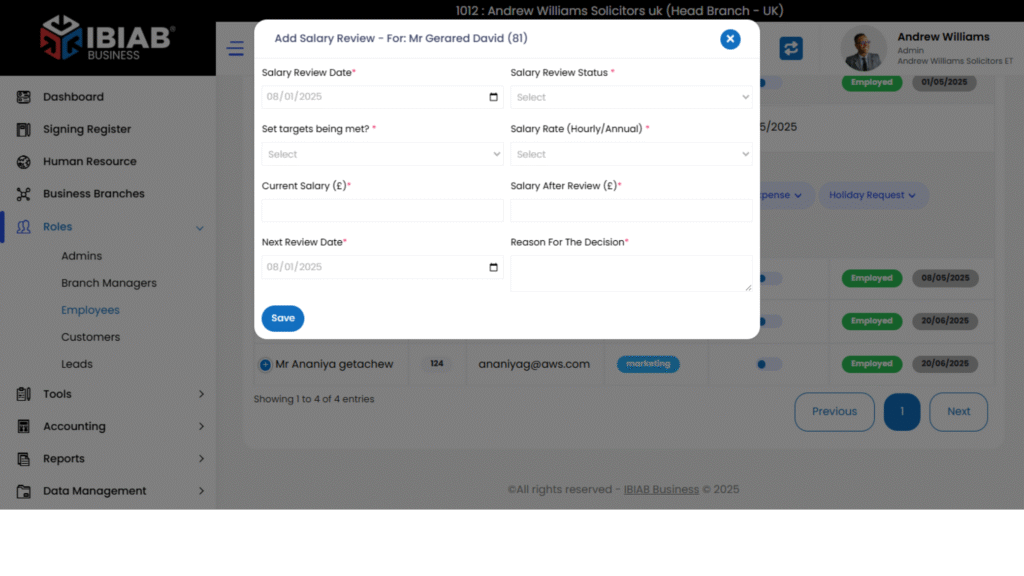
Manage employee salary evaluations with two menus : Add Salary Review and View Salary Review.
➕ Add Salary Review
Used to record a new salary review for an employee.
🔹 Form Fields:
- Salary Review Date*
(Required – date of the review meeting) - Salary Review Status*
(Required – e.g., Approved, Pending, Deferred, Rejected) - Set Targets Being Met?*
(Required – Yes/No dropdown or toggle) - Salary Rate (Hourly/Annual)*
(Required – selection field to specify rate type) - Current Salary (£)*
(Required – salary before review) - Salary After Review (£)*
(Required – updated salary amount) - Next Review Date*
(Required – future date for next salary evaluation) - Reason for the Decision*
(Text area – justification or HR notes)
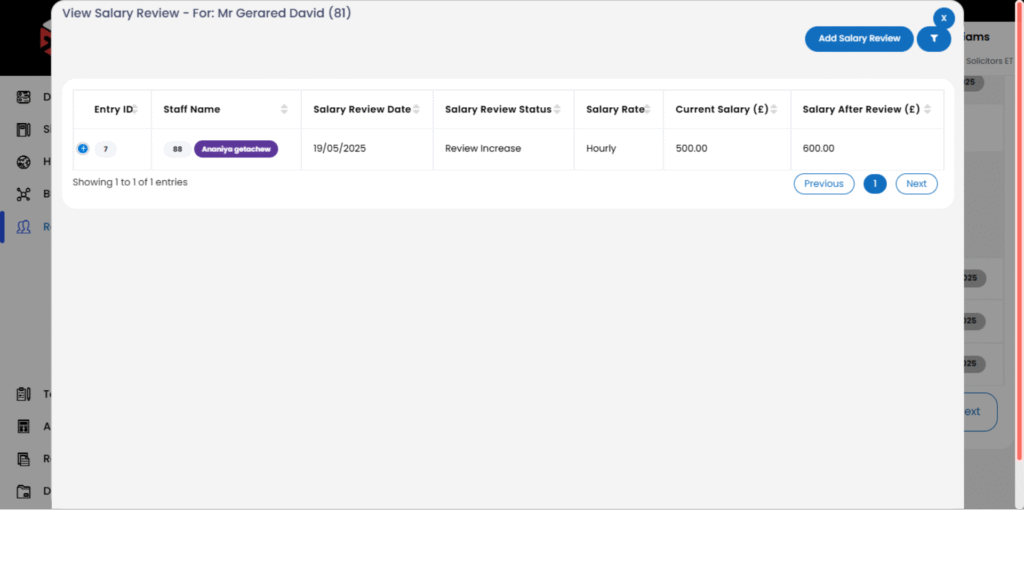
📄 View Salary Review
Used to browse and track past salary reviews in a table format.
🔸 Table Columns Displayed:
- Entry ID – Unique record identifier
- Staff Name – Employee being reviewed
- Salary Review Date – Date of the salary review
- Salary Review Status – Status of the review
- Salary Rate – Indicates whether rate is hourly or annual
- Current Salary (£) – Salary before review
- Salary After Review (£) – Updated salary post-review
7.Employee Expense – Submit and process staff expense claims with receipts.
Streamline the submission and management of staff expense claims through two Menus: Add Expense and View Expenses.
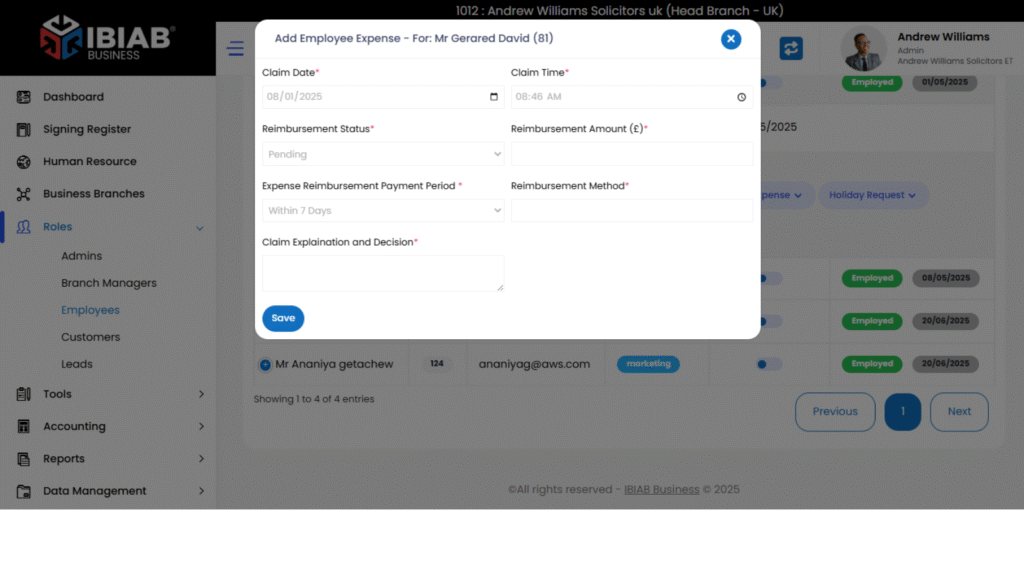
➕ Add Employee Expense
Used to submit a new expense reimbursement request.
🔹 Form Fields:
- Claim Date*
(Required – date the expense occurred or was submitted) - Claim Time*
(Required – time of the expense or claim submission) - Reimbursement Status*
(Required – e.g., Pending, Approved, Rejected, Paid) - Reimbursement Amount (£)*
(Required – total amount to be reimbursed) - Expense Reimbursement Payment Period*
(Required – e.g., Monthly, Biweekly, One-time) - Reimbursement Method*
(Required – e.g., Bank Transfer, Payroll Adjustment, Cash) - Claim Explanation and Decision*
(Text area – details of the expense and reasoning for reimbursement decision)
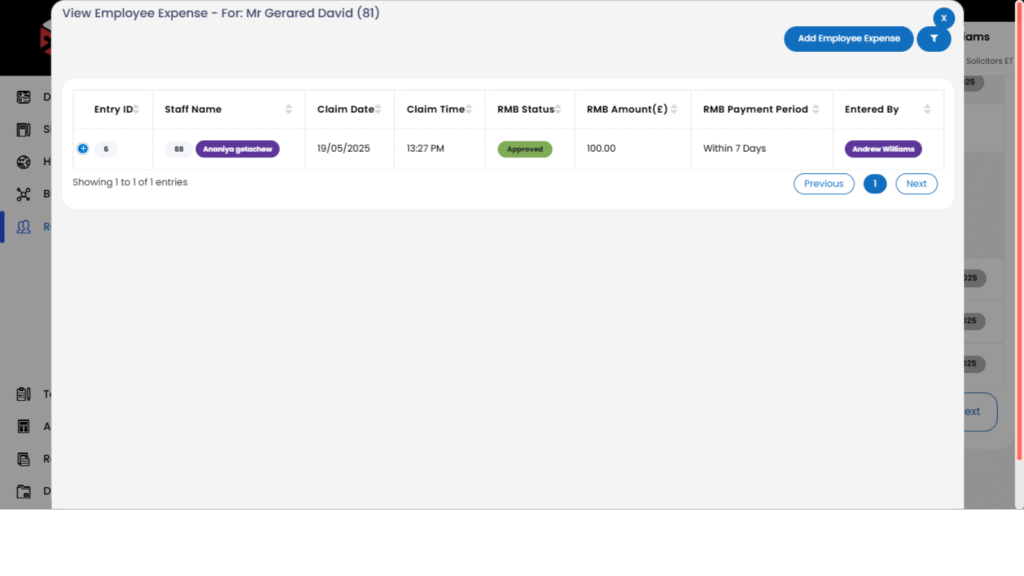
📄 View Employee Expenses
Displays a table of all submitted expense claims.
🔸 Table Columns Displayed:
- Entry ID – Unique record number
- Staff Name – Employee who submitted the claim
- Claim Date – Date of the expense claim
- Claim Time – Time of the claim
- RMB Status – Current reimbursement status
- RMB Amount (£) – Amount claimed
- RMB Payment Period – Scheduled payment timeframe
8.Holiday Request – Request, approve, and monitor annual leave balances.
Holiday Request Module
Manage employee leave with three integrated sections: Annual Allowance, Add Holiday Request, and View Holiday Requests.
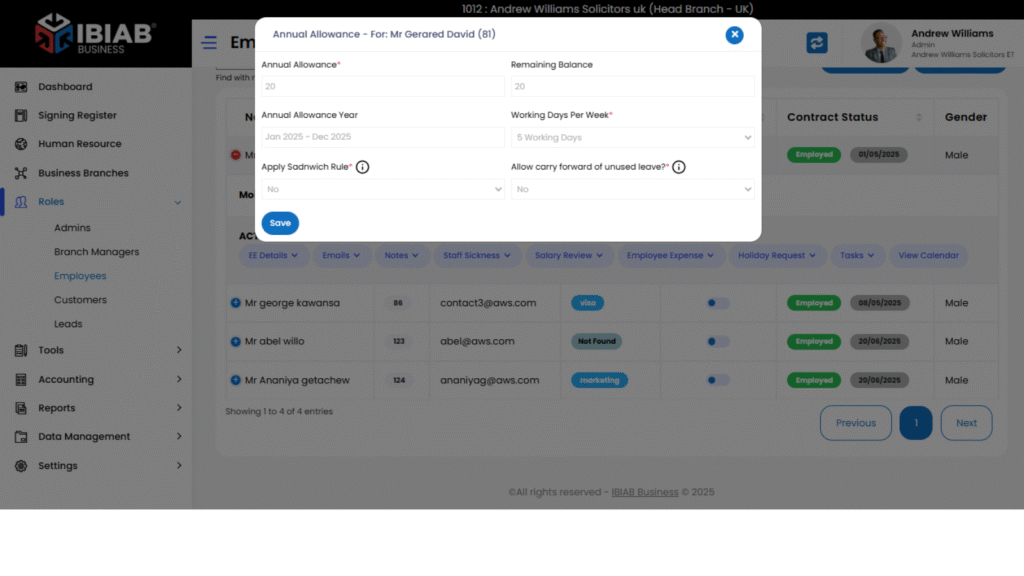
1️⃣ Annual Allowance Setup
Used to configure yearly leave entitlements per employee or group.
🔹 Form Fields:
- Annual Allowance*
(Required – total leave days allotted for the year) - Remaining Balance
(Auto-calculated – based on usage and allowance) - Annual Allowance Year
(The calendar or fiscal year the allowance applies to) - Working Days Per Week*
(Required – helps calculate leave accurately) - Apply Sandwich Rule*
(Yes/No – determines if weekends/public holidays within leave are counted) - Allow Carry Forward of Unused Leave?*
(Yes/No – enables rollover of unused leave to next year)
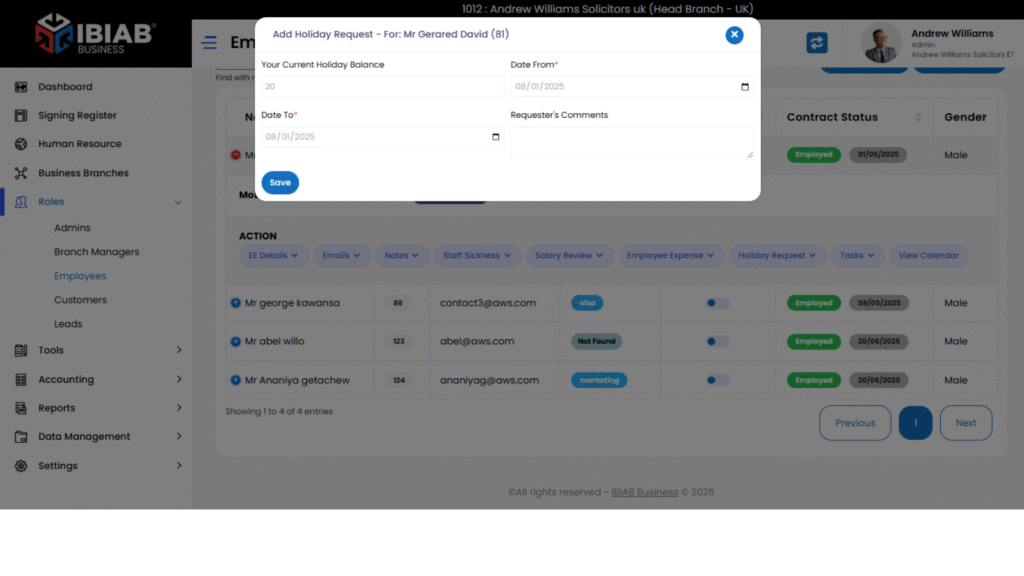
2️⃣ Add Holiday Request
Allows employees or HR to submit new leave requests.
🔹 Form Fields:
- Your Current Holiday Balance
(Read-only – shows up-to-date remaining leave) - Date From*
(Required – leave start date) - Date To*
(Required – leave end date) - Requester’s Comments
(Optional – reason or additional notes for the leave)
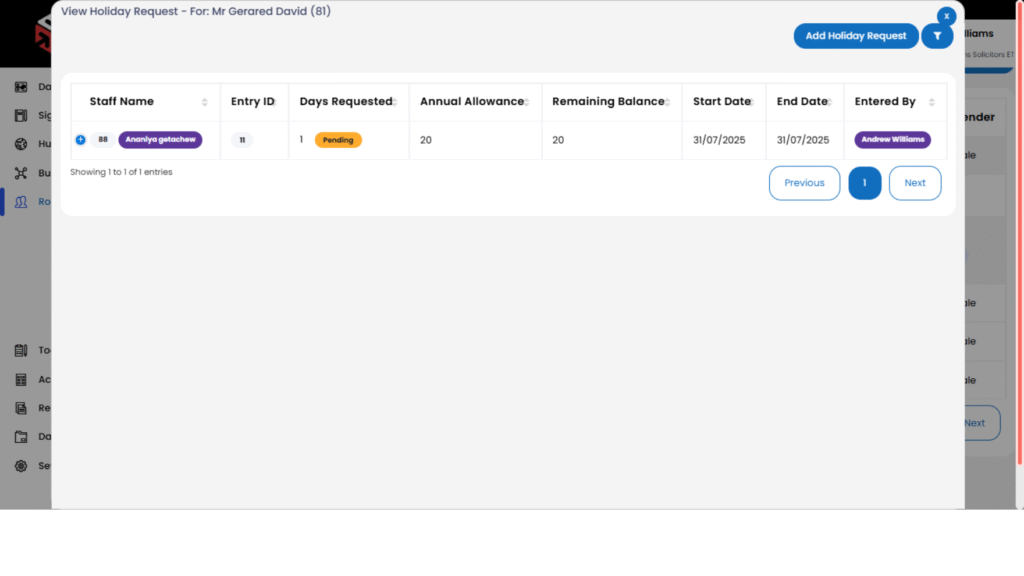
3️⃣ View Holiday Requests
Displays all leave requests in a structured table.
🔸 Table Columns Displayed:
- Staff Name – Employee name
- Entry ID – Unique request ID
- Days Requested – Total leave days requested
- Annual Allowance – Total leave entitlement
- Remaining Balance – Leave left after request
- Start Date – First day of leave
- End Date – Last day of leave