2.Setting
2.1. Business Settings
Business Settings Fields
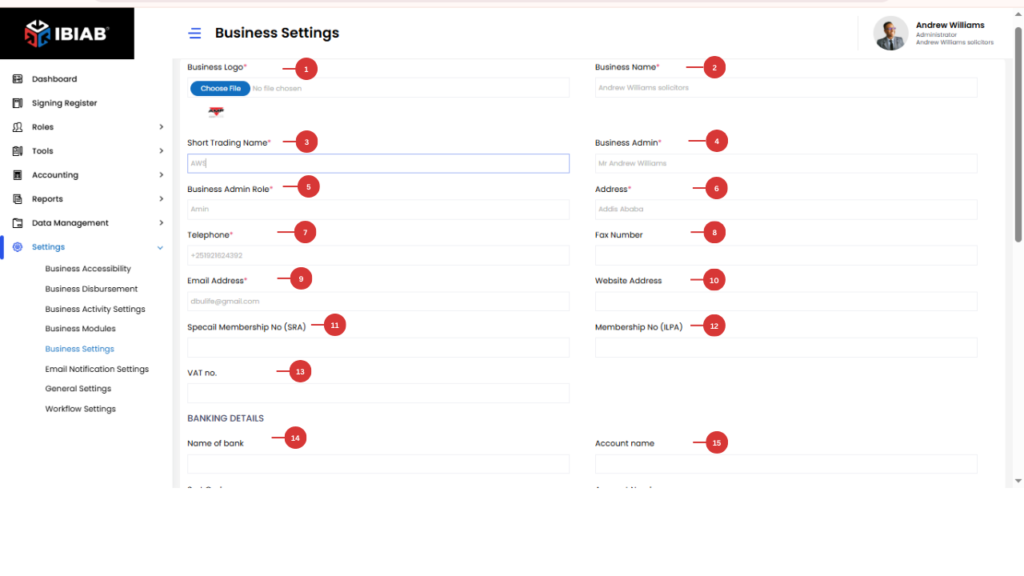
Basic Information
- Business Logo* – Upload your company logo.
- Business Name* – Enter the full registered business name.
- Short Trading Name* – Provide a short version of your business name.
- Business Admin* – Assign the main admin responsible for the business.
- Business Admin Role* – Define the role of the business admin.
- Address* – Enter the official business address.
- Telephone* – Provide the main contact number.
- Fax Number – (Optional) Add a fax number if applicable.
- Email Address* – Enter a valid business email.
- Website Address – (Optional) Add your website URL.
Membership & Tax Details
- Special Membership No (SRA) – Enter your Solicitors Regulation Authority membership number.
- Membership No (ILPA) – Provide your ILPA membership number.
- VAT No. – Enter your business VAT number.
Banking Details
- Name of Bank – Enter the bank name your business uses.
- Account Name – Provide the account holder name.
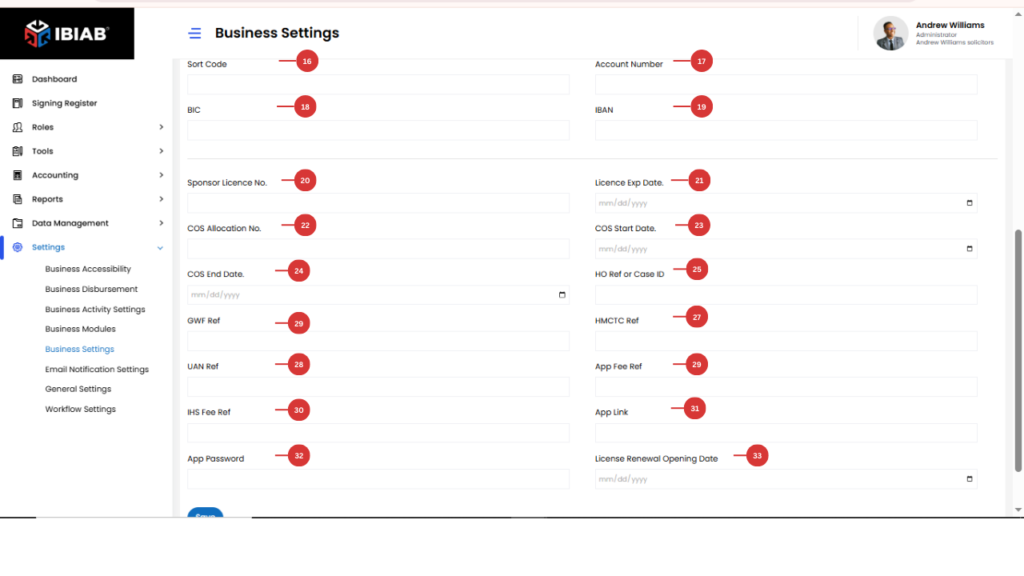
- Sort Code – Enter your bank sort code.
- Account Number – Provide the business bank account number.
- BIC – Enter your Bank Identifier Code (BIC).
- IBAN – Provide your International Bank Account Number (IBAN).
License & Immigration References
- Sponsor License No. – Enter your sponsor license number.
- License Expiry Date – Specify when your sponsor license expires.
- COS Allocation No. – Provide the Certificate of Sponsorship (COS) allocation number.
- COS Start Date – Enter the start date for the COS.
- COS End Date – Enter the end date for the COS.
- License Renewal Opening Date – Specify when the renewal process begins.
Home Office & Application References
- HO Ref or Case ID – Enter the Home Office reference or case ID.
- GWF Ref – Provide the GWF reference number.
- HMCTC Ref – Enter the HM Courts & Tribunals Service reference.
- UAN Ref – Provide the Unique Application Number (UAN).
- App Fee Ref – Enter the reference for the application fee.
- IHS Fee Ref – Provide the Immigration Health Surcharge (IHS) reference.
- App Link – Add the link to the application.
App Password – Enter the password for the application.
📌 Note: Fields marked with an asterisk (*) are mandatory and must be filled in before saving changes.
2.2. Business Accessibility Settings
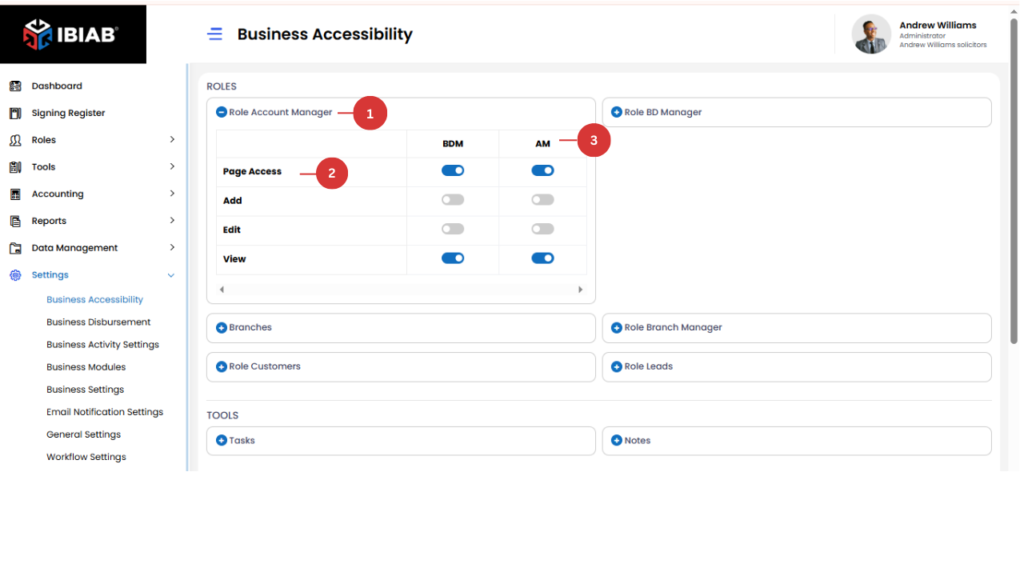
The Business Accessibility page allows users to manage permissions for different roles, determining which pages and features each role can access.
Sections in Business Accessibility
The page is divided into three sections:
- Roles – Lists all available roles in the system.
- Tools – Features or functionalities that can be controlled per role.
- Accounting – Permissions related to financial data and transactions.
Managing Role Permissions
- Under the Roles section, all roles are listed.
- Users can click on a specific role to expand its settings.
- Each role has different permission types, such as:
- Page Access – Controls whether the role can access a specific page.
- Add – Determines if the role can add new entries.
- View – Allows viewing of information without editing.
- Page Access – Controls whether the role can access a specific page.
Permission Toggle
- There are two columns representing different roles:
- Business Development Manager
- Account Manager
- Business Development Manager
- Users can toggle between ON and OFF to enable or disable permissions for each role on specific pages and actions.
📌 Tip: Carefully manage permissions to ensure users have access only to the necessary features.
Account Manager Page Access Permissions
- Role: Account Manager
- Permission Type: Page Access
- Who Can Access:
- Business Development Managers (BDMs)
- Account Managers
- Business Development Managers (BDMs)
Both BDMs and Account Managers have permission to access the Account Manager Page to manage relevant business operations.
2.3. Add Disbursement Settings
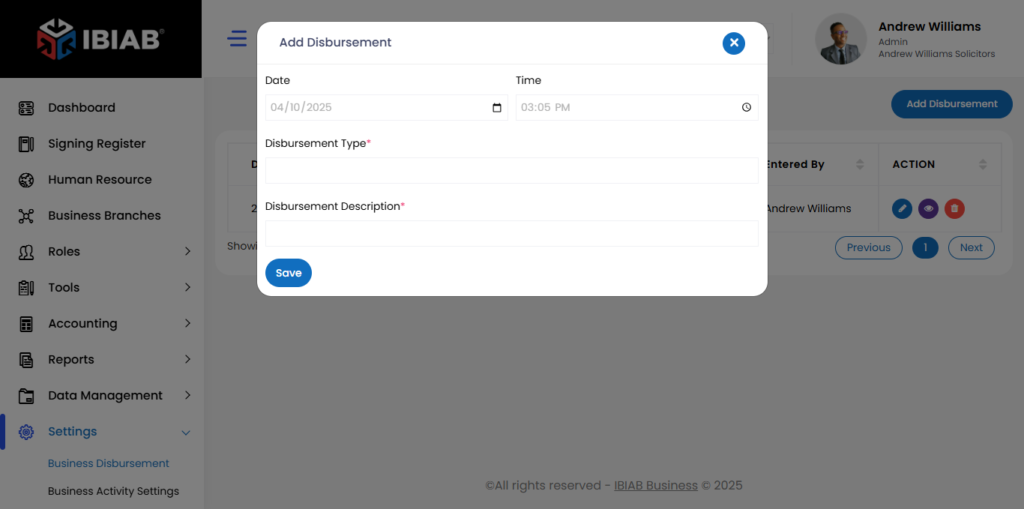
The Disbursement Settings page allows users to manage and record disbursements. Below are the available fields and their explanations:
- Date – Select the date when the disbursement is made.
- Time – Specify the time of the transaction.
- Disbursement Type* – Choose the category or type of disbursement (e.g., payment, refund, expense).
- Disbursement Description* – Provide a detailed description of the disbursement, including purpose and relevant details.
📌 Note: Fields marked with an asterisk (*) are mandatory.
2.4. Business Modules Settings
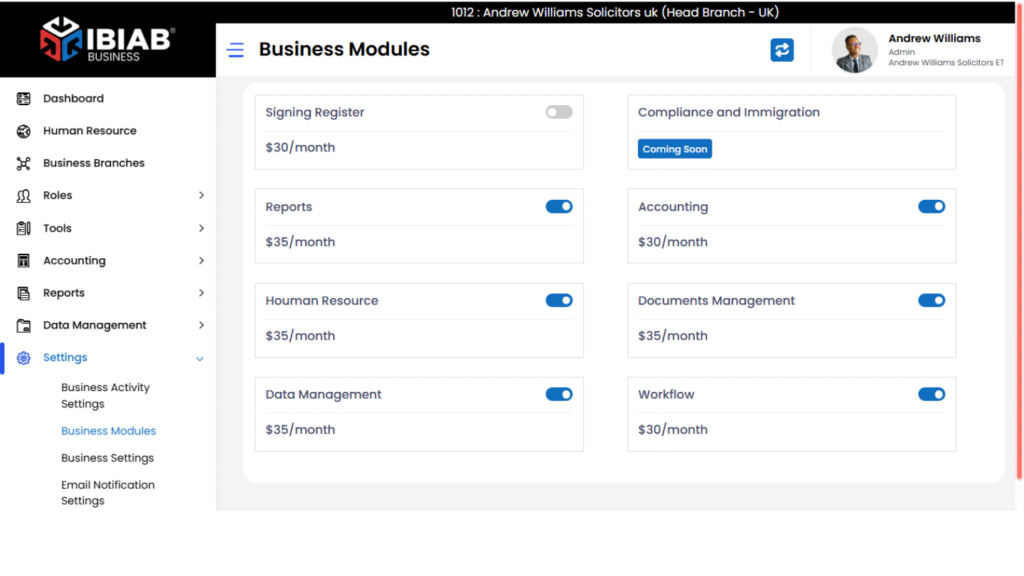
The Business Modules Settings page allows users to manage and enable/disable different modules for their business operations.
List of Modules
- Signing Register Module – Manages sign-in and sign-out activities for employees or visitors.
- Documents Management Module – Helps organize and manage documents sent to customers or other clients.
- Reports Module – The Reports Module provides a powerful tool for businesses to monitor, track, and analyze essential metrics across various functions.
- Data Management Module – Helps organize and manage various customer data.
- Compliance and Immigration Module – Handles immigration-related information for customers and business activities.
- Workflow Module – Automates business processes and workflows, allowing users to define steps to complete specific tasks
. - Accounting Module – tools for day-to-day transaction management
- HR Operations Module – Streamlines internal HR operations, optimizing staff management and ensuring smooth workforce administration.
📌 Tip: Click on the name of the module to learn more about the module
Enabling or Disabling Modules
- Users can toggle between ON and OFF to enable or disable specific modules.
- Enabled modules will be available for use in the system.
📌 Tip: Only activate the modules you need to streamline business operations efficiently.
2.5.Email Notification Settings
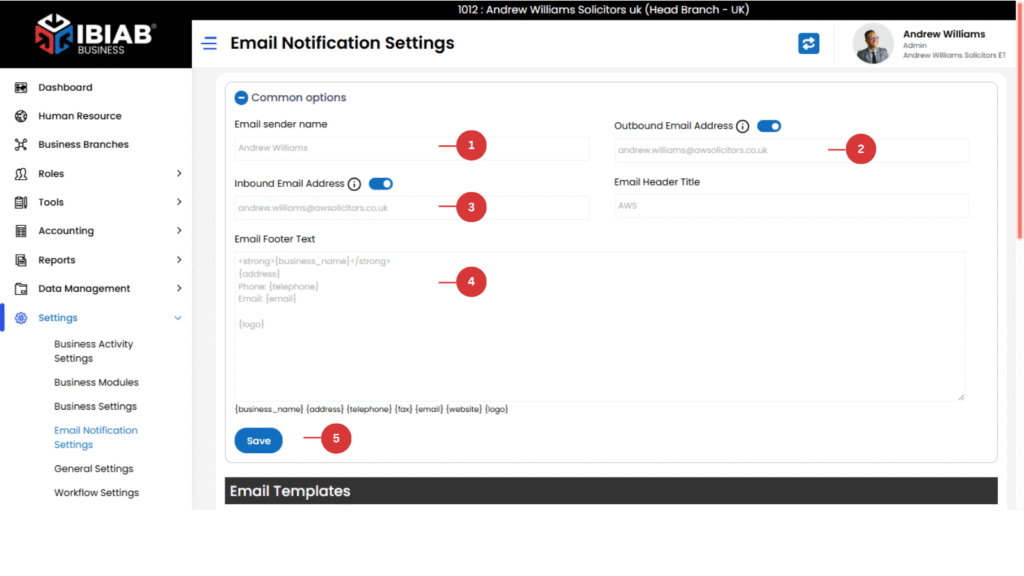
The Email Notification Settings page allows users to configure email notifications for different system events.
Email Notification Settings
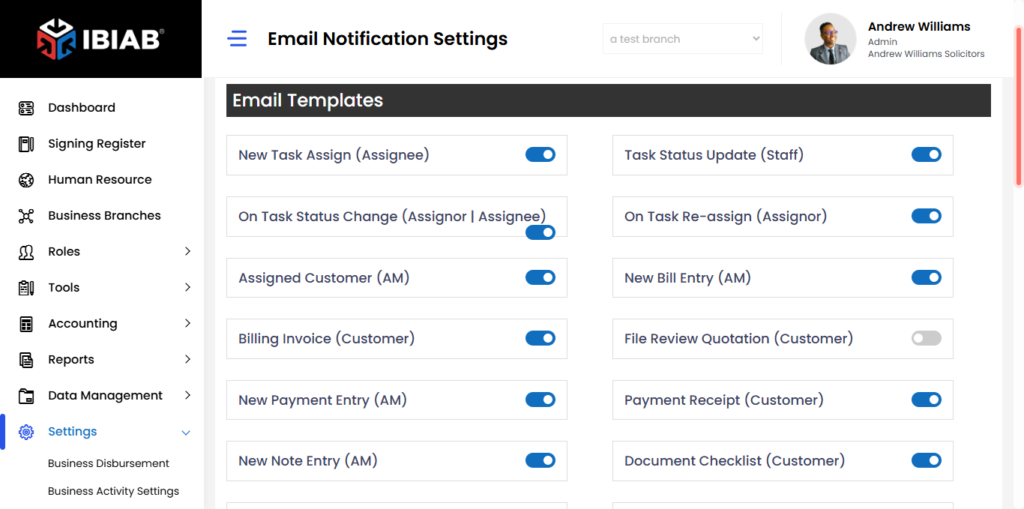
Customize your email notifications by setting up sender details and message formatting.
- Email Sender Name – The name that appears as the sender in outgoing emails.
- Outbound Email Address – The email address used to send notifications.
- Inbound Email Address – The title displayed at the top of emails.
- Email Footer Text – Custom text displayed at the bottom of emails.
- Dependent Field for email footer
📢 Ensure these details are correctly configured to maintain a professional communication experience!
Task Notifications
- New Task Assign – Notifies the assignee when a new task is assigned.
- Task Status Update – Notifies staff when a task status is updated.
- On Task Status Change – Notifies both the assignor and assignee when a task status changes.
- On Task Re-assign – Notifies the original assignor if the task is reassigned.
📌 Billing & Payment Notifications
- Assigned Customer – Notifies the account manager (AM) when a customer is assigned.
- New Bill Entry – Notifies the AM when a new bill is added.
- Billing Invoice – Notifies the customer when an invoice is generated.
- File Review Quotation – Notifies the customer when a file review quotation is available.
- New Payment Entry – Notifies the AM when a payment is recorded.
- Payment Receipt – Notifies the customer upon payment confirmation.
📌 Document & Form Notifications
- New Note Entry – Notifies the AM when a new note is added.
- Document Checklist – Notifies the customer about document requirements.
- Terms & Conditions – Notifies the customer about terms & conditions updates.
- Initial Questionnaire – Notifies the customer when an initial questionnaire is assigned.
- Authority Form – Notifies the customer when an authority form is required.
- Final Letter – Notifies the customer when a final letter is available.
- Questionnaire Submitted – Notifies the AM when a customer submits a questionnaire.
- Authority Form Submitted – Notifies the AM when an authority form is submitted.
- Customer Care Letter – Notifies the customer when a customer care letter is available.
📌 Event & SMS Notifications
- New Event Entry (Attendee) – Notifies attendees when a new event is added.
- New Event Entry (AM) – Notifies the AM when a new event is added.
- New Event Entry (Customer) – Notifies the customer about a new event.
- SMS Login Reminder – Sends a login reminder to AM | BM via SMS.
- SMS Activity Checklist – Notifies the AM about activity checklists via SMS.
- SMS Message Board – Notifies the BM about new messages via SMS.
📌 Business Customer Notifications
- Business Customers Form – Notifies the business about a customer form.
- Business Customers Form Submitted – Notifies the AM when a business customer form is submitted.
📌 Reminder Notifications
- Task Due Reminder – Notifies the assignee when a task is due.
- Matter Submission Due Report – Notifies the AM about pending matter submissions.
- Task Overdue Reminder – Notifies the assignee when a task is overdue.
- Questionnaire Submit Due – Notifies the customer when a questionnaire is due.
- Questionnaire Submit Due (AM) – Notifies the AM when a questionnaire submission is due.
- BF Date Expiry Report – Notifies the AM about approaching BF expiry dates.
- File Review Due/Overdue Report – Notifies the AM about pending or overdue file reviews.
- Visa Expiry Reminder – Notifies AM | BM when a visa is about to expire.
- Visa Expired Reminder – Notifies AM | BM when a visa has expired.
- Passport Expiry Reminder – Notifies AM | BM when a passport is about to expire.
- Passport Expired Reminder – Notifies AM | BM when a passport has expired.
📢 Customize your email alerts to stay informed and never miss an important update!
2.6.General Settings
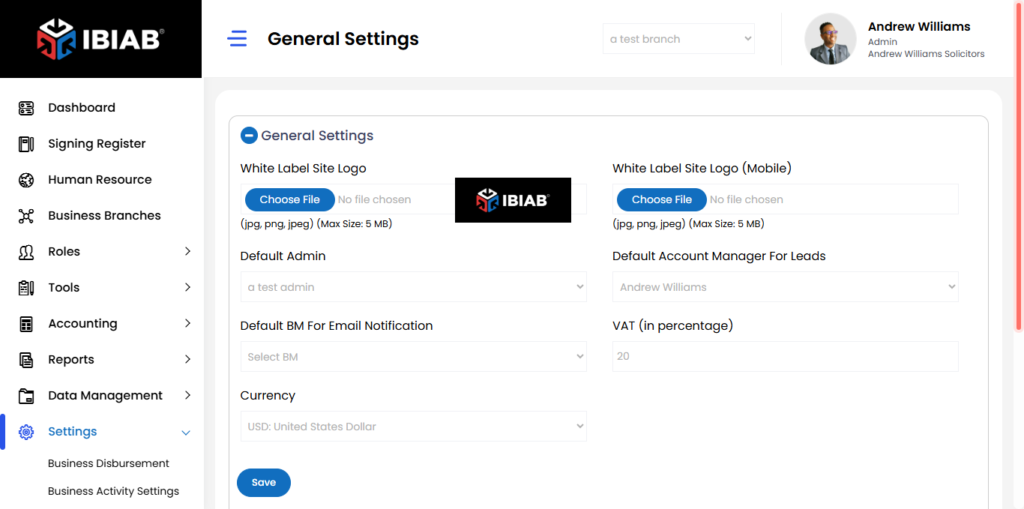
Common Section
This section includes general settings for white labeling, admin defaults, and PDF customization:
- Configure key settings to personalize and streamline your system.
- White Label Site Logo – Upload a custom logo for branding.
- White Label Site Logo (Mobile) – Upload a logo specifically for mobile view.
- Default Admin – Set the default administrator for system management.
- Default Account Manager for Leads – Assign an account manager for incoming leads.
- Default BM for Email Notification – Set the default Business Manager for email alerts.
- VAT (in percentage) – Define the default VAT rate for transactions.
- Currency – Select the preferred currency for business operations.
Manage Labels Settings
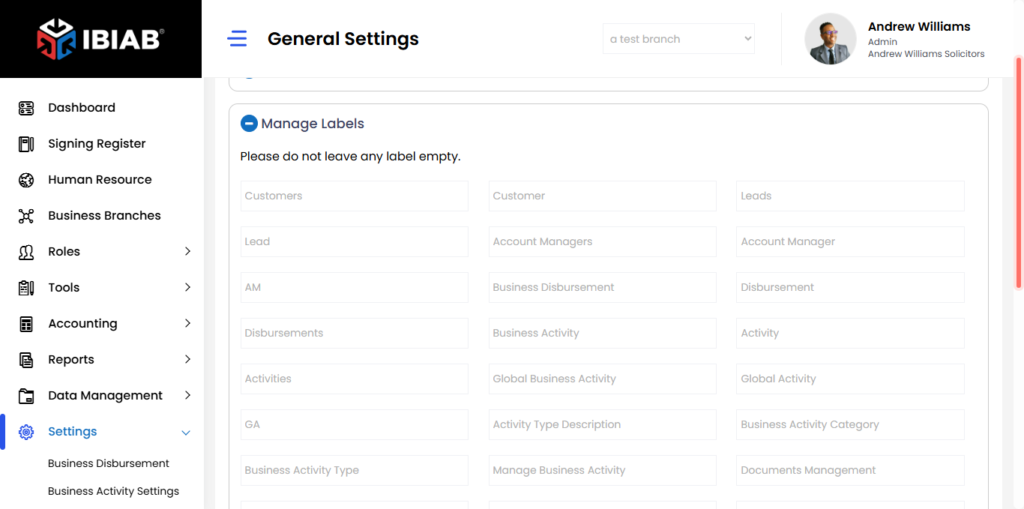
This section allows users to rename labels across the system UI to match their business terminology. The following fields can be customized:
- Customers → Customer
- Leads → Lead
- Account Managers → Account Manager
- AM
- Business Development Manager → BD Manager
- BD Managers → BD Manager
- BDM
- Business Disbursement → Disbursement
- Business Activity → Activity
- Global Business Activity → Global Activity
- Activity Type Description
- Business Activity Category
- Business Activity Type
- Manage Business Activity
- Default Activity
- Documents Management → Send Documents
- Customer Status
- Bring Forward → BF Exp
- Customers Bills → Customers Bill
- Customer Payments → Customer Payment
📌 Tip: Customizing labels ensures the system aligns with your business-specific terminology for better usability.
PDF Document Settings
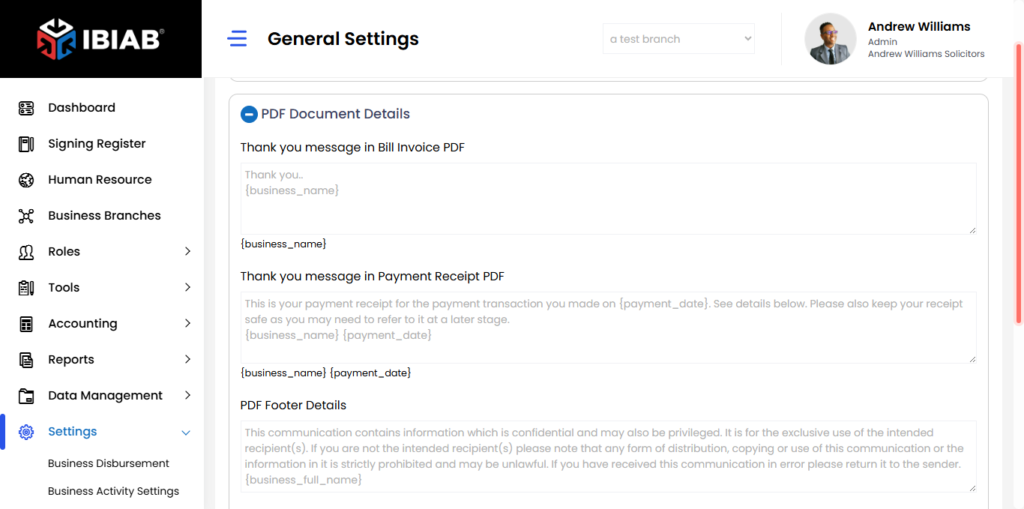
- Bill Invoice PDF
- Add a thank-you message that appears on customer invoices.
- Use {business_name} to dynamically display your business name.
- Add a thank-you message that appears on customer invoices.
- Payment Receipt PDF
- Add a thank-you message to payment receipts.
- Use {business_name} for the business name and {payment_date} for the payment date.
- Add a thank-you message to payment receipts.
- PDF Footer Details
- Customize the footer with dynamic business information.
- Available placeholders:
{business_full_name} – Full business name
{business_short_name} – Short trading name
{business_admin_name} – Business admin’s name
{business_admin_role} – Business admin’s role
{business_email} – Business email address
{business_address} – Business address
{business_fax} – Business fax number
{business_tel} – Business telephone number
{business_website} – Business website
{business_sra} – Special Membership Number (SRA)
{business_ilpa} – Membership Number (ILPA)
{business_vat} – VAT number
- Customize the footer with dynamic business information.
This setup ensures your PDFs are personalized and professional while dynamically pulling relevant business details. 🚀
Reset Password
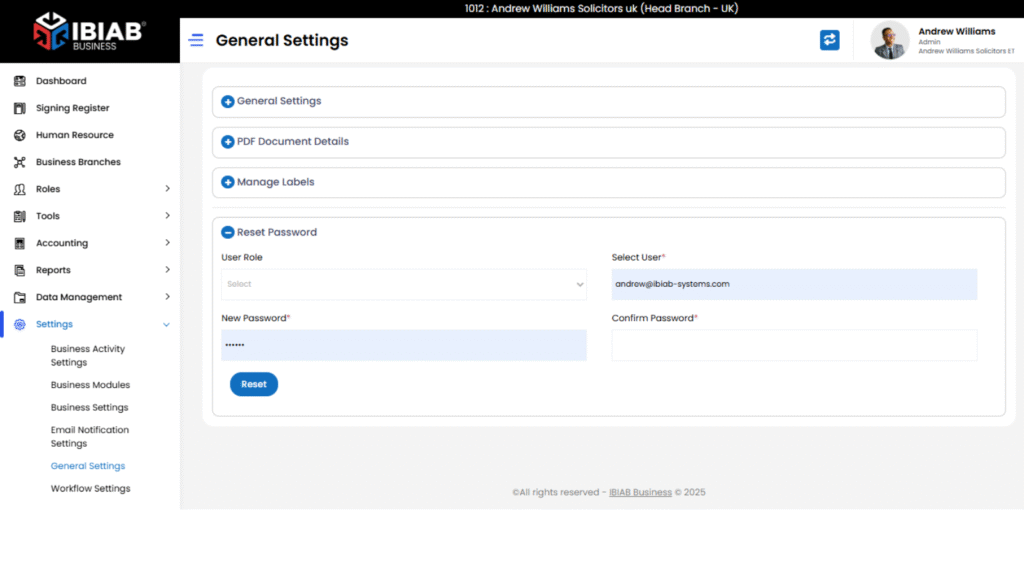
To reset your password, follow these steps:
- Enter Your Email – Make sure your email is correct
- Set a New Password – Choose a strong new password and enter it in the New Password field.
- Confirm Your Password – Re-enter the same password in the Confirm Password field to ensure accuracy.
- Submit- Click the Reset Password button to update your credentials.
Once completed, you’ll be able to log in with your new password! 🚀
2.7. Workflow Setting
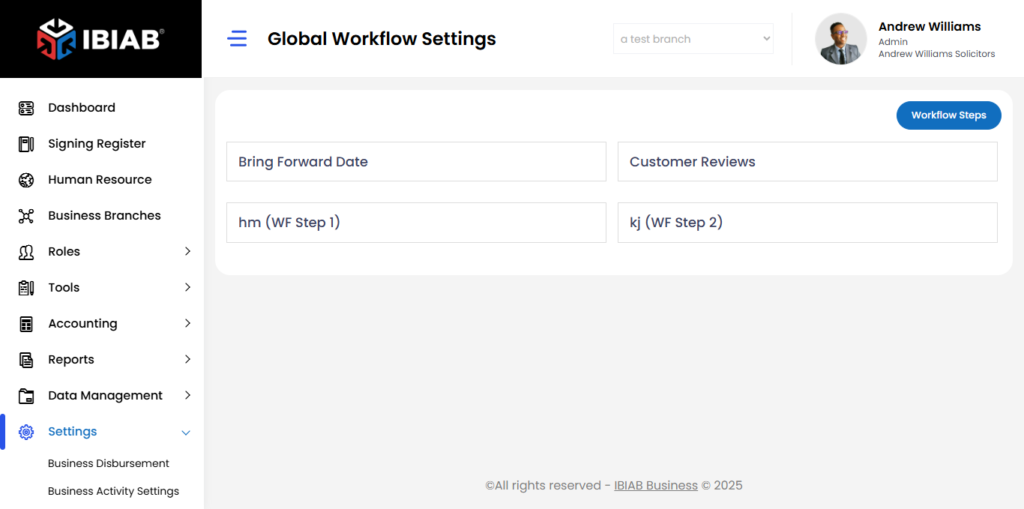
Workflow Settings in IBIAB help you define and manage the steps required to complete tasks efficiently. By structuring workflows, you ensure consistency, track progress, assign responsibilities, and streamline operations. This feature enhances productivity by standardizing processes, reducing errors, and improving accountability across your organization.
By clicking on Workflow Settings in the side menu, you will see a list of workflow steps, including both system-generated and custom-defined steps.
Understanding the Workflow List
- The list contains predefined and user-created workflow steps.
- Bring Forward Dates and File Reviews are system-generated default workflows that cannot be removed.
- Any additional workflow steps are user-defined and can be customized as needed.
Managing a Specific Workflow Step
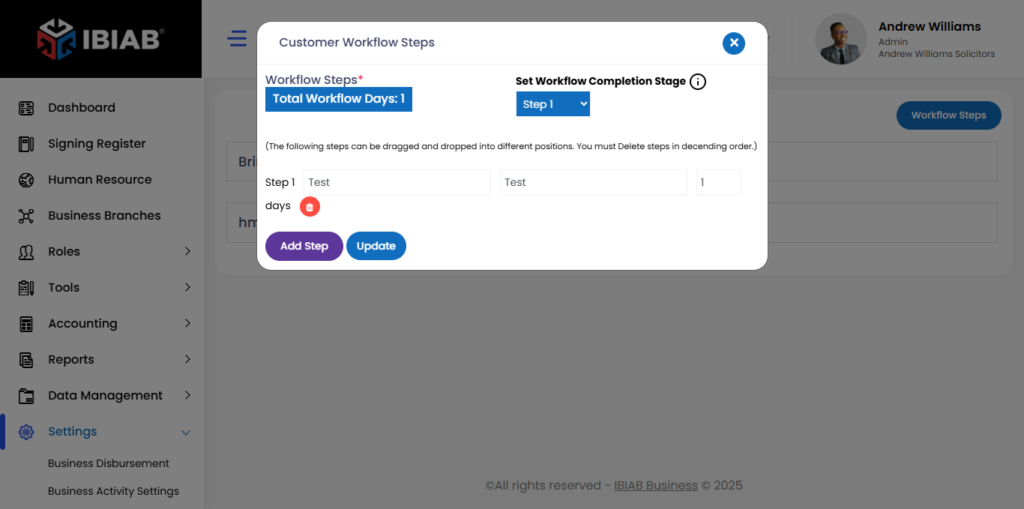
When you click on a specific workflow step, a popup window will appear, allowing you to update and manage its details. The popup contains the following fields:
Fields & Features:
- Total Workflow Days – Displays the total duration of the workflow.
- Set Workflow Completion Stage – Select the step that marks workflow completion.
Rearrange Steps – Drag and drop steps to adjust their order. (Steps must be deleted in descending order.)
- Step Description – Define the task for this step.
- Step Acronym – Enter a short identifier (Max: 20 letters).
- Days – Specify the number of days required for this step.
Once all fields are filled out, click the Update button to save the changes. This ensures that the workflow step remains structured and properly tracked within your business processes.
2.8. Business Matter Settings
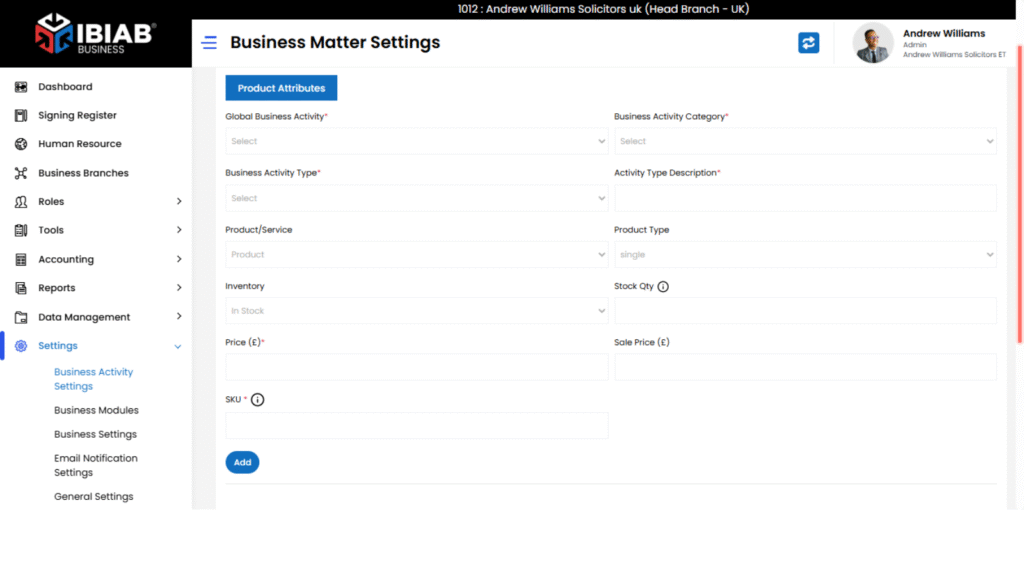
The Business Matter Settings module allows you to manage business-related activities, whether products or services, by categorizing them into different levels. This helps streamline your organization’s workflow and structure business operations efficiently.
Navigating Business Matter Settings
When you click on Business Activity Settings in the side menu, a page will open displaying a list of business activities in a structured table format.
The page consists of four main tabs, each representing a different level of business categorization:
- Global Business Activity (Top-Level Category)
- This represents the highest-level business activity.
- To add a new Global Business Activity, enter the activity name in the provided field and click Add.
- The table below will display the added activities, showing:
- Global Business Activity Name
- Action Buttons (Edit, Set Default, Delete)
- Global Business Activity Name
- This represents the highest-level business activity.
- Business Activity Category (Second-Level Category)
- Each Business Activity Category is linked to a Global Business Activity.
- Select a Global Business Activity from the dropdown, enter the Business Activity Category Name, and click Add to create a new category.
- The table will display all created Business Activity Categories, allowing you to manage them.
- Each Business Activity Category is linked to a Global Business Activity.
- Business Activity Type (Third-Level Category – Live & Enforced)
- Each Business Activity Type is linked to both a Global Business Activity and a Business Activity Category.
- Select the Global Business Activity and Business Activity Category from the dropdowns, enter the Business Activity Type Name, and click Add to create a new type.
- This links all three levels together into a structured hierarchy.
- Each Business Activity Type is linked to both a Global Business Activity and a Business Activity Category.
- Activity Type Description (Detailed Description for Each Activity Type)
This section allows you to add descriptions for each Business Activity Type. click on activity type description button and a form will appear to add a new Activity Type
This form allows you to define and manage different levels of business activities, products, or services.
Fields:
- Global Business Activity* – Top-level category of the business activity.
- Business Activity Category* – The second-level classification.
- Business Activity Type* – Specific type under the selected category.
- Activity Type Description* – A brief description of the selected activity.
- Product/Service – Define whether the entry is a product or a service.
- Item Type – Select either:
- Single – A standalone item.
- Variant – If selected, additional fields appear:
- Item Attribute* – Define the unique attribute of the variant.
- Item Description* – Describe the variant.
- Item (£) / Item ($)* – Set the price in the preferred currency.
- Item Attribute* – Define the unique attribute of the variant.
- Single – A standalone item.
After filling in the details, save to add the new business activity!
Product Attributes
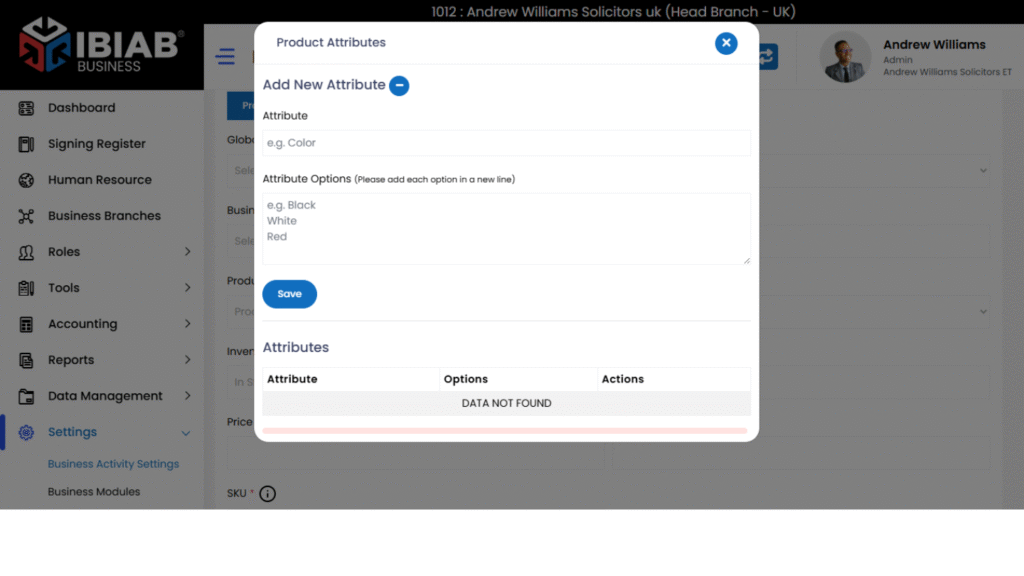
This section allows you to define specific attributes for your products.
Steps to Add an Attribute:
- Enter the Attribute Name in the provided field.
- Click the Save button to add the attribute.
Once saved, the attribute can be used for product variants in your inventory or service listings.
Managing Business Matter Settings
Once your business activities are set up, you can use the Action Buttons to further configure each entry:
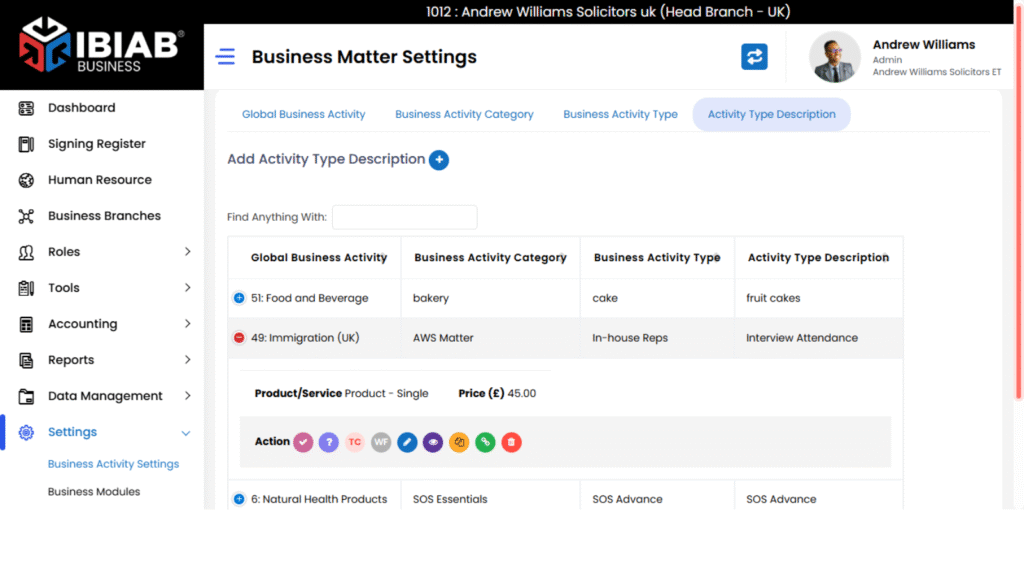
- Attach Customer Business Cover Letter – Link a cover letter to the selected business matter.
- Attach Terms and Conditions File – Upload terms and conditions related to the matter.
- Attach Document Checklist – Associate a document checklist with the business activity.
- Attach Questionnaire Form – Add a questionnaire for data collection.
- Add Link to Custom Web App – Connect the business matter to an external web application.
- Workflow Setting – Define workflow steps for the business matter.
- edit Settings – Edit configurations.
- Delete – Remove the business matter from the system.
This structured approach allows businesses to effectively categorize, manage, and automate their workflows within the IBIAB Business Management System.